OFF CAMERA FLASH CAR PHOTOGRAPHY, PART 2 OF 2 : THE SHOOT
Canon EOS40D - Canon EF70-200mm f/2.8 L IS - 73mm 1/200 sec f2.8 ISO100
Advanced level tutorial by Mark
So after reading part 1 of this tutorial you went out and spent your remaining life savings to get the necessary flash units, triggers, stands and cabling required to start using off camera flash photography on our favorite subject: cars.
And you've had two weeks to get it all configured, setup and tried it all out for hours on end ... right now you know exactly how it all works, how you can dial in different power levels on your specific flash unit and perhaps even how shutter speed and aperture work together when combining flash and ambient light ... so you are ready to put it all into practice and finally get that elusive car in front of the camera and bring out those flash units on location.

1. Single flash workflow
I could say: 'too bad, this won't work' ... but I would be talking bull, sure you can get some amazing shots with only one additional light source, it will only take a bit more work, that's it.
In this case you will be taking more than one photo on location, in fact at least two, but probably more like three or four shots will be required to get the look you are aiming for, working with only one flash unit does complicate things a bit. For one you are not able to see how the shot looks right on the display of your camera, you will have to wait until you get home to notice if anything went wrong ... in that case you will either have to decide to deal with it and make the best of it, or schedule a re-shoot with the car.
1.1 the full frontal shot
This is an easy one to be honest, just put the flash at the left of the camera, take a shot, move the light stand to the right of the camera, approximately at the same distance and angle as it was on the left ... and take another exposure ... done.
Well almost that is, you need to have a tripod for this kind of photography, you did remember to bring it with you right ? Also a nice option if you only have one off-camera flash setup would be a wire trigger for the camera, this way you do not have to touch the camera on the tripod to take the shot. Also remember we are working in full manual mode here, this implies the settings remain exactly the same for both shots.

With these two photos we take it into post processing, I know you probably want to start removing the license plate (if you didn't take it from the car at the location as we talked about earlier) and cloning stuff out of the shot ... but first things first : putting both shots as individual layers into a new image file, this way we don't ruin the original file during our attempts to 'balance' the light.
1.2 Post processing
Bring the two shots into Adobe PhotoShop, I would copy/paste both of them into a single, new document, this will avoid you hitting 'Save' and destroying one of the original image files ... safety first right ?
I will not describe all the little details, but the workflow should be something like this : open both photos at the same time, perform a 'Select All' on one of them and either 'Cut' or 'Copy' the content. Now close this file, do NOT save changes here, go into File and create a 'New...' document, the dimensions and dpi should already be present so just hit 'Enter' and you'll get a black canvas, now 'Paste' the first exposure onto it. Switch to the second image, do another 'Select All', hit the 'Cut' or 'Copy' and close this one too without saving. You will be seeing the new document again now, all that's needed is to 'Paste' the second shot above the first one ... oops, we don't see the photo below anymore !
Don't worry, totally normal, now 'Add layer Mask' to the top layer and start 'painting' with a rather large, soft black brush ... behold the lower layer starts to become visible. If you made too much from the underlying layer visible all you need to do is switch to a white color and start painting again to cover the layer up.
After some practice ... and even more patience you should end up with a rather nicely, balanced light in your photo and create the illusion of having made the shot with two flash units instead of one :

Naturally the above shot had some more tweaking done to it, making the car stand out even more, removing the light poles in the background and de-saturating the surroundings to avoid having them draw attention from the car.
So using only one light source to get into off camera car photography isn't as hard as it sounded at first right ? It only takes some more post processing work that's all, but the result can be easily as nice ... and remember: you don't have to stop at only two exposures ... some colleagues go to as much as 40 shots for just one photo.
1.3 the front three-quarter shot
Using only one light source on a three quarter shot will require some more work compared to the frontal shot, but you will see the end result is even more impressive. The first step is to decide on the angle you are going to use, some three quarter angles can be handled with two shots, others need three or even more, we will take a look here at an angle that shows more of the side of the car than the front, which is the easiest in fact.
Once you've setup the car and the camera you'll have to mount the flash for the first exposure, keep in mind that nor the car nor the camera will be moved during these subsequent exposures, just like on the full frontal shot we discussed earlier. I always take the first photo with the light on the front of the car and work my way to the back of the car ... you will have to be working in a steady pace as you are going to loose the light quickly towards sunset.
1.3.1 First flash position : front corner that is closest to you.

In the photo above you can clearly see only one light source is hitting the car, in this case a Canon EX580II on a light stand about 1m50 above ground pointing down and directly at the corner of the bumper to avoid a large hot spot ... and it worked, this is an OOC shot, straight from the camera with no cloning whatsoever, and that's what we should be aiming for ... less cloning means quicker post processing, time is money right ?
In this shot you also notice the natural light at about 8 pm was still strong enough to create a nice glow over the engine cover, windshield and roof, I always try to get this look, combining artificial light with ambient light ... in a near perfect balance.
Also notice I had the headlights turned on to get that nice glow in them, especially at the rear the red taillights add just a touch of color in the photo, as this is a silver metallic car it doesn't pop in the frame, so adding that little extra hue at the rear just makes the photo even better ... it all comes down to details like this you know, it separates a photograph from a snapshot.
1.3.2 Second flash position : rear corner
That's right, you might be thinking you would put a flash on the side of the car, but that would give a massive hot spot on the car, so to avoid that we point the light at the rear corner with just enough 'light spill' to get some brightness on the side too, now this might need some trial and error depending on the actual car in front of you.
The trick is to give the car enough light but not to blow out the design of the car, more importantly the creases and roundness of the bodywork, in case of this Mercedes you just have to show the wheel arches and the nice curvature of the doors. If we would put a big light straight onto the side of this car not only would we be getting a massive hot spot that would be nearly impossible to clone out, but we would also be 'flattening' those arches and door curves, making the photograph a lot less interesting.

1.3.3 Post processing workflow
So once back behind the computer load the first exposure into PhotoShop, subsequently load the second exposure and do a 'Select All' on this one, 'Copy' the entire image into the clipboard and close this file again, the first exposure should be visible, and active again ... just 'Paste' the second one over it.
No need to panic if you don't see anything from the first exposure right now, that's the trick we are going to do now, making the lower 'layer' visible again through the upper layer ... and there are two ways of accomplishing this effect: an amateur way and a professional way.
May sound harsh, but trust me, you'll thank me later on. If we would explain it how we did it the first time using PhotoShop layers we would tell you to get the eraser and start erasing the 'dark' parts of the upper layer, if you make a mistake just 'Undo' it right ? WRONG ! Once you've saved your work you will not be able to Undo anything anymore, so do not use the eraser method here but get to grips with the way the professionals do it: using a Layer Mask.
So right after you've Copied the second exposure onto the first one perform an 'Add layer Mask' to the top layer and select a rather large, albeit soft brush, hit 'D' to select black as your foreground color and start painting over the dark, front section of the Mercedes in the shot ... the lower layer becomes visible again and the front of the car, that was dark in the second exposure is now getting lots of light again.
The difficult part of using Layer Masks in your post processing is the fact of knowing when to stop, you can quickly erase too much, or not enough ... fortunately even after saving the file (in PSD format including layers naturally), sleeping over it and taking a fresh look in the morning ... you can still change your mind: painting black clears a view from the underlying layer, but painting in white covers it back up, and you can even use the 'Opacity' setting when painting ... try painting the surround of the mask with a 50% Opacity setting, it will make the difference between the upper and the lower layer less harsh ... sometimes this is just what you need to get to the result you are looking for.

In case of this silver metallic Mercedes I not only showed the front bumper, hood and wheel from the first exposure, but also a section of the gravel that received extra light from the left mounted flash, this way you don't make it look artificial in the end, the point of using multiple exposures in flash photography is to have a balanced shot, and that doesn't mean you should get the car balanced ... but also the background and the foreground.
So even a more difficult angle can be easily executed with only one flash on hand, it just takes a bit more work on site and additional post processing. In case you would like to have some more light at the very rear end of this car just pop another shot with the flash angled more towards the taillight and do a three layer job in post processing, same principle, only some extra work.
Would you like to see some on the interior ? No problem, put your flash inside the car at a low power setting and take another exposure that you 'Mask' in during post processing ... you can even light underneath the car, put some highlight on the wheels if they are custom ... the options are endless, and the number of exposures almost unlimited ... I have seen photographs that were combinations of up to 40 different exposures ... only your imagination is the limiting factor now.
2. Twin flash workflow
Did you notice I called it 'Twin flash' and not 'Dual flash' ? There is a reason for that you know. I will be the first to admit this kind of car photography doesn't come cheap, even if you are looking into buying it on a budget and getting the decent entry level material it will get expensive in a hurry ... getting your investment back will take some time.
But I do have one piece of advice here: get the same flash twice. It is so much more practical if you only have one type of flash to work with, you know the settings, you know how to get into the menu ... if you have to remember how to dial in the power setting on two or more different types of flash units you will be making errors somewhere along the way, trust me.
So I made the though decision of getting two Canon EX580II units, with CP-E4 battery pack and Elinchrom SkyPort Universal trigger ... ran up an invoice of nearly €1,500 to be honest, but in the end it was worth every cent.
So why does having two flash units make our life so much easier ? Plain and simple: most of the time you can just take one exposure and you're done, no more moving around flashes and putting different image files together in post processing ... just shoot and you have a balanced shot ... most of the time.

As you can clearly see in the above shot using two identical flash units allows to get a nice light with only one shot, also note that in this case you have to be even more careful of the positioning of the flash units ... avoiding hot spots at all costs is still the most important thing to keep in mind here, and by adding more flash into the equation you aren't making things any easier.
It might take some practice, but rest assured in the end you will be putting down those light stands with ease, even dialing in the correct power setting on the flash will become second nature after some experience.
So let's get into 'twin flash' car photography with some samples and background information on positioning and settings ...
2.1 the classic front three-quarter shot
This is one of those classic car shots, just about every factory brochure has at least one of these in it, and if you take it to the next level it will remain a 'poster quality' shot for many years to come.
Take a look at the final shot from the setup with the white SUV seen earlier :

As you can see we have a nicely balanced shot, the front is lit by the flash on the camera right while the side received light from the flash on the camera left, some minor cloning and our traditional soft light layer ... and bingo ! Done in 60 seconds, how does that sound to you?
I have to admit the above shot was the result of a two exposure workflow ... care to take a guess as to why I used two different exposures in this shot ... I did have my twin flash setup correctly so it wasn't for a lack of light on any side.
Don't tell me you've forgotten about using a polarizing filter already did you ? Yep, you are getting where I'm going here, I used two exposures to make sure I got rid of the reflection on both the side windows the windshield, something that would be a lot more difficult when using only one flash unit.
Now I can hear you guys thinking: 'a silver or a white car is easy, they reflect nicely, but what about a dark shade ?' And you are right, a dark car is rather difficult, not only do you need more light power to get it balanced, but it also reflects much more, so you have some additional issues to address when taking on the job of photographing a dark car using off camera flash units.
But it can be done ...
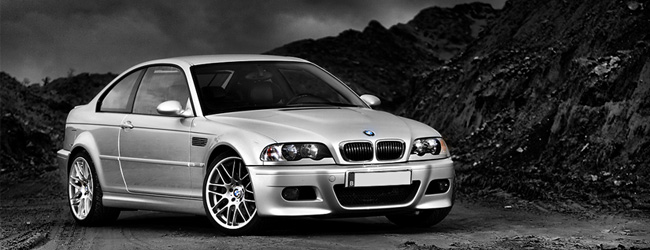
2.2 flash photography with a black car
It takes a bit more experience to setup off camera flash units on a black car, but it is not as difficult as it sounds, you only have to be extra careful when it comes to reflections and hot spots.
Naturally we use a twin flash setup again, and here we will put a black BMW E30 M3 in front of our camera.
With the usual setup, one flash at camera right and one flash at camera left we get a balance of artificial light in our shot, we moved the flash on the left further away from the BMW because the light reflected too much in the headlights, so we had to improvise here.

When you are facing the challenge of a black car you immediately understand the phrase 'you can never have enough light' ... it is plain and simple in fact, we can not put the power on our flash units too high because that would create ugly hot spots, but because this is a black car it really absorbs the light we do manage to shine on it.
Take a look at the setup shot above, we have our two units positioned to the left and the right of our camera, as they should be, and by putting the right unit at this angle it barely lights up the front bumper but it does put the custom rim in focus and gives some light spill on the side of the car, nicely showing those angular wheel arch extensions of the classic BMW M3.
Our flash on the left is put a bit further away so it still lights up the front bumper and that trademark BMW sign ... without hitting the headlights with too much power ... however take a close look at the rear of the car, if you ask me a little extra light from a third flash would be just the touch of light that is missing now.
So another €500 expense ... or not. Why not do a second exposure with the two flash units we already have ... in another position? Just like we did when we only had one flash available ... that would solve the problem right on the spot ... but I had another solution in mind that didn't require additional work on site.
2.2.1 post processing the 'Black BMW shot'
I think I might have mentioned it before, but photographing a black car isn't finished once you wrap up the shoot, it will most likely require some level of post processing anyway, adding some flash light into the shot will only make your post processing time a bit longer. Take a look at the OOC (Out Of Camera) shot of our black BMW M3 model, it sure doesn't look as bad as I imagined actually.
 shot from the setup seen earlier, a flash at the front of the car and a second flash at the front wheel gives us a very nice basis to start our post processing workflow")
Judging from the small LCD screen on my Canon 5D Mark II I got the impression I needed additional light at the back of the car, but I was wrong ... in fact I really like the low light look at the back, the lines of the car are still visible and the rim isn't too bright either, so for me that section was just about right.
However I noticed another problem: during the shoot I already pulled the flash to light the front further away, but with the second flash pointed at the front wheel I still had some light spill over the front bumper and headlights ... onto our post processing to fix this.

In fact this is one of the easiest things to solve in post processing, some might call this a 'dodge and burn' operation as was used in the good old days, but in the digital era I just call it our Softlight layer trick ... I am a big fan of using non-destructive post processing, so I work with adjustment layers a lot, and one of the layers I use the most is a layer in 'SoftLight' mode.
So I add a 'New Layer' and change the Mode to 'Softlight', select a nice soft brush , set my foreground color to black and start painting over the sections I think are too bright. If the effect is too intense I either lower the opacity of the entire layer or use 'Fade' found in the 'Edit' menu and lower the opacity of the last brush stroke made.
For the small section of black plastic on the bumper in the left of the frame I use a much smaller brush so I can get into the details, I also put some thin black on the headlights on both sides and on the front wheel, which I deemed to be just a little bit too bright.
A nice de-saturation of the background, some 'Levels' adjustment on the background only by using a Layer Mask (remember) and I end up with a special looking photograph featuring a black BMW E30 M3.

There you go, it isn't the easiest task to accept: photographing a black car with off camera flash units, but in the end it isn't nearly as difficult as you might expect, only thing is that if you really want to make your life easier on dark shades you will need even more flash units, I would say three is a minimum, but four or five would be even better ... only downside would be the high cost of getting an entire light setup including flash, batteries, trigger and stand ... five times.
With that in mind I think I can handle most situations with two lights, but I still got me a third unit anyway ...
2.3 the other 'angle of attack'
Until now we've seen how to setup an off camera shoot for the classic front three quarter look, but there are other angles on a car too you know, however the principle remains exactly the same: you put the flash units in such a position where they give you the smallest hot spot possible, do keep in mind that you will not be able to avoid hot spots altogether, we are working with bright light here, so you are bound to be seeing it on the car anyway, the trick is to keep it as small as possible.
2.3.1 the low light, side show
This shot was taken using two flash units, but both were at camera right this time, one of the units a bit in front of the car pointing towards the corner of the bumper and the second unit a bit further away pointed at the side of the car.

Because of the sunset we still had some nice, subtle light at the left of our frame and due to the position of the flash units we had some more powerful light on the right side of the frame ... this is an ideal setup to get a low key shot, which is not uncommon in portrait photography, but why not use it in car photography too?
So just like a nice low key bodyscape I went out with a loaner and tried it on a car too, putting two flash units on one side of the car with the opposite side towards the sun that was already setting at that time (it was past 8 pm already), turned on the headlights and started looking at the setup.
Due to the sunset I had a really nice 'rim light' on the left with a subtle tint of red that perfectly lit the silver metallic bodywork creating a nice contrast with the dark background.
On the right side of the frame I had the hard light from the twin flash units, so I dialed in a rather low power setting and positioned the front flash unit just ahead of the front bumper so some light was touching the entire front, but most of the light hit the front wheel and parts of the side. The second flash was placed further from the car so it would create some 'fill light' and not really hit the car too much, it is a silver metallic bodywork, so it doesn't need too much light.
The biggest problem here is to balance the flash with the amazing looking ambient light, so I went for a rather slow shutter speed of 1/60 and an f-value of 2.8, this way the flash is clearly visible, but there is still a hint of ambient light too, putting the shot through some post processing to get all the details right and tone down the background even more and we get an amazing looking, low key car shot:

If you take a close look at the front bumper in this shot you'll notice a nice little spark on the corner ... that was actually done in post processing, normally I would clone stuff like that out of the image, but in this case I think it adds to the overall look and feel of this picture.
2.3.2 full side profile
On some cars the view from the side is easily as impressive as a low angle front three quarter shot, take a look at this silver metallic BMW M3 model :
 and balance the light with your shutter and f-value.")
The main issue when doing a full side profile is putting the flash units to hit the wheels first, if you put the 'hot spot' just between the tire and the wheel arch it will not be visible in the shot, just the way we want it.
This way we also get enough light spill on the entire side of the car, you might have a small, less bright spot on the door, but that can quickly be edited in post processing, so when you take everything into account the full side shot is a piece of cake ... or not?
Take a look at these OOC shots :

In the shots above we've played around with shutter speed and aperture settings, but also with flash power ... there is only one thing you must keep in mind :
Shutter speed vs aperture using a flash
The flash is actually a very bright burst of light, but very short in time, probably about 1/1000 of a second or even shorter, so if you use a shutter speed of 1/60, 1/125, 1/160 or 1/200 the only thing you are influencing is the amount of ambient light that gets captured in the photo, the light from the flash has gone away long before the shutter closes again.
So with a constant flash power you have to change the aperture setting on your camera to get more or less light from the flash units ... however things do get a bit more complicated due to technical restrictions. Most camera bodies and wireless triggers have a limit on the shutter speed, it can be no faster than 1/250 usually, but I would advice to keep it 1/200 or slower just to be on the safe side.
So once you are setting up in the field you start with a shutter speed/aperture/iso and flash power level as a standard and work your way to the perfect exposure from that point on.
3. More samples
Let's take a look at some more angles and settings when using off camera flash in car photography.
3.1 another three quarter front view:

Setup : one flash at camera left pointing at the side to create some fill flash positioned just outside the frame. A second flash angled in front of the car to light the bumper.
After a passage through our post processing workflow applying a de-saturation of the surroundings and some general tweaking the above shot was turned into this really nice looking photograph:

3.2 the three quarter rear view:

Setup : one flash at camera left pointing at the rear to light that section and one flash at camera right pointed at the front wheel, due to the distance it the side receives some nice light spill on the entire side of the car ... from both flash units.

Take a look at the BTS (Behind The Scenes) shot above and you see what I always aim for when I'm out photographing cars ... this shot doesn't need a lot of post processing, I'm sure that after less than 15 minutes this shot is ready for the brochure it was going to be published in ... and that is something you have to keep in mind: a customer can see how long you work when you are at the shoot, but all the time 'lost' in post processing is invisible to a customer ... so he has an issue paying you five or six hours of work when you only spent about an hour on the shoot.
3.3 Quick samples
3.3.1 Dax shoot

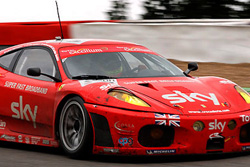
Setup : one flash at camera left pointing at the rear wheel and a second flash straight at the front to be able to see the radiator, also note this shot had the sun in front of me, I actually used the flash units at full power to be able to 'overpower' the sun, hence creating a special look by brightening up the shadow side of the car.
3.3.2 Dacia shoot

Setup : one flash at camera left pointing at the rear wheel and a second flash straight at the front to be able to see the radiator, also note this shot had the sun in front of me, I actually used the flash units at full power to be able to 'overpower' the sun, hence creating a special look by brightening up the shadow side of the car.
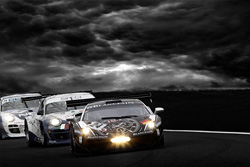
3.3.4 The apocalypse is near ...

The above shot is a bit over the top I agree, but when I was taking this shot on that location I knew I had a winner on my CF card, two flash units were used, at the left and at the right, so far this is a standard shot, but then I pulled it into a pseudo HDR action that created some amazing contrast in the shot. (I used Dynamic Photo HDR as a first step)
After the HDR style I continued in PhotoShop to create a look that would make it really be in style with an apocalypse in the making, I completely de-saturated the surroundings (the BMW sat on sand actually) and used levels to create the dark look, using a mask to make sure the BMW M3 itself remained bright.
Note that the impressive clouds in the background haven't been pasted into the shot, they were already there in the original photo, to be honest nothing has been pasted or cloned in this shot, only an HDR style and some tweaking to get this dark look.
4 Conclusion
Still from time to time we will get it wrong, call it routine, or rushing into the shot, a deadline that is lurking over your shoulder ... all kinds of external factors could have you making errors.
Fortunately you have the option of seeing the photo on your camera LCD right away, if you feel you can't really judge the image on that small LCD take along a portable to the shoot and transfer your images on the spot so you can review them on a larger screen, perhaps even showing your customer a sneak preview of the shots to keep him happy ... and craving for more.
So in the end it all comes down to a combination of shutter speed, aperture and iso setting together with a power level setting on the flash that has been positioned in such a way you avoid hot spots on the bodywork of the car.
Still keep in mind that great photographs are created in post processing, there are very few people in the world that publish OOC photos, so don't feel bad if you have to tweak the image on your computer to get it just right.
 |
CPT Premium member BONUS : 80102 As a member you can download the instructions listed in this turorial as an easy to print PDF for offline reading and to take along on your shoot. |
Note : commercial use or publishing of our tutorials in any way, written or electronic, is strictly forbidden, we present these for your personal development only. None of our material may be published in any way without prior, written permission from the Car Photography Tutorials founder. All workflows and photographs are copyright protected and owned by the Car Photography Tutorials team unless stated otherwise
Advertisement
Become a MEMBER
Premium Membership
Become a CPT Premium Member and download all our tutorials including a PDF for printing and the result as a PSD file with layers if any.
Interesting articles
Photographing a major motorsport event
Motorsport like car races are always very interesting events to capture as an automotive photographer, we explain how to make the best of your experience.

Outdoor car show - Best practice tips
one of the best opportunities to get a nice, exotic super car in front of your camera is during one of the many outdoor car shows during the summer, we take you over some tips to get the best shots.

Our 60 second workflow on automotive photos
Only have a minute to spare ? Don't worry, that's more than enough to make your photograph stand out of the crowd.
Make panning shots like a pro
We all made these mistakes at first, but after gathering some more experience we could pinpoint these mistakes and share them with you so you can avoid them.

Using actions to add a watermark to your photos
We show you a way to add a custom watermark to all your photos, no matter if they are in landscape or in portrait orientation using actions that require no manual intervention.
Keep up with CarPhotoTutorials
Why not follow us, become a fan, get our RSS feed or mail a link to a friend ?
![]()
![]()
![]()