BACKGROUND REPLACEMENT MADE EASY
Canon EOS 350D - Canon EF70-200 f/2.8 L IS USM - 200mm 1/500 f5.6 ISO 100
Advanced level tutorial by Mark
We all encounter it on a regular basis when photographing a car event, you will be able to shoot great looking cars but the background could be a major drawback as these events are regularly held on race track paddocks or on other, crowded areas, so the trick is to get a good photograph and worry about the background when you get home.
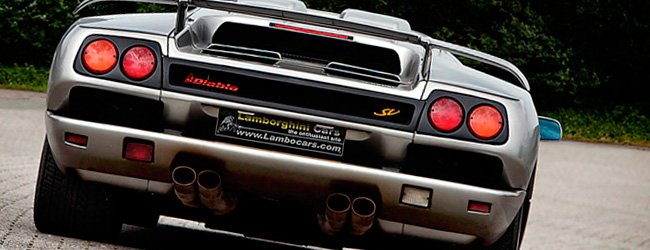
 I knew the moment I took this exposure of the grey Lamborghini Diablo SV driving away from me I had a possible winner on my hands, this low angle full rear shot just screams 'power' by showing the full width of this massive car, an angle mostly seen when driving behind one on the highway.
One major drawback ... that background just looks like rubbish, it draws way too much attention from the main feature, the Lamborghini, so I knew I would have my work cut out for me when I came home ... it actually looks a lot harder than it is, and with a bit of practice you will be able to do exactly the same thing on your shots.
STEP 1 : getting the exposure right
During a car event you do not have the time to try different exposures in manual mode, perhaps when you get really experienced you will be able to shoot manual all the time and are able to predict the correct settings, but for now just put the camera in these standard settings :
Aperture priority fix it at f/5.6 or f/8.0 (depends on the light)
Iso speed dial in at 100 (on a sunny day) or up to 400 (on a very cloudy day)
Flash You could use a bit of fill-in flash on a sunny day to bring out the shadows, but be careful not to use too much power.
RAW ! I've said it before and I will keep repeating it : use raw for your automotive photographs, you have so much more control afterwards.
And that's about it, just leave the shutter speed up to the camera, it will do a good job most of the time, and in those cases where he really missed the ball (a white or a black car for instance) you can always fine tune the exposure later on in PhotoShop as you took the shot in raw ... remember ?
STEP 2 : Loading the photograph into PhotoShop
When you get home you will be transferring your shots from the memory card to your computer (using a card reader or by connecting the camera directly to the computer), first thing to do is go over the shots quickly, deleting the ones that are really beyond saving (out of focus, missing the front or rear of the car, etc ...), afterwards make a backup copy (on DVD or external HD) just in case.
 As we've shot our cars in raw the Adobe Camera Raw opens when we double click the picture we want to work with, in this screen you have a lot of options and settings, and I have prepared a special tutorial explaining you how to work with ACR, but for now I will only do some basics to get started.
If the original shot is rather good you could just click the 'auto' option in ACR, this will make sure the image is calculated by Adobe's standards into a decent looking shot ... it isn't always what we wanted, but for now it will do.
If the automatic setting is way wrong you can start sliding the different settings to get a better view, mostly exposure to counteract any flaws the camera had when shooting in aperture mode (over or under exposed shot), but as I said, I will go into details of ACR in another tutorial.
STEP 3 : First things first ...
If you have taken a look at some of the previous tutorials you will have noticed that the first step in my workflow is just about always the same : USM, that's right, I don't apply sharpening in ACR when I develop the RAW file but I rely on PhotoShop to do a good job.
Actually I use two methods for sharpening my automotive photography, either the UnSharp Mask or an 'overlay' layer with a 'High Pass' filter, let me explain both of these steps :
 The well known USM (or UnSharp Mask) from Adobe PhotoShop is a very powerful filter, it will allow you to put a little extra sharpness in your shots. I normally use a setting of 100 - 1,0 - 1, which are relatively low values, but in this case if the effect isn't strong enough I just perform it again until I am satisfied with the look. When you see artifacts showing up on your image, you've exaggerated and you'll have to undo the effect and redo it with lower settings.
 Naturally there are also other methods to boost the sharpness of your image, putting in an extra layer with a High Pass filter also works nicely, just copy/paste your entire image on a new layer and put this layer in 'overlay' blending mode.
Most of the time this effect will be a bit over the top, simply lower the opacity of the layer to get the right look you want.
STEP 4 : determining what to replace
Now that my base has been dealt with I can start looking at the image and decide what I would like to change in it, on this particular shot the entire background will have to go, that's for sure, but there are a few other things that bother me too :
 Next to the entire background I feel that the shadow parts are too dark, a downside from shooting at 1pm in the afternoon, the sun is too high in the sky and the dark pavement didn't reflect any light upwards, also a fill flash wouldn't have worked in this case because the car was too far away and the license plate would have reflected too harshly.
Talking about that license plate (I already removed the digits for privacy reasons), I think it looks hideous on the car, so I will replace it with a brand new I have created in PhotoShop, but that's not all, take a close look at the right ... you will notice a reflection from other cars and people standing just outside of the frame, I'll have to remedy that one too.
STEP 5 : putting in another background
 If you take a look at the original photograph you'll notice that the DOF of this picture is rather small, this will actually be use to our advantage, it means we can put the background out of focus too, so we can get away with some minor errors, for this picture I've selected a nice treeline taken from another Lamborghini shot.
Now we have to make the parts of the car 'shine' through the treeline, so I started erasing the trees where I didn't need them anymore, normally you would use a layer mask for this, but I went the old fashioned way. A layer mask would be better however, it allows you to correct possible errors while 'masking' parts away you might need afterwards, I went for a different solution to this.
Make sure that the pavement and sides of the road from the original picture remain on the composition with the new background, these were perfect to begin with, so there is no need to start erasing, covering or cloning them, just a few papers that were lying around have been cloned out.
STEP 6 : mind the details
 Drawing a mask to reveal the underlying layer, or erasing the top layer like I did, will take a bit of practice, and actually a mouse isn't really suited for this kind of work, you should really consider getting a tablet, something like a Wacom is great, but a bit expensive, I actually started out with a nice, big Trust tablet ... works perfectly on a PC, unfortunately it doesn't work on Macintosh, but the best part is the price, for about 100 Euro you are in business.
So who can tell me what I did wrong in this picture ? Easy, because I erased the background I made a monumental error with the view through the car, now we are talking about a Lamborghini Diablo here, so the rear window is rather small, more of a letterbox opening, but still you can see the original background through it.
 If I had used a layer mask like I always tell you to do this wouldn't be a problem, but because I made the mistake of erasing the background in those places I felt it wasn't needed, there is nothing left to see through the window anymore, so another solution had to be found ... and it was a very simple one, let's tint the rear view window like on those black limousines you see all the time.
You must have seen Lamborghinis with the side windows tinted solid black, so I went for the same look on this car, which is very easy, just add another layer and paint the window with black, after that lower the transparency setting of the layer a bit so something is visible but you can't recognize what ... perfect solution.
STEP 7 : a few more issues
 I really don't like that reflection on the right, there were bright cars parked at that side of the road, and a lot of people as this was a popular Italian car event in the Netherlands, so my next point of business was removing those, which is rather easy, just copy the necessary part from the other side, where no reflection is visible.
I copied the part of the rear fender from the left, pasted it on the right and flipped it with the transform option in PhotoShop, then a little more positioning and a feathered eraser to make it blend in nicely and I was almost there, I did need a little bit of cloning to make it just perfect, but that is part of the fun, after a few minutes the distracting reflection on the side was completely gone.
STEP 8 : the license plate
 I make sure never to publish a photograph of a car with a visible license plate, just for privacy reasons and to avoid any problems, you never know. That is why I actually made a nice little license plate in PhotoShop, with a shadow I can manipulate depending on the position of the sun in the original image.
In case of this Lamborghini Diablo shot I also had to erase the license plate where the lights would be, a car like this uses two small units to light the plate at night, and they were covered when I pasted the new license plate in place, so a little touch up with the eraser and they were visible again.
Don't worry of the new license plate doesn't cover the old one perfectly, I actually made a large one that I paste onto the original image and then use 'Transform - Distort' to make it fit nicely over the image, effectively covering it nicely.
STEP 9 : the final touch
 I was nearly finished, but my eye fell on the Diablo sign at the rear, normally that is finished in red, but since this car was about 10 years old it apparently had faded over time, no problem, just copy/paste the sign onto a new layer and put the 'color overlay' effect on this new layer, by default the color is red, but the entire rectangle is now red, so I switched the blending mode for the effect to 'Linear Burn' and lowered the transparency a bit which made the logo look brand new.
I usually add another soft light layer and use a gradient from black to transparent to put the focus on the car, creating a kind of artificial vignetting on the shot, by making the corner and sides darker you automatically draw attention to the car itself.
STEP 10 : different picture - same process
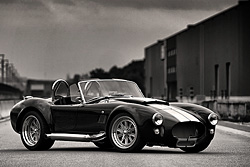
 This method can be applied on just about every image you want, this white BMW was shot in front of some trees, the background didn't look too bad, but I still felt the car would look so much better with a different, more industrial background, so I replaced the trees with these plates ... and the image packs a lot more punch than the original one.
You don't have to replace every single background, but just in case it doesn't suit the car, or it is distracting from the main object you can follow these simple steps to put a totally different background in place. One thing to note is reflections, cars are shiny object, they reflect everything around them, so make sure there are no reflections from the old background or surroundings still visible that could unveil the fact you've replaced the background.
 |
CPT Premium member BONUS : 61275 If you would like to print this Background replacement tutorial you can download our special PDF which is optimized for hardcopy layout and includes the original files in multi-layer PSD. |
Note : commercial use or publishing of our tutorials in any way, written or electronic, is strictly forbidden, we present these for your personal development only. None of our material may be published in any way without prior, written permission from the Car Photography Tutorials founder. All workflows and photographs are copyright protected and owned by the Car Photography Tutorials team unless stated otherwise
Advertisement
Become a MEMBER
Premium Membership
Become a CPT Premium Member and download all our tutorials including a PDF for printing and the result as a PSD file with layers if any.
Interesting articles
Buying a tripod for car photography
A lot has been going on about tripods, do you really need one when your main objective is to photograph cars ? We go over the advantages and the problems and help you to select the best one.
Make panning shots like a pro
We all made these mistakes at first, but after gathering some more experience we could pinpoint these mistakes and share them with you so you can avoid them.
Virtual tuning in post processing
Sometimes the car you want to photograph just doesn't exist in real life, so you start with a regular model and virtually customize it in post processing ... and this time I show you all the steps in a video

Must have base equipment
In this article we talk you through the large amount of camera's you could buy to get started well in automotive photography.

Taking care of your equipment
You should take really good care of your photographic equipment given it's price, but it also helps you to get better images in the long run.
Keep up with CarPhotoTutorials
Why not follow us, become a fan, get our RSS feed or mail a link to a friend ?
![]()
![]()
![]()