BUYING A TRIPOD FOR CAR PHOTOGRAPHY

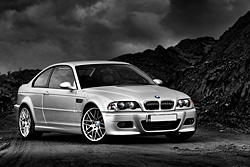
Canon EOS40D - Canon EF70-200mm f/2.8 L IS - 145mm 1/60 sec f2.8 ISO100
Intermediate level tutorial by Mark
When you advance into photography, be it car photography, portraits or any other kind of shooting that involves you using a camera there will be a point in time someone will offer you the advice to get a tripod … and once you take a look at tripods in your local store you’ll get a headache as the choice is really overwhelming.
 The first thing you should ask yourself is this : ‘have I ever missed a shot because of camera shake ? If the answer to this one is yes then you should consider either a tripod or investing into a lens with some kind of image stabilizing … so when do you go for a tripod and when would an IS (or OS or VR) lens be the best choice ?
It depends, if you are at an indoor car event and you end up using shutter speeds of 1/10 at a focus length of 18mm for instance, a stabilized lens will do just fine most of the time, however when you get down to shutter speeds of 1 second or less this expensive lens will be useless, and it’s a better idea to drag along a decent tripod.
The thing I always consider is this : will a tripod give me better images ? The quick answer is yes, but … and here it comes. For me personally I rather use iso 800 on my camera to get shutter speeds of 1/10 or 1/15 and process the shots correctly to reduce any noise that may be present when I visit a high profile auto show or something similar. The burden of walking around all day with a large tripod just doesn’t weigh up to the relatively low noise images we get with modern digital SLR cameras these days, but on the other side a tripod does give you some nice advantages. So as usual it is all a matter of priorities and what you expect from it.
 When would a tripod come in handy ? That’s a relatively easy question to be honest, and the rule (I usually break a few rules when photographing cars, but this one does get useful when it comes to getting the tripod out of the trunk or not) is simple : it all depends on your lens and the focus length of the resulting shot :
50mm and you should have a shutter speed of at least 1/60
100mm and the speed goes to at least 1/125
200mm and we are shooting at 1/250 or faster
When you keep the above figures in mind you will most likely have sharp images when you shoot the car in front of you (these figures drastically change for panning shots naturally, but then again, a tripod for panning isn’t really useful anyway). Also note that these numbers do not take into account a stabilized lens, but the extra cost of an IS lens most likely will equal or even exceed the price of a nice tripod anyway.
However there are times that you will use a 1/125 shutter speed at 17mm and still won’t get a sharp image, camera shake can happen at any shutter speed hence the use of a decent tripod is an advantage at any car photo shoot you will be doing.
 So we are talking about buying a tripod, we’ve decided to get a nice little three-legged helper and avoid camera shake during long exposures. The first thing you should think about is budget : how much are you willing to spend on this new toy ? Prices go from US $20 right up to several hundreds of dollars, with just about every level in-between, my first advice : avoid the cheap ones, they are good for a small, lightweight point and shoot camera, but any decent DSLR with a lens attached to it is way too heavy for such a cheap tripod so spend your money wisely and preferably only once to buy a tripod that is perfect for your use and not way over the top either.
Weight watchers
When would a tripod come in handy ? That’s a relatively easy question to be honest, and the rule (I usually break a few rules when photographing cars, but this one does get useful when it comes to getting the tripod out of the trunk or not) is simple : it all depends on your lens and the focus length of the resulting shot :
 One of the major things to think about once the money has been counted is the weight of the tripod you would like to get, this is very important as the best tripods around are also only to be used in a studio setting, they are way too heavy to carry along all day when you cover an auto show. But another important factor is the actual weight the tripod itself is able to carry, it is totally useless to buy a tripod that can support 12 kg of gear when your camera and lens combination only weighs in at 2 kg.
In the good old days of film photography you would see many tripods being made of wood which is in fact a very good material to support your camera with, but a bit impractical these days, so your best options today are aluminum or the more expensive carbon fiber tripods.
Foundations
Remember that you could compare a tripod to the foundations of your house, if it isn’t stable enough you’re in trouble. The tripod might creep down under the weight of your camera/lens combination or even worse it might tip over and send your expensive piece of equipment into a one way ticket onto a concrete floor, neither is what we are looking for I guess.
 So how do you test this ? Easy, put your most heavy combination on the tripod, extend the tripod as high as it will go, if you are using a tele zoom lens extend it to the furthest and gently tap the end of the lens while you look through the viewfinder. Wait until the image is totally still again … if this takes too long look for another tripod, easy right ?
Another option is to extend the tripod all the way and then push gently on top of the tripod, if it flexes, squeaks or retracts under moderate pressure you might want to consider another one to put your expensive camera on.
Also keep in mind that their might be relatively strong winds during your next outdoor photo shoot, the tripod should be able to counteract this to a certain level, naturally I would advice you to stay indoor in gale force winds …
Lock down
Take a look at how the legs are locked in place on the tripod you are looking at, when you extend the tripod just how do you fix them in the position/height you want ?
 Some tripods use a screw mechanism while other use clips … here it all comes down to personal preference to be honest.
I like the clips as they are quick to set and are easily adjustable when they start to wear after some time (two hex keys came with my tripod to fasten all screws that might come loose over time) but I know many people that prefer the screw lock mechanism seen on some aluminum Giotto tripods for instance.
Section three
Most tripods consist of three legs with multiple tubes that slide into each other when transporting it, some of them have two sections, other have three and the smallest ones even boast four sections. A two section tripod is most likely a studio unit, as it will be rather large to transport, naturally the less sections the less issues you might have with stability, but portability is another important factor when selecting a tripod so I would go for at least three sections.
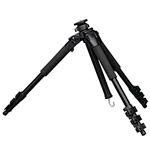 Some makes even offer four sections, like the Manfrotto 055CX Pro 4, but make sure you are sitting down when viewing the price for this professional tripod, it is rather expensive, but worth it when compactness is important to you when carrying it around on a crowded auto show.
I initially went for a nice three section tripod with larger diameter tubes which is important as the tubes get thinner on the inner most tube, you have to make sure even the smallest tube is still thick enough to hold the weight of your equipment.
Another very nice feature on a tripod is the fact that the angle of the legs can be adjusted independently from each other, this allows you to place the tripod on very difficult grounds and even very low to the floor, perfect for those 'upwards' facing shots of cars you see regularly.
Up and away
The height of a tripod is very important, if you have to bend down to look through the viewfinder it will put some serious strain on your back, which should be avoided at all costs. Your invoice from the chiropractor will be high enough from lugging around that backpack holding your equipment alone, so no need to worsen the problem by using a tripod that is too low.
Some tripods feature a center column that can be extended to make the tripod even higher, but also considerably less stable, so try not to extend it too far which means you should get a tripod that can be level with your eye, the problem is that the height of a tripod is reflected in the asking price … as I am rather tall myself it took some serious searching to locate a tripod I could use at eye level.
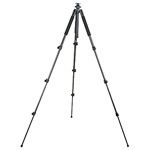 Also take into consideration that you might not always work on a level surface, so one or more legs of the tripod might have to be extended further down to reach a stable setting, so don’t go for a tripod that is too low for your posture.
However remember that the camera and the tripod head will add to the total height, add a battery pack and you gain another inch or so. Another idea might be an angle viewer, this allows you to look into the viewfinder from above, hence the camera can be positioned lower, so the tripod doesn’t need to reach your eye in this case.
The maximum height is important, but remember that some of the photographs you will be making are low level shots, so go for a tripod that can put your camera close to the ground too, the lower the better in this case.
Heads up !
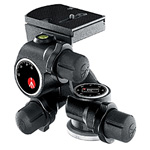 Your choice of tripod is very important, but perhaps even more important is selecting the right tripod head for you, two major types exist : either the Ball Head or the Three way head.
My preference is a three way head with big handles to adjust the camera in 3D : tilt, angle and rotation, it allows me to perfectly frame the car in front of me without too much trouble. It has become second nature to me to set op the tripod and adjust the head within seconds using my combination, but I know that many will prefer a ball head which has the advantage of only releasing one knob and you can twist, tilt and turn your camera in all directions possible … but I have a problem with getting the camera perfectly level when using a ball head, so I don’t use it a lot, but again, this is personal preference.
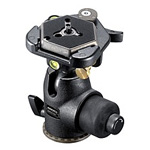 I would suggest you go out to your favorite camera equipment store again and just try out some options regarding your future tripod head so you can select the one that pleases you best.
Just like the tripod itself, the head has a maximum weight figure too, so make sure that you select it according to the tripod you are screwing underneath it, there is no need to buy a tripod that can hold 12 Kg of equipment and mount a head that only holds 2 Kg. When I was shopping for a tripod I actually put my camera with battery grip and two batteries loaded, an external flash with battery pack and my heaviest lens on a scale to get an idea of the total weight I might put on the tripod … I then multiplied this by two and went shopping. This way I was sure my heaviest camera combination would be safe and sound on the new tripod, always calculate some serious reserve into the maximum weight your new tripod is able to support.
Do note that sometimes you can buy a tripod/head combination at a reduced price, most manufacturers offer complete sets of their bestselling tripods and heads, so you could save a few bucks shopping for such a pre-defined package.
Conclusions
When you follow these tips you are ready to spend that hard earned money on a tripod and head that you will be keeping for years to come, the biggest mistake is to go for a cheap tripod just because you don’t have the funds yet … continue saving up and don’t buy a tripod until you can afford the good ones, otherwise you are spending your money twice (or even worse …)
 We all made this mistake I guess, I currently own three tripods, the first one I ever bought cost me $19.95 on eBay … the biggest mistake I ever made in buying photography gear, I used it twice before I tossed it on the shelve and went out to buy a better one which set me back about $150 in 2003 … but I still use it today from time to time, so it was a good investment.
So why do I now own a third one when this second one was a good one ?
I wanted a lightweight set up to take with me, so I went for the Manfrotto 055CX Pro4, a nice lightweight carbon fiber unit with four leg sections, perfect to take along with your during those crowded car events, it’s only 1.7 Kg and folds down to about 55cm but can still hold up to 8 kg of weight … sadly it is also very expensive at about $400, and that’s without a tripod head.
 The head actually doubled the price as I went for the Manfrotto 405 Geared Head, a perfect companion to this tripod as it can hold 7.5 Kg and weighs only 1.6 Kg itself, so my combination is just over 3kg, which I can carry all day and still have a very solid stand when needed. The three knobs on the 405 allow me to perfectly frame my shot while adjusting the camera in all directions, I love this kind of tripod heads to be honest.
Naturally that’s what I’m using right now, there is no need for you to go out and spend over $800 on your first tripod, instead go for a nice basic set from Manfrotto and you’ll come home with a good, steady tripod/head combo for less than $200 in total when you opt for the Manfrotto 190XPROB with a 056 3D Junior head including a tripod case … a perfect set to get you started that can hold up to 3kg. Add about $20 and you get this tripod with the 804RC2 3-Way head, the one I would buy to start with right now as it can hold 4kg … the more the better you know.
 I went for Manfrotto starting with my second tripod, however this is my choice, there are probably hundreds of makes out there, make sure you go for the one that fits both your needs and your budget, there are some really nice low budget items out there, but finding them is the challenge. I managed to get a lemon the first time, but others might find it a good alternative to spending ten times as much on something they hardly use … I on the other hand carry my lightweight tripod with me most of the time, so it is money well spent in my case, but again you might have a totally different idea about how much you are willing to spend on your three legged friend.
If you are looking for a nice entry level tripod you should look into Slik or Velbon, these aren’t too expensive and still offer nice tripods. Manfrotto offers both prosumer and professional tripods and heads which reflect in their pricing, you can have a nice low budget Manfrotto for about $150 while their pro range will easily go over the $1000 threshold. If you are really serious about your photography and you have the funds to back it all up you might want to take a look at Gitzo, they are top of the line with equally high prices … I never said car photography was going the make you rich now did I ?
Also keep in mind that I’m talking about a tripod for car photography here, things change completely if you want to use your tripod for wildlife or birds, in this latter case you will be using 500mm lenses that weigh a lot, so you requirements for a tripod and head change considerably, here you will be looking at Gitzo with RRS or Kirk heads, and a price tag of thousands of dollars, a different ballgame altogether.
Options
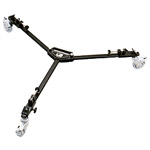 There are a few things that might come in handy once you’ve got your tripod with you, I actually bought a dolly for my tripod, this is a three spoke cross with wheels underneath that allow you to roll the tripod around, really nice inside the studio and nice to use at a car show because you don’t have to carry your tripod and camera around. I usually mount a body with a wide angle lens and polar filter on these wheels and carry another body with flash around my neck. The dolly allows me to use long shutter speeds while the quick shots are taken with the second body.
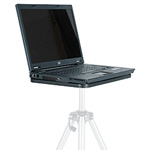 Another nice accessory is a laptop plate that fits on top of the tripod, this is really great to use when you are shooting scale models in a light cube, this way you can do some ‘tethered shooting’ … which means you take a shot and immediately see it on the screen of your laptop by connecting the camera with an USB cable to the computer.
You will need two tripods in this case, one to put your camera on and a second one for the laptop, but once you get used to working this way you wouldn’t want to do it any other way.
Most decent tripod heads will come with a quick release plate, make sure you order enough of these, one for each camera body and one for each of the heavier lenses, as in this case you do not mount the camera on the tripod but the lens itself.
A quick release plate is screwed onto the camera or lens and stays there, this way you do not have to re-screw your camera to the tripod each time you use it, it just clicks in place, do make sure it is securely fixed before you let go of the camera.
 |
CPT Premium member BONUS : 52389 If you would like to print this article you can download our special PDF which is optimized for hardcopy layout ... |
Note : commercial use or publishing of our tutorials in any way, written or electronic, is strictly forbidden, we present these for your personal development only. None of our material may be published in any way without prior, written permission from the Car Photography Tutorials founder. All workflows and photographs are copyright protected and owned by the Car Photography Tutorials team unless stated otherwise
Advertisement
Become a MEMBER
Premium Membership
Become a CPT Premium Member and download all our tutorials including a PDF for printing and the result as a PSD file with layers if any.
Interesting articles
Background replacement made easy
There are times you've managed to photograph a great looking car, but the background is far from good looking ... no problem, just replace it with a different one.
Common mistakes when shooting a car
We all made these mistakes at first, but after gathering some more experience we could pinpoint these mistakes and share them with you so you can avoid them.
Taking care of your equipment
You should take really good care of your photographic equipment given it's price, but it also helps you to get better images in the long run.
Behind the scenes of a professional car shoot
You've managed a nice exotic super car for a private photo shoot, but how do you manage an outdoor shooting ? We will explain 10 of the best tips for you.
Off camera flash car photography, part 2 of 2 : the shoot
You managed to buy the necessary items to get into off camera flash photography, in part 2 of our tutorial we explain how to use it.
