CAR PHOTOGRAPHY THAT SELLS THE CAR
Canon EOS40D - Canon EF-S17-55mm f/2.8 IS - 21mm 1/30 sec f8.0 ISO100
Advanced level tutorial by Mark
We've all seen it, an ad for a car that just makes tears rolling down your cheeks ... be it from laughing or from feeling sorry for the guy. There is no getting around it, a picture says a thousand words, and if it's a bad picture your chances of ever selling the car (or the photograph for that matter) are getting very slim to non-existent these days.
People are used to getting top quality for peanuts, so why would anybody pay top dollar for sub standard work, that is why we will show you how to get a great photograph right from the start and make it even better in post processing so you end up with a near perfect (there's no such thing as perfection right ?) image that sells the car (or the image) on the spot.
So what do we need to pull this one off ? Easy, first thing is a car, but that's only the start, as with every shoot make sure the car is spotless, no dents, no scratches, nicely detailed both inside and outside, that way you have the basics covered. If there happens to be a dent on one side of the car, shoot the other side for the eye-catching shot and shoot the dent to show further down in the ad if needed ... if your car is dented on both sides don't even bother getting a great shot, unless it's an exotic it isn't worth the effort and a great shot of a wreck won't help to boost the price anyway and secondly no owner of such a car will pay you for getting a great 'selling' shot.
The car
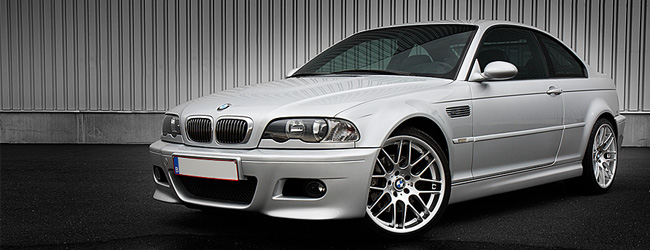
We've got a rather nice car lined up for sale to illustrate this tutorial, a classic silver metallic BMW M3 in pristine order, not the most exotic car around (we can't always sell Lamborghinis now can we) and we must admit that silver is a rather easy shade to photograph, but still it is perfect to show you what to do and what not to do when shooting a car to increase it's selling potential.
 Now this shot will not help selling the car ... why not ? Because it's terrible, we have a full side view here and as it was getting dark outside the entire shot is under exposed, this gives a depressing feel about the image, something we don't want when trying to sell a high power two-door like this M3, also take a look at the background, you'll notice trees (not necessarily a bad thing, but still) but what's much worse, there a building in the background that pulls away our much needed attention from the car.
We are selling a car here people, not a building or a forest, so the main point of focus should be on the automobile at hand, not on some disturbing stuff in the background, which brings us back to one of the basic rules when photographing a car : Mind the surroundings !
To be honest we are lucky with this car, the silver metallic shade gives us a nice impression of the lines and design of the car, black cars are much harder to photograph (take a look at our to get our point) because everything is reflected in them, a silver car reflects much less, but still we'll be using a circular polarizing filter to block any unwanted reflections in our final shot.
The angle of attack
The most important about shooting a car for sale is the concept you want to convey onto the potential buyer, we are looking at a high power, two-door car ... would you put it on grass to be photographed ? Not really, we're not talking about an SUV, this is a low slung sports car so put it on concrete with a nice, modern background so people know they aren't buying a run down car that's been mowing the lawn in the past.

It's all about location, so we've taken this BMW to a distribution warehouse on a Sunday when business is closed, a nice abandoned industrial site is perfect to photograph this car, high tech and clean surroundings are just perfect for our 'selling' shot.
So we now have a nice, light shot of our BMW, but this picture is far from perfect, note the dents in the siding of the wall behind, they again draw too much attention away from the car, also you'll notice a small reflection at the front wheel, which is nice, but if you are working with a reflection make sure the entire car is visible, not just a part, that doesn't work.
One final 'problem' with this shot, it's taken from eye level ... never do this when shooting a car, people see cars like this all the time, instead kneel down and take a shot from headlight level, it will make a much stronger shot and at the same time cover the dents we now see above the roof-line of the BMW ... two birds with one shot.
Getting it right
We're nearly ready to take our first, decent shot of the BMW M3 now, mount the camera on a tripod (you did remember to bring your tripod for the shoot right ?) and set it at headlight level so we get a nice, low angle of the car, the initial photograph for a car ad is mostly a three quarter, front view, so we'll settle for that one first.
 As you can see in this first shot we've taken a low angle and made sure the reflection of the car is used to it's maximum potential, also by using this low stance the dent in the siding on the wall isn't visible anymore as it is blocked by the BMW M3 in the foreground, also note that the exposure of the silver metallic paint is near perfect, a small highlight at the front fender, but that one is easily corrected in post processing ... this shot has to potential to become a winner.
Keep in mind when shooting a car that you use a good lens on your camera, you do not want too much distortion on the image, we've used the award winning Canon EF-S17-55 f2.8 IS USM lens on our old Eos40D unit, and although it might not seem obvious in the shot, even at the 21mm setting there is a distortion visible : take a look at the sidings on the wall, from left to right you'll notice the lines don't remain parallel, but that's no problem in our shot.
Perfecting the shot
Ok, the work 'on-site' has been finished (naturally we've taken more angles and different backgrounds) and we've come home to get started on post processing our shots, together with the owner of the car we've selected the above shot to be used as the main image in the ad so now we'll start working our magic on it.
 The first thing we do is combine our three shots (you did remember to use the bracketing option when doing the shoot ?), this way we have a correctly exposed shot, a 2 stops under exposed one and a 2 stops over exposed shot, with these three we can go any direction we need.
For instance there is a highlight on the front fender that looks a bit over exposed in our original shot, so we'll 'paste' this image over the under exposed shot and mask out this part of the fender (take a look a the psd file in our Member package) to show the darker underlying fender. The same thing with the front turn signal, it looks a bit too bright, so we again mask out the darker one from the 2 stops under exposed shot.
Also take a look at the windows in this new shot, they are a lot darker than in the original shot, again just a mask of the -2 stops shot, we like dark tinted windows, and with this option we don't even have to put in a new layer in Photo Shop to get them, the darker exposed shot works fine for this purpose.
In this particular shot we only used the 'over' exposed shot for one small part of the image, the grille insert in the front bumper, it was a bit too dark in the original shot so we pasted the 2 stops over exposed shot on top of the other two layers and masked it out completely, now with a small brush set at 25% opacity we 'revealed' the light insert again, perfect for what we wanted.
The final touch
We're almost done with our BMW M3 shot, the image is nearly perfect to go in the ad to sell this car quickly and for a decent price, which is it all about after all.
 To get to this final result we were looking for we actually turned the image into a black and white version, but we've used an adjustment layer for this so we can draw on the mask to reveal some color touches back in view like the BMW logo and the windows, we also added some serious vignetting on a soft light layer to emphasize the car itself even more and darken the surroundings.
To really get a clean look we 'cloned' the remaining, small dents in the siding that were still present and cleaned the front bumper from a few bugs that got caught during the drive to the shoot location. You might notice that we didn't remove the license plate for this shoot ... and we have a good reason for it.
Normally we would always remove license plates because blanking them in post processing isn't the best way to deal with them, but as this car was going to be sold locally we left the plate in place and removed the digits from it, this shows that the car is actually registered locally and driven, it's not a garage queen nor is it an import (with all the hassle that could give the buyer afterward), it is a local car that is being driven by the owner.
Shooting for a car ad
If you offering to photograph a car for an ad there are a few rules you might want to keep in mind : Never remove dents or scratches from the car in post processing unless the owner will have them removed before people come to see it. If you present a perfect car it should be just as clean in real life, stuff like bugs and dirt can be cleaned up in your computer, but never present the car in any other way than it can be seen and tested in real life.
 Make sure you have the following angles when you put together a car ad, the usual front and rear three quarter shots, sometimes even a full profile shot is nice to have, also front and back views are handy as smaller thumbs in the ad, but more importantly the dashboard and the seats. People that are looking into buying a car (be it new or second hand) always want to know what the inside looks like, especially on used cars the condition of the leather or cloth on the seats is important, also the odometer could be a good idea to show the mileage of the car, do make sure the interior is clean and there is no garbage anywhere in sight when you photograph it.
 |
CPT Premium member BONUS : 89442 As a registered member of CarPhotoTutorials you can easily download this tutorial to print at home for personal use, we also included the layered psd file for you to look over. |
Note : commercial use or publishing of our tutorials in any way, written or electronic, is strictly forbidden, we present these for your personal development only. None of our material may be published in any way without prior, written permission from the Car Photography Tutorials founder. All workflows and photographs are copyright protected and owned by the Car Photography Tutorials team unless stated otherwise
Advertisement
Become a MEMBER
Premium Membership
Become a CPT Premium Member and download all our tutorials including a PDF for printing and the result as a PSD file with layers if any.
Interesting articles

Photographing a major motorsport event
Motorsport like car races are always very interesting events to capture as an automotive photographer, we explain how to make the best of your experience.
Case study - Lamborghini Murciélago LP640
We take a look at one of the most difficult scenes, a black car during a bright, sunny summer day in the early afternoon.
Scale car photography explained in detail
In this article I guide you into scale car photography, from the preparation over the setup including lights, aperture, shutter speed and then taking the shot ... a lot of these tips can be used on full size cars too.
Use a mouse or a tablet for post processing
Perhaps a mouse isn't the most appropriate option when working on automotive photos in post processing, so let's take a look at a pen and tablet.

Must have base equipment
In this article we talk you through the large amount of camera's you could buy to get started well in automotive photography.
Keep up with CarPhotoTutorials
Why not follow us, become a fan, get our RSS feed or mail a link to a friend ?
![]()
![]()
![]()