SCALE CAR PHOTOGRAPHY EXPLAINED IN DETAIL
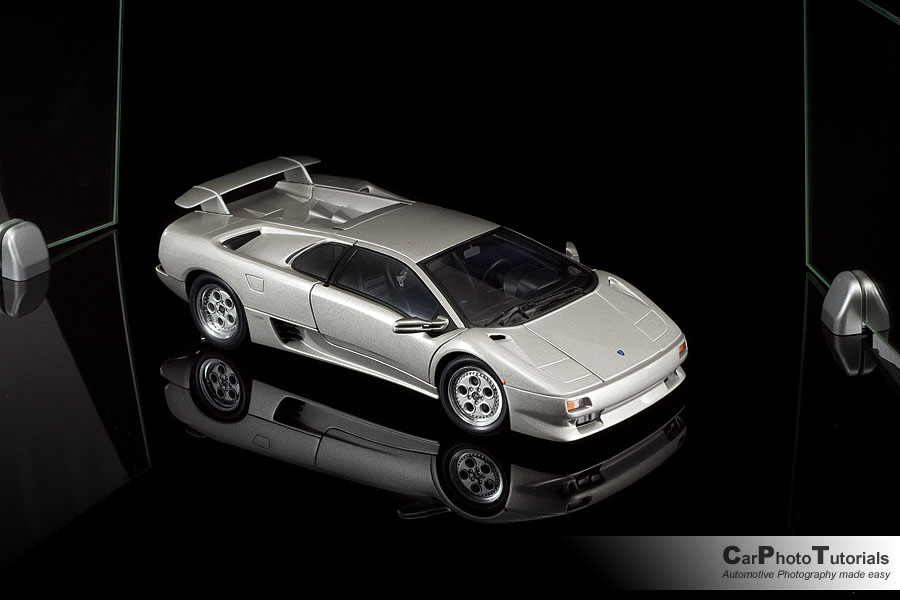
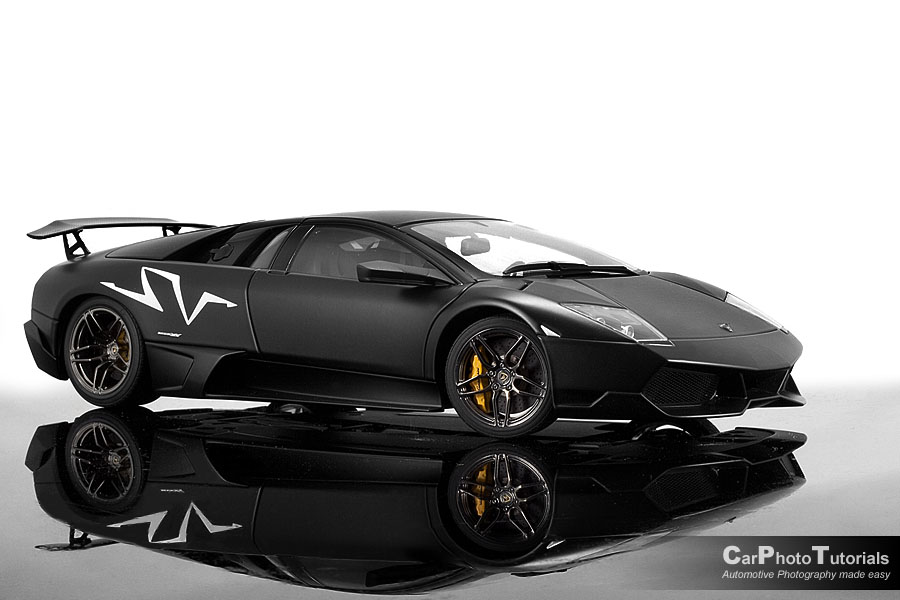
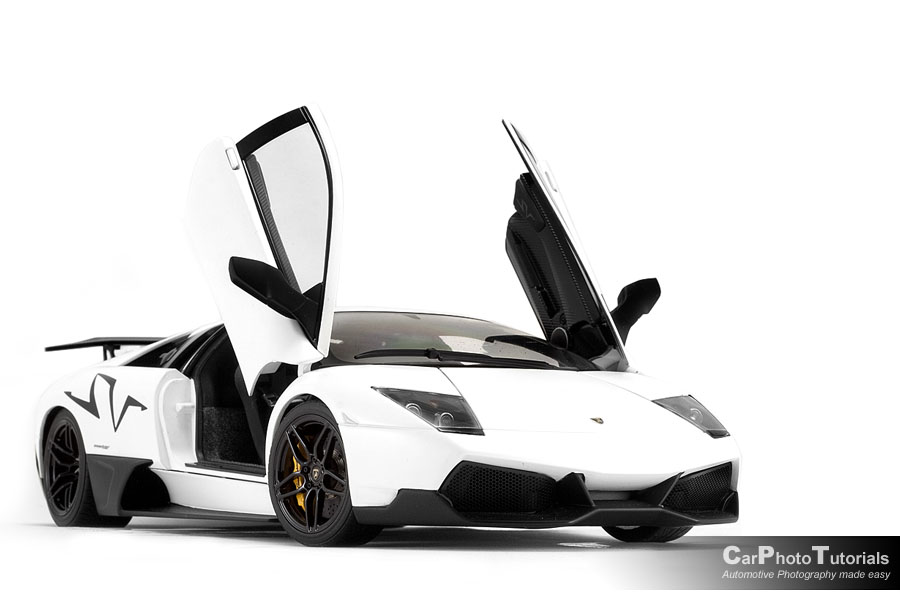
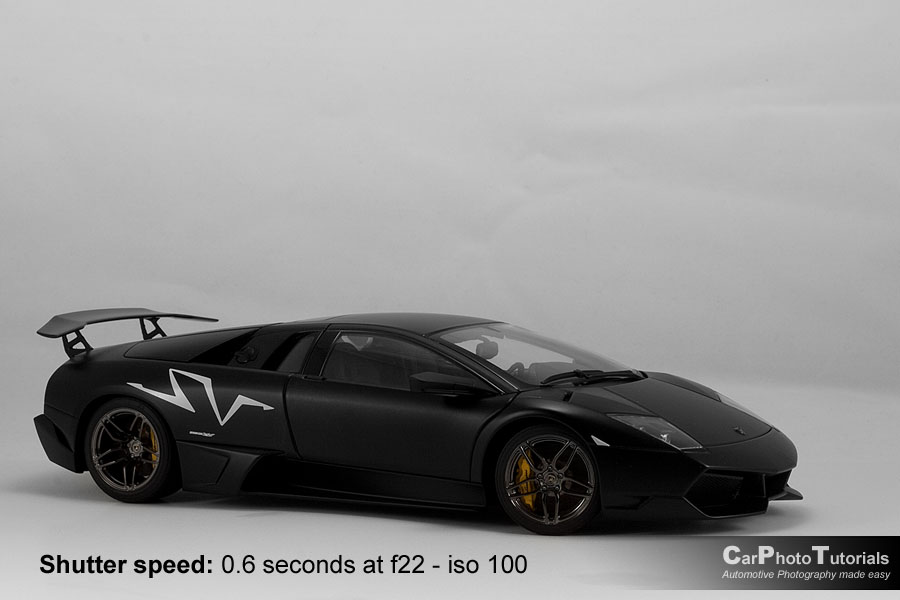
Canon EOS350D - Canon EF50mm f/1.8 - 50 mm 2 sec f22 ISO100
Intermediate level tutorial by Mark
Scale car photography offers all the challenges you will be facing with real 1:1 cars too, the reflections, the lighting, the angles and the post processing ... but on a smaller scale. In fact if you look into scale car photography and understand the effect of lights on the car with regards to position and angle ... you will be able to easily translate this into your shoots with real cars.
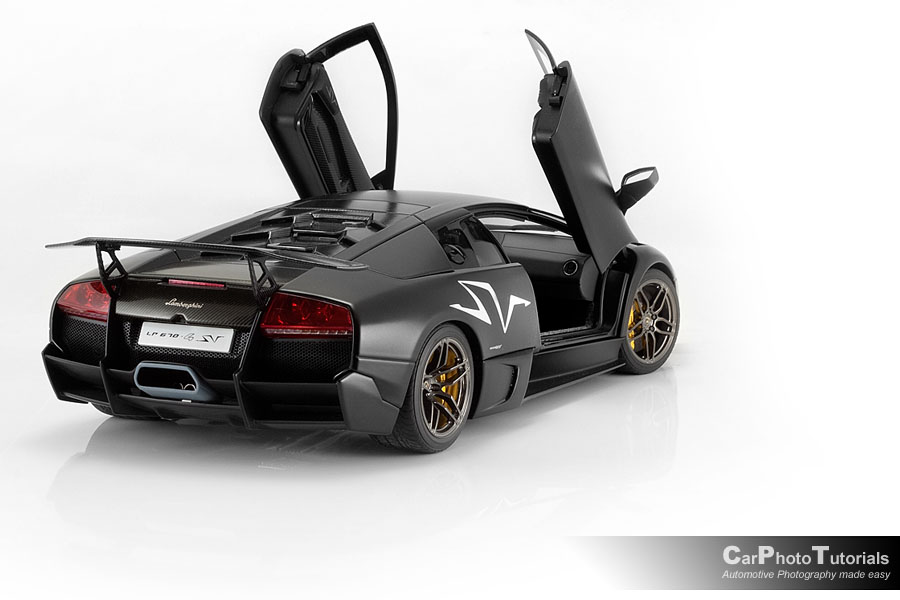
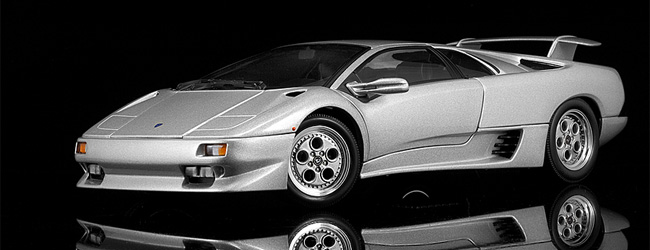
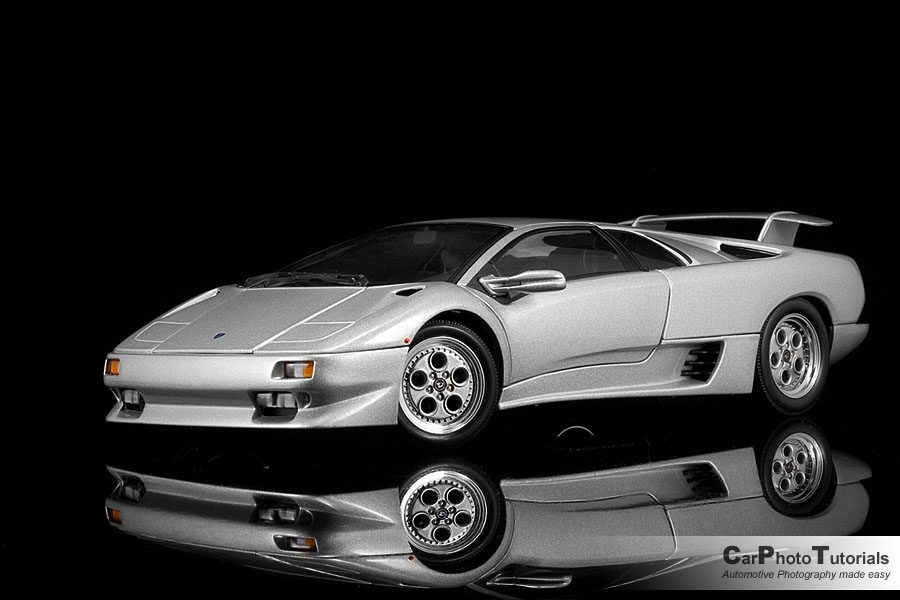
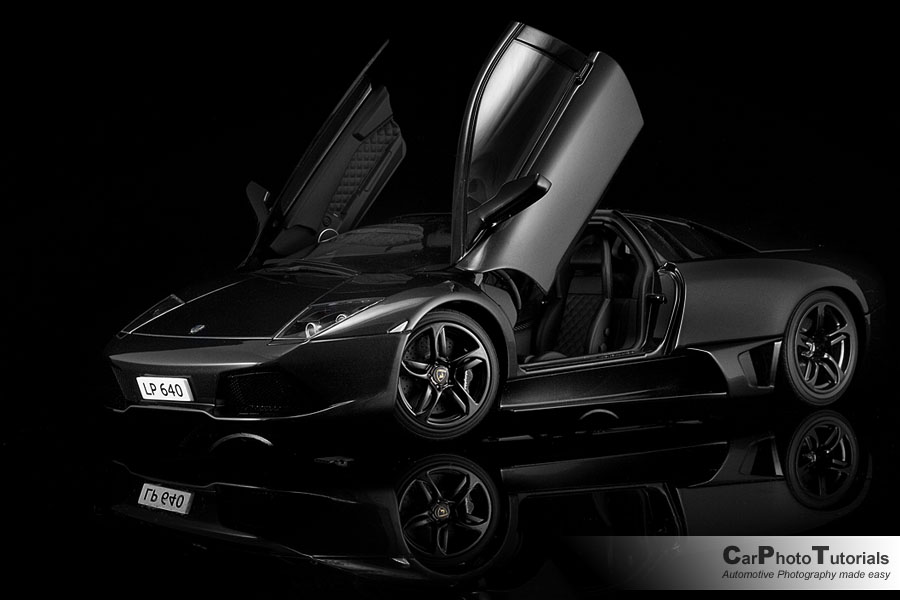
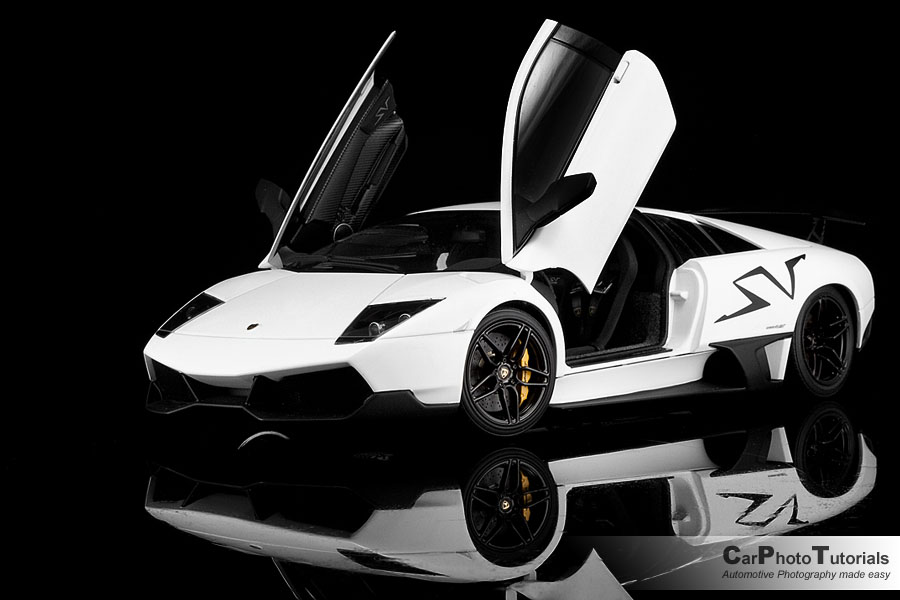
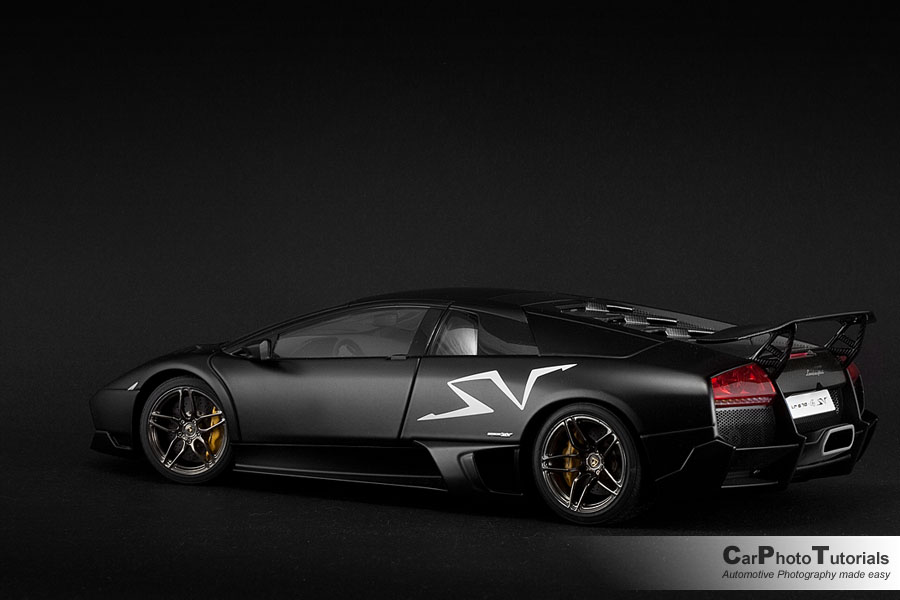
Similar to a real car, a silver metallic scale car is the easiest to get right, this shade reflect light perfectly and nicely shows the design lines of the car, put it on a black background and you have a strong contrast between the car and the surroundings ... on the other hand a white or a black car is still the most difficult, and I've taken it into extremes by using a matte black model car for this tutorial.
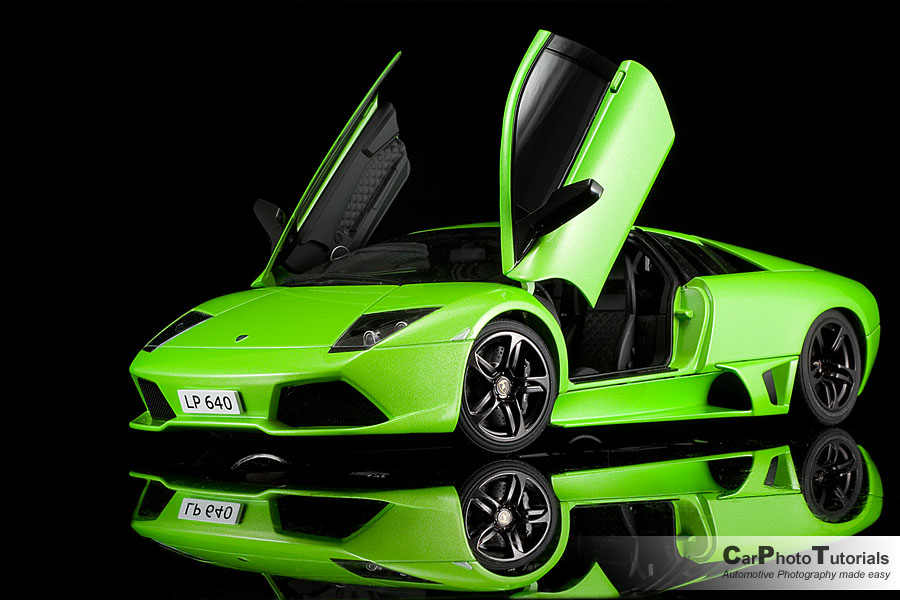
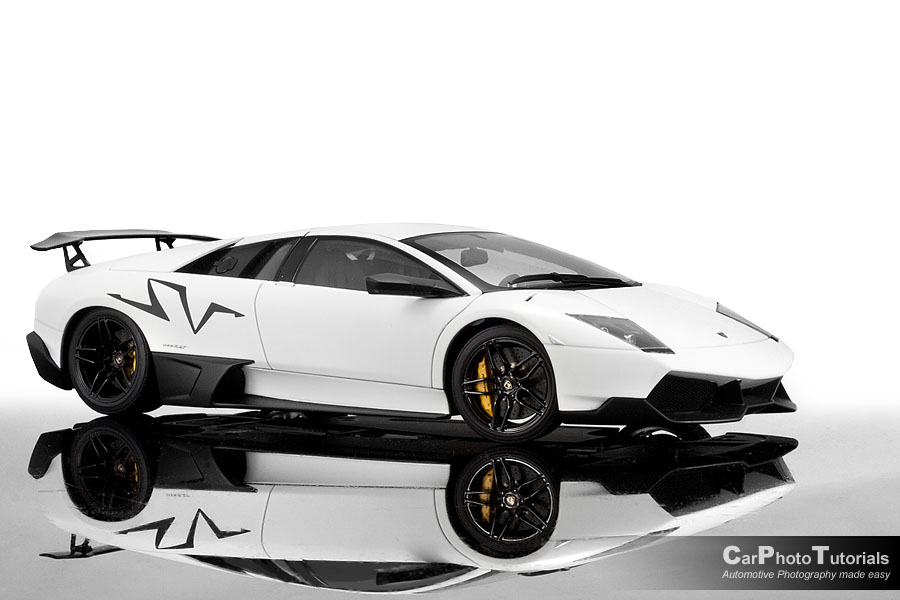
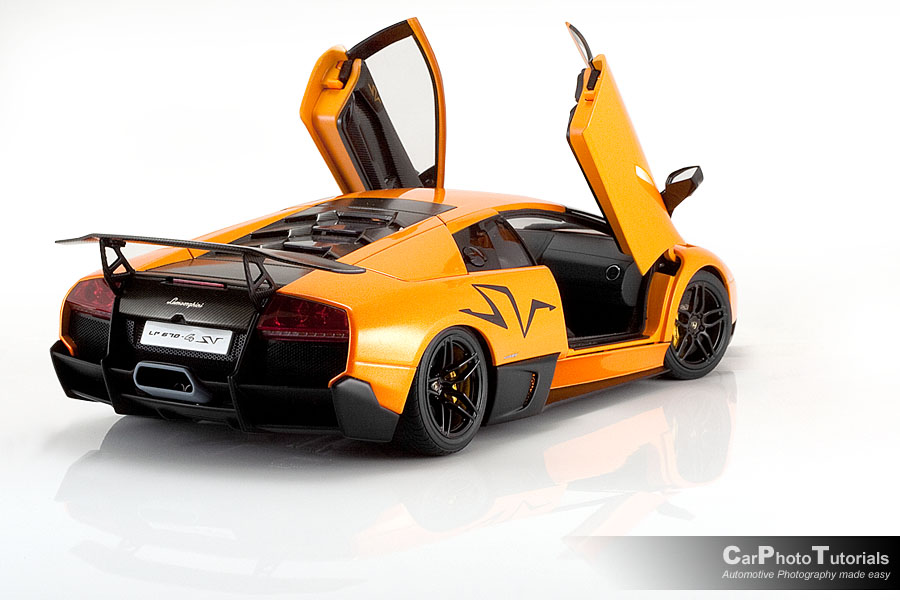
Getting a perfect shot of a matte black scale car on a black background is one of the most difficult things you could imagine, I will show you exactly how to do later on, but for now I've put the Nero Nemesis Lamborghini Murciélago LP670-4 Super Veloce (what's in a name right?) in 1/18 scale from AutoArt on a white background, again a very strong contrast ... and it makes live a little easier.
1. Preparation before shooting a scale car
If you've just received a brand new car straight from the factory or the dealer chances are it will be nice and shiny ... but I always put some polish on every car I receive the moment I remove it from the box, in fact I have an entire 'kit' put together to clean my scale cars.
1.1 Clean, polish, wax ... shoot
In the past I've used Turtle Wax on my models, but recently I've moved onto Meguiar's material, the Ultimate Compound for older cars that have lost their luster a bit ... keep in mind a Compound like this will actually bring up the paint underneath the top coat, so don't get scared if there is some 'shade' of the paint on your cloth.
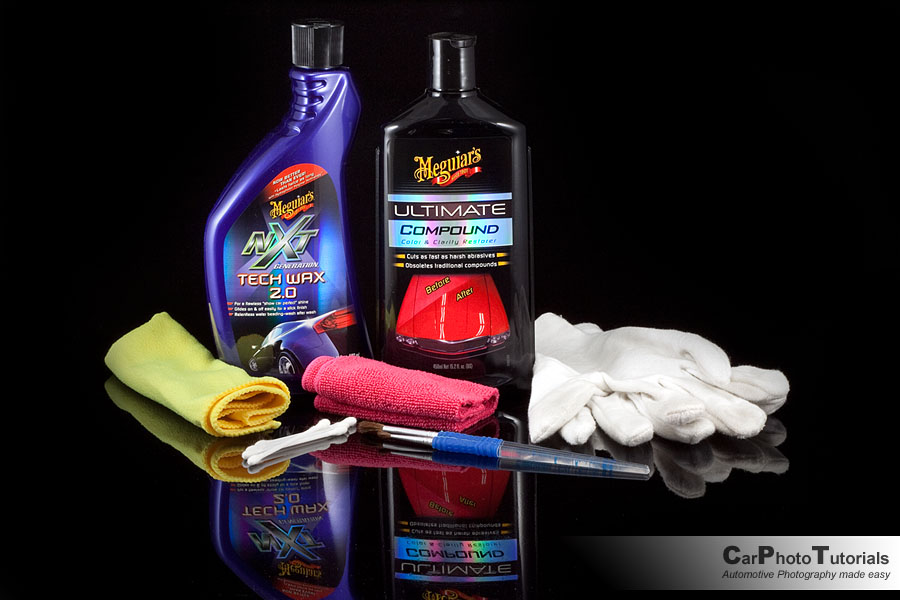
After the Ultimate Compound I use the Tech Wax to seal the deal ... it keeps the model shining for many months and has that mirror like finish I want for my photo shoot. As with the Compound, Wax tends to get into every little crease of the car, also avoid touching rubber like wheels or trim with it, you might be cleaning a lot longer than you imagined.
In the shot you see different micro fiber cloths, the yellow one is very, very soft while the red one is a but rougher ... I apply with the red one slightly moist and buff into a shine with the yellow one ... just be very, very careful around aerials, windshield wipers, rear wings ... decals, logo and stuff like that, you do not want to ruin your model by getting them caught up on the cloth.
The two soft brushes in the front are no use for applying paint, they are way to big for that, but to remove dust from difficult to reach spots like interior and engine compartment these work perfectly, as for the white Q-tips I use them to remove excess wax from lines and indents on the car ... and they are also great for removing dust specs from inside the car ... on the windshield for instance.
During the entire 'cleaning' preparation for my scale car shoot I'm wearing gloves, this avoids getting greasy fingerprints on the car after I've just spend an hour cleaning it ... do note I wear a different set during the shoot itself as my white 'cleaning' gloves can get some compound or wax on them.
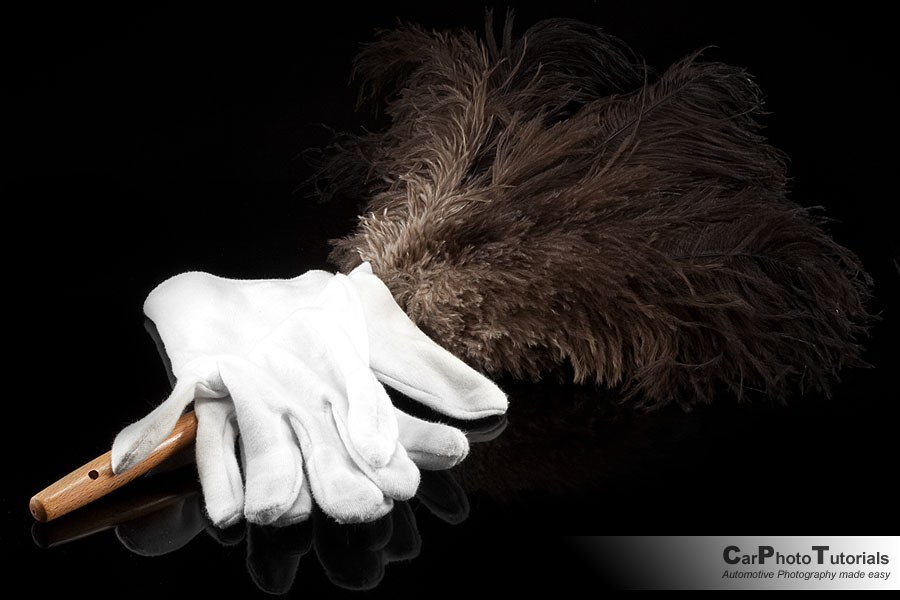
Note the 'Plumeau' I tend to use to swipe the car just before I make an exposure, it will attract the last few dust specs I don't have to remove in post processing ... again take care not to get aerials or wipers stuck in these features ... and as I sometimes use a glossy black plastic plate for a reflection this plumeau also serves to get that as dust free as possible ... sorry to bust your bubble, but a glossy black plate like this will always have dust specs on it, no matter how much you clean it.
1.2 VERY IMPORTANT NOTE
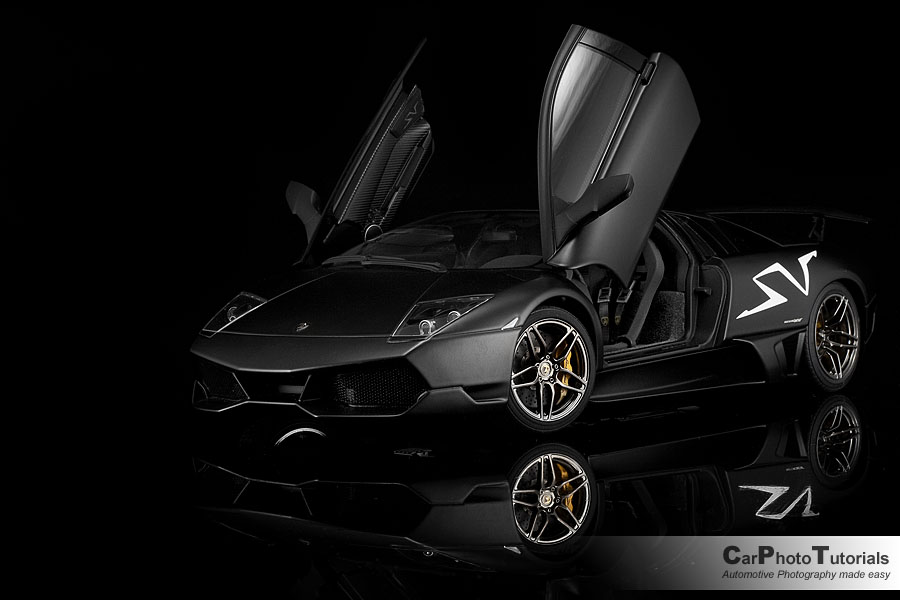
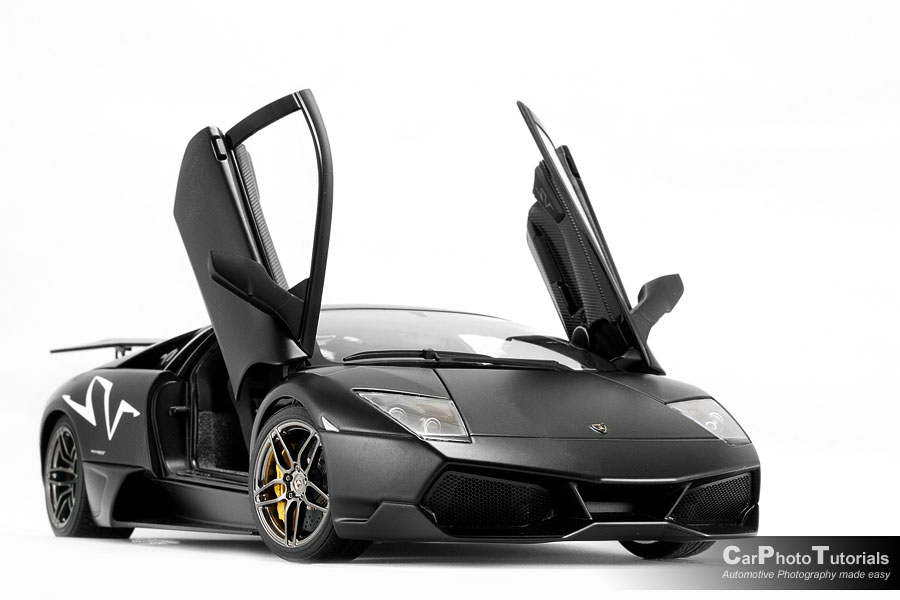
Do NOT use compound or wax on matte finished cars like the black Murciélago Super Veloce ... these kind of cars are intended to be matte, you do not want to wax them into a shine ... it will not work and ruin the car entirely, so do not make this costly mistake.
When attempting to photograph a matte black scale car like this one you will be facing a whole lot more challenges compared to a silver metallic, a red or an orange car, on a black car you need to have the light in such an angle it shows the lines of the car, but doesn't make it light grey ... black cars are the worst to photograph, both in scaled down format and in real life.
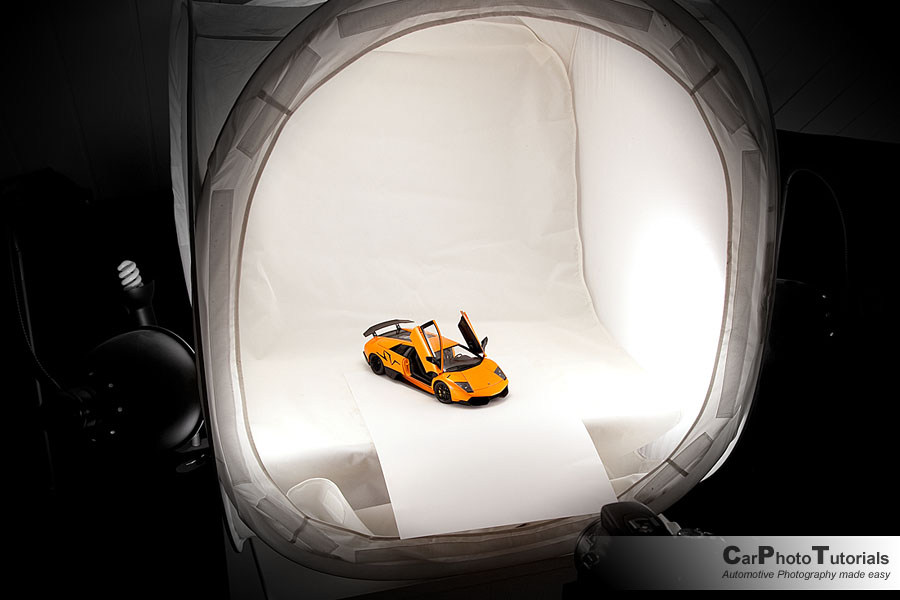
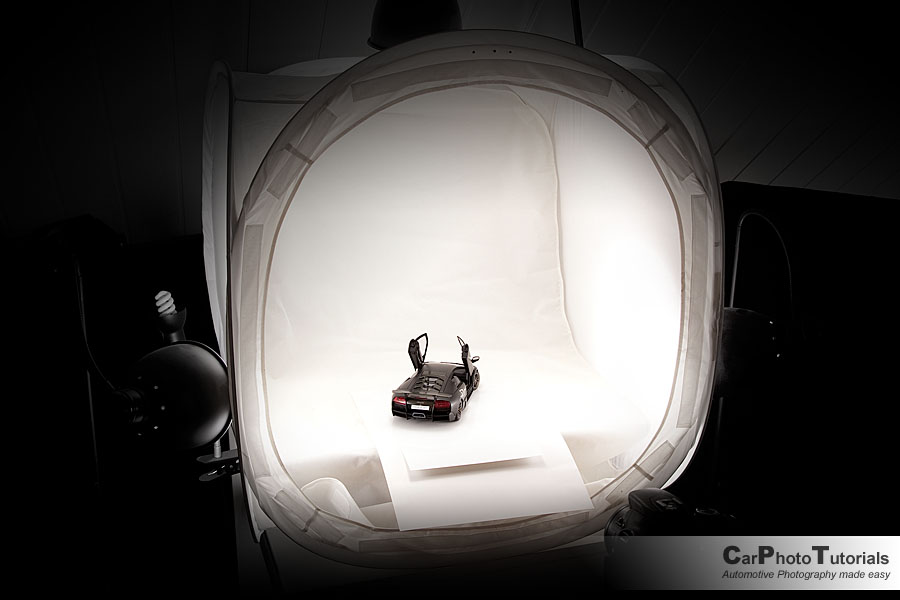
2. My scale car photo setup
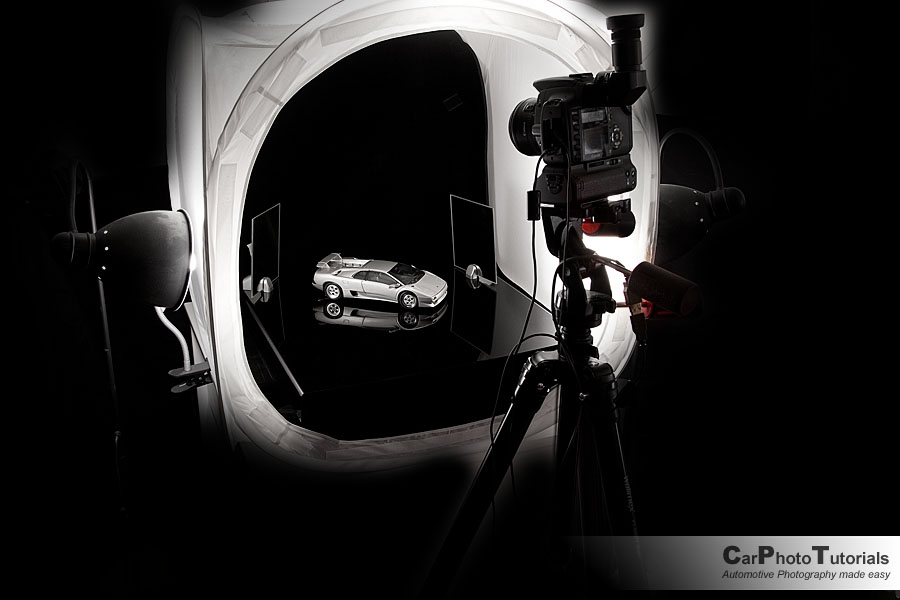
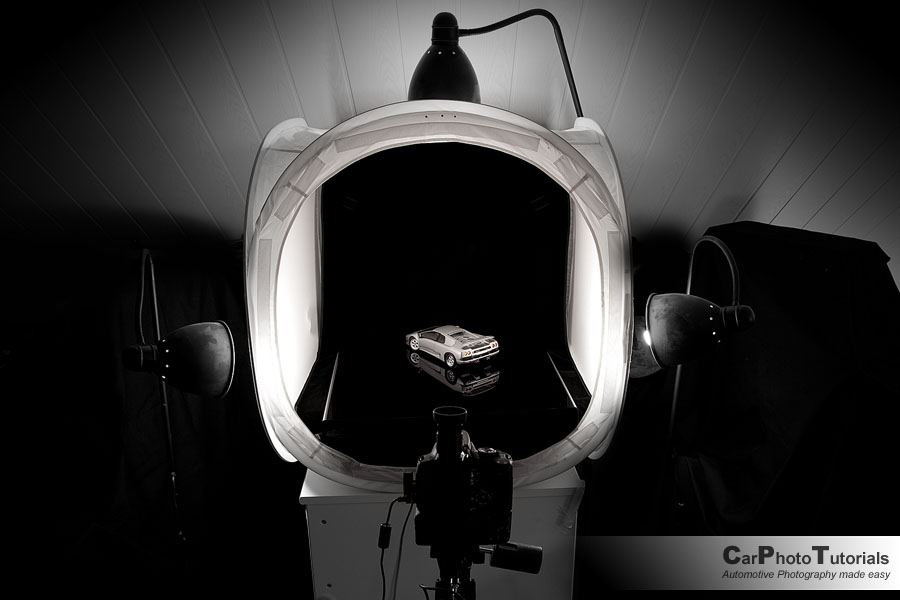
2.1 The light cube
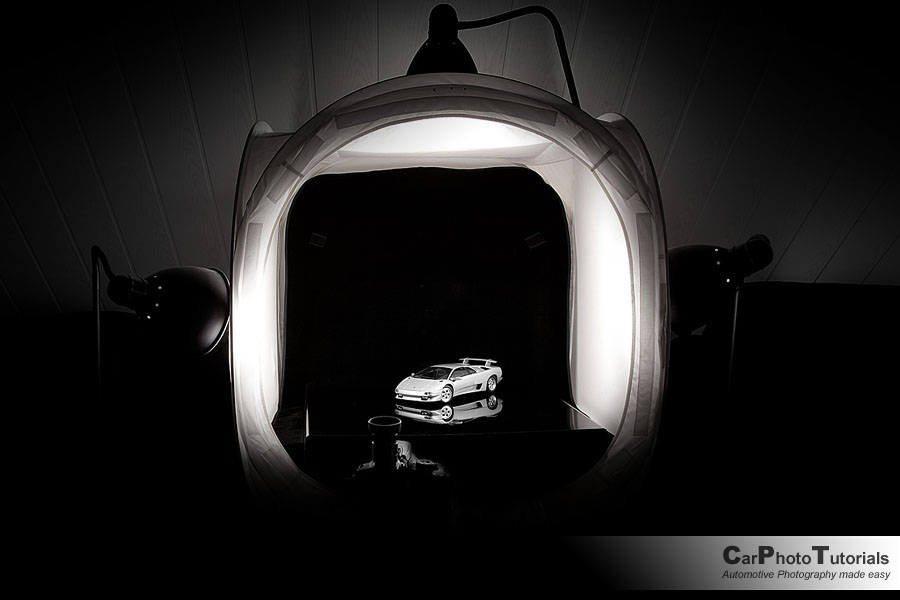
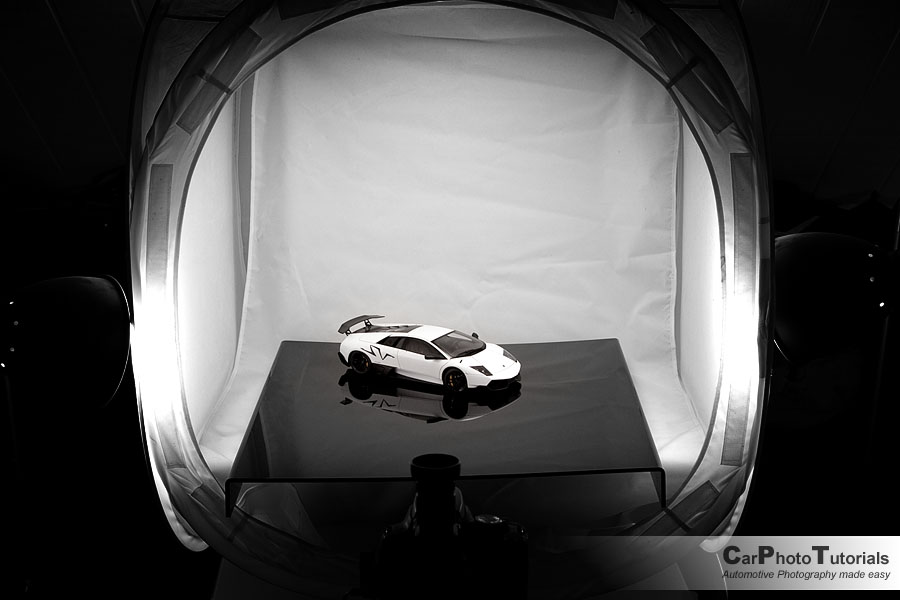
I use a three light setup around an 80cm light cube I've bought from eBay, together with three 5500°K daylight lamps and a triplet of Ikea Lersta lamps because these can have their heads adjusted and only cost about €10 each, the one 'shining' down is fixed on a 'boom stand' I bought for my off camera flash setup ... so now it doubles as my scale car photo booth system.
One thing you have to keep in mind when photographing scale cars ... and this applies to real cars too by the way ... are the reflections, try not to have a bright light behind the cube, nor have a windows with sunlight spilling in behind you when you photograph these cars. I actually have a skylight behind me as I have this setup in the attic, but I put in a shade that completely blocks out light from coming in. Also keep in mind not to wear any bright clothes during your shoot, they will also reflect in the bodywork and distract from your shot.
2.2 My 'old' camera
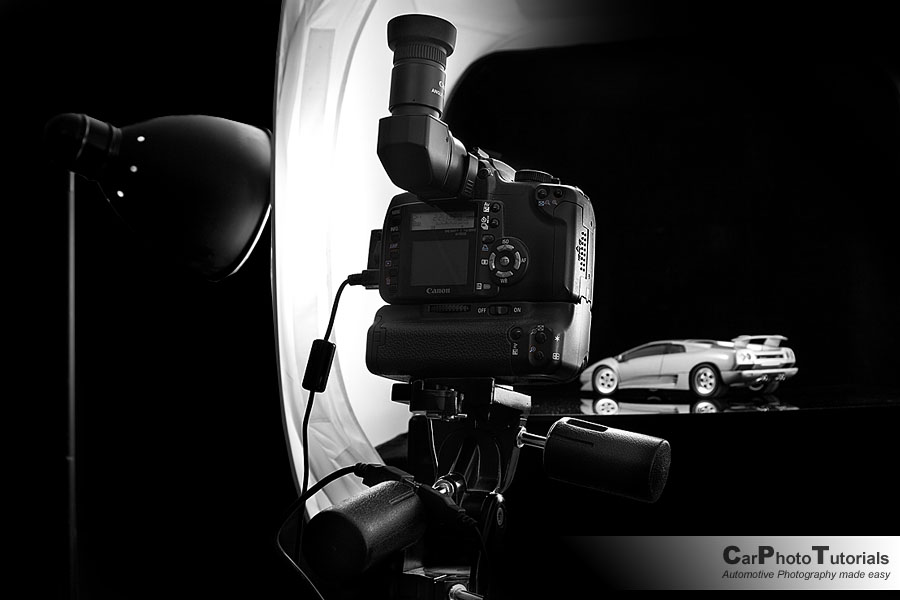
I have had the Canon EOS40D before, I now have the amazing Canon EOS 5D Mark II and even a 1D Mark IV ... but for my scale car photography I still use the first DSLR I ever bought, an old Canon EOS350D.
Bought in early 2006, it still works perfectly today, I put a little Canon EF50mm 1.8 lens on it as this is a classic lens, it isn't too fast so I wouldn't use it for action photography (unlike the much more expensive Canon EF50mm 1.4 USM version) and the 1.8 version is made entirely from plastic ... but it allows some very close photography and as a 50mm prime there is no distortion in the shot, perfect for scale cars ... and to sweeten the deal even further: it is only about €100 brand new, but I've bought mine second hand so it was even cheaper ... just to show you do not need an expensive specific macro lens for scale car photography.
2.3 Tethered shooting
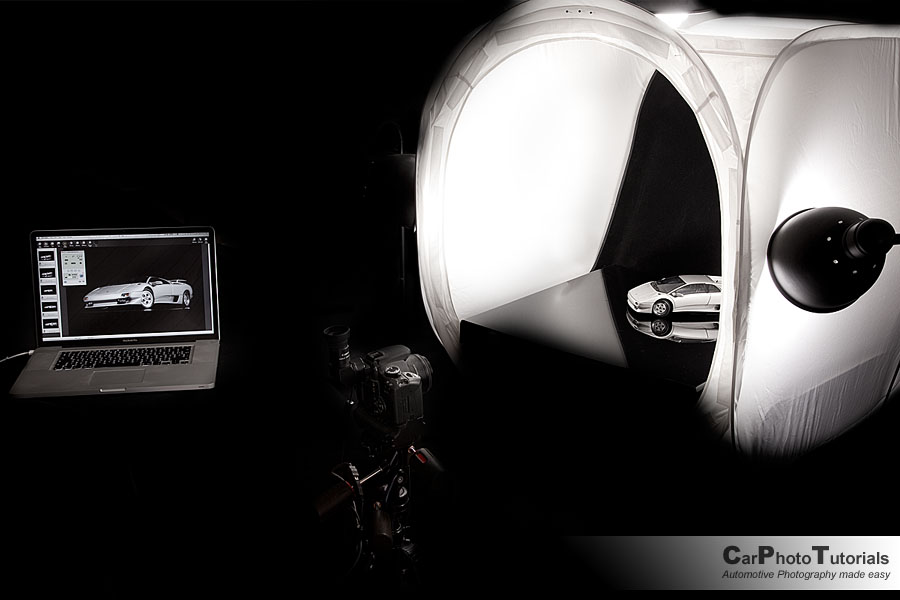
Now I would call this a 'nice to have' setup, you do not really need to hook up your computer to the camera, this is called 'tethered shooting' and the advantage of this kind of system is you can actually take an exposure without even touching the camera itself ... so you avoid camera shake like this and you can 'judge' the image right away on a nice, large display.
In my case I'm using a MacBook Pro 17-inch computer with a fully 'profiled' display, I actually use an EyeOne spectrophotometer to measure the display on a regular basis. After the measurement of the screen has been taken an ICC profile is created by the software and I use this in the color management system so my display actually shows totally color correct images during post processing ... now a laptop display usually isn't the best for color management, but on the MacBookPro it actually works nicely ... on my desktop system I have IPS displays that are perfect for color managed post processing.
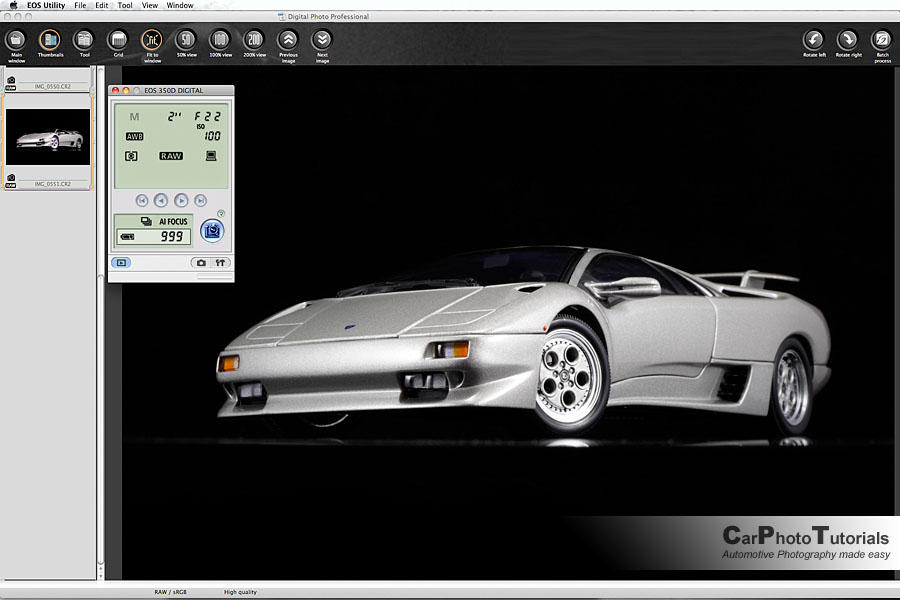
Tethered shooting might seem like black magic at first glance, but in fact it is really easy to put together and use, in my case I just needed an USB cable to connect the camera to the computer (I did use an USB extension cord to avoid accidents) and run the EOS Utility to 'pilot' my Canon EOS350D, in the background I run the Digital Photo Professional with the preview active.
Now each time I take an exposure the image file gets transferred to the computer and it shows up on the large screen automatically, if a copy is saved on the camera's CF card is an option in fact, it is not really required for a tethered shooting setup, but could be a good idea to have a backup of all photos taken this way ... you never know when bad luck creeps around the corner.
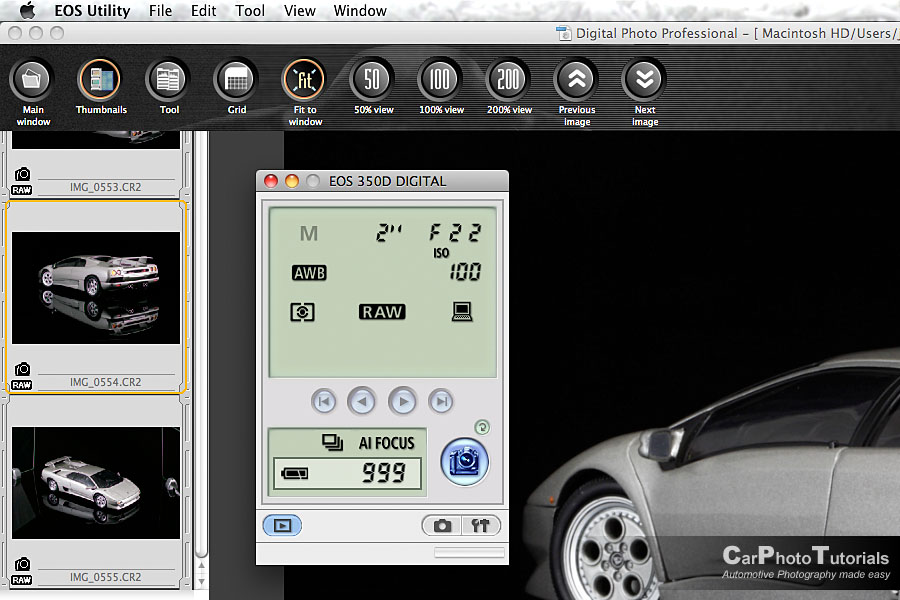
From within the EOS Utility software I have nearly full control of the camera, I can change just about every setting possible before taking an exposure ... all without even touching the camera itself. If the shot is too bright I can change the shutter speed to counteract this, normally scale car photography will be done in full manual mode, because the camera has to be on a tripod you can use long shutter times (up to several seconds) to capture enough light while leaving the ISO value at 100 to avoid 'noise' in the dark areas.
The Aperture I set at the largest f-value possible for my Canon EF50mm 1.8 lens ... f22, this allows me to get as much DOF (Depth of Field) as I can to keep most of the scale car sharp, even at f22 a three-quarter front shot will leave the rear wheel a bit out of focus ... if you really want to have the entire car perfectly sharp you will have to revert to 'Focus Stacking' which is nothing more than taking multiple photos each with their focal point a bit further to the rear of the car and after that putting it all together in post processing.
2.4 The tripod
Scale car photography is all about getting the right light to reflect from that small car, and this will most likely mean you will have to use long shutter speeds, now I don't know about you but I sure can't hold my camera still for even one second ... hence I need a tripod to mount the camera on.
For real life photography you need a good, sturdy tripod so you'll be able to use it outside in wind and even rain, and that translates into an expensive unit ... for scale car photography with a light cube like I use you are perfectly able to use a less expensive unit, I'm using either tethered shooting or a wired remote (more on that later) so I don't touch the camera itself ... hence my tripod is a cheaper on I bought online for about €100, add another €50 for the 3D head and you're set.
I like using 3D type adjustable tripod heads for my photography, I know some people prefer a Ball Head Mount but I don't really like them to be honest, a nice geared head found a place on my outdoor full carbon fiber tripod and I really love it, but those are a bit too expensive to keep installed permanently in the attic for my scale car studio.
2.5 Nice to have extras
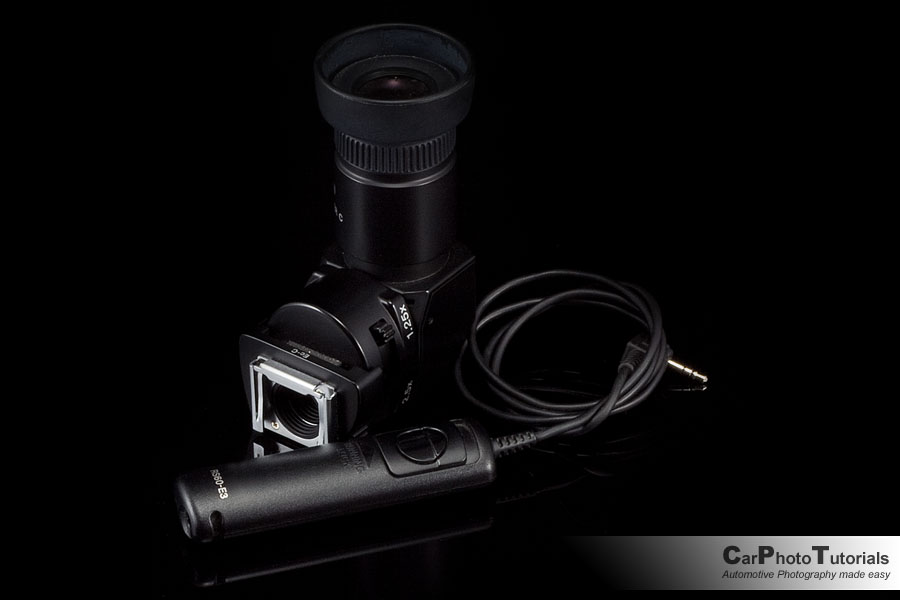
Now I wouldn't call these two items a requirement for scale car photography, but they do come in handy most of the time. The Angle Finder actually allows you to look through the viewfinder from above the camera ... or from the side as it can be turned around. You might ask yourself why this might be used ... well the old Canon EOS350D didn't have Live View yet, so no way to have your image displayed on the LCD at the back before taking the shot, these days a lot of DSLR have Live View showing the image on the display like the compact cameras, some even have adjustable displays you can angle ... if you don't have such a camera the Angle Viewer is ideal for those low angle photos.
The second item in this shot is a wired remote control shutter, if you are going for a tethered setup like I explained earlier you might not need a remote shutter, but I don't always bring up my laptop to the attic when I want to photograph my scale cars. In that case the remote shutter is ideal to avoid camera shake during those 2 or 3 second exposures ... and if you get one online they don't cost that much either.
Sometimes you just need to have some additional light on a specific part of the model, either to emphasize it or just because the three main lights don't seem to be able to be bright enough on some areas ... that is why I bought a few small mirrors in my local DIY shop, got some small shelve holders with them and now I can position up to four 'reflectors' around the car to make sure I have the light reaching those parts I really want to 'enlighten'.
In some circumstances you will have to 'block' the light, which is needed when you do not want to have the full intensity of the light on a specific item, in that case I just turn the mirror around as the rear of these 10x10cm tiles are finished in matte grey, perfect for 'absorbing' light and avoiding a reflection on the scale car ... just like in real life it is all about the light.
3. Using different backgrounds for variation
All the shots below have been made in the same 80x80x80cm light cube I've shown before, only the background and the support plate has been changed between these shots to show you how light and reflection can play tricks on your eyes.
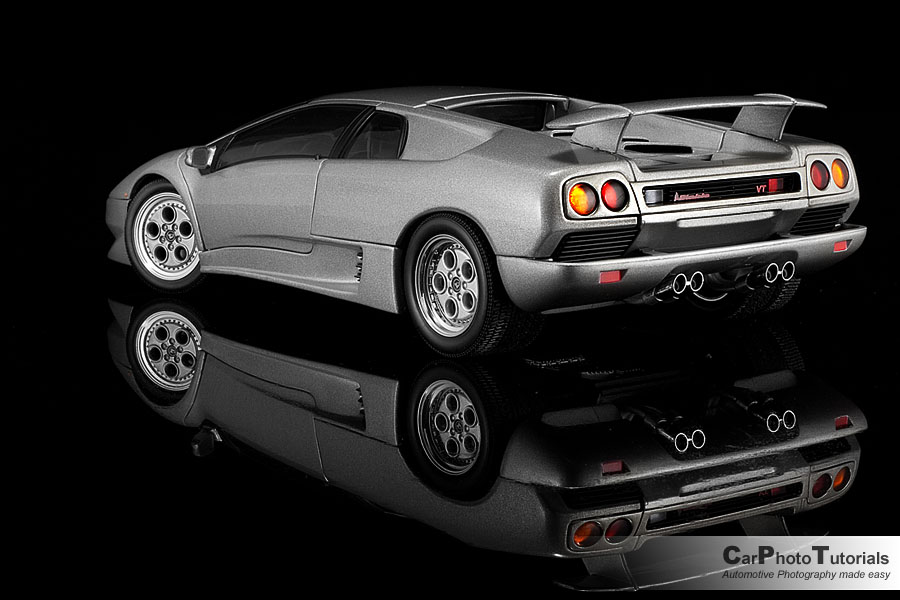
3.1 Black velvet with a glossy black plate
I really like to use a black velvet background and a high gloss black plate to position my scale cars on, the velvet material actually absorbs light very well and you get an intense black shade behind the car while the glossy black plastic plate gives an amazing looking reflection ... the only downside to this is dust ... you will never be able to get rid of all the dust specs on this plate when you photograph your scale cars, so the shot will require some serious post processing to make it look clean.
3.2 White velvet with a glossy black plate
These light cubes come with a few different backgrounds, usually black and white, but sometimes even blue, red or green ... now I only use either black or white, but even with the white background in place I can still use the glossy black plate for my reflection, just check out the setup for this white car ... and the result.
Because of the white background and white cube it all reflects onto the black plate and turns it into a grey one, also note the shutter speed changes depending on the shade of the car itself, you do not shoot a white car with the same settings as a black one for instance.
3.3 White velvet with a white sheet of paper
Using a sheet of white paper to put the scale car on will give a totally different look and feel in your photograph, also keep in mind the white floor will reflect light onto the car from underneath, something a black floor will never be able to do.
Naturally there will be next to no reflection with the car just sitting on a white sheet of paper, nothing fancy, but still the result is very nice. Sure there will be some post processing required, but just about every photo you take from your scale models you will need to do some degree of post processing to, so don't let that frighten you from shooting your collection.
3.4 White background and a sheet of Photo Paper
Using a nice high glossy sheet of photo paper you can create a nice reflection without buying an expensive whiteboard or something like that, just a new sheet of paper and the entire car is reflected on it, just make sure it is large enough, an A4/Letter format might be just a bit too small for 1/18 scale models.
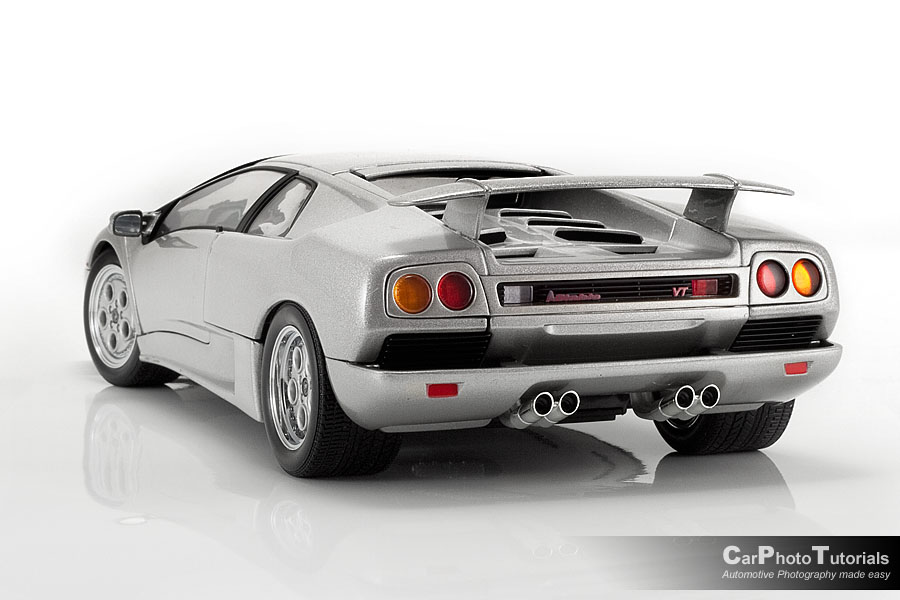
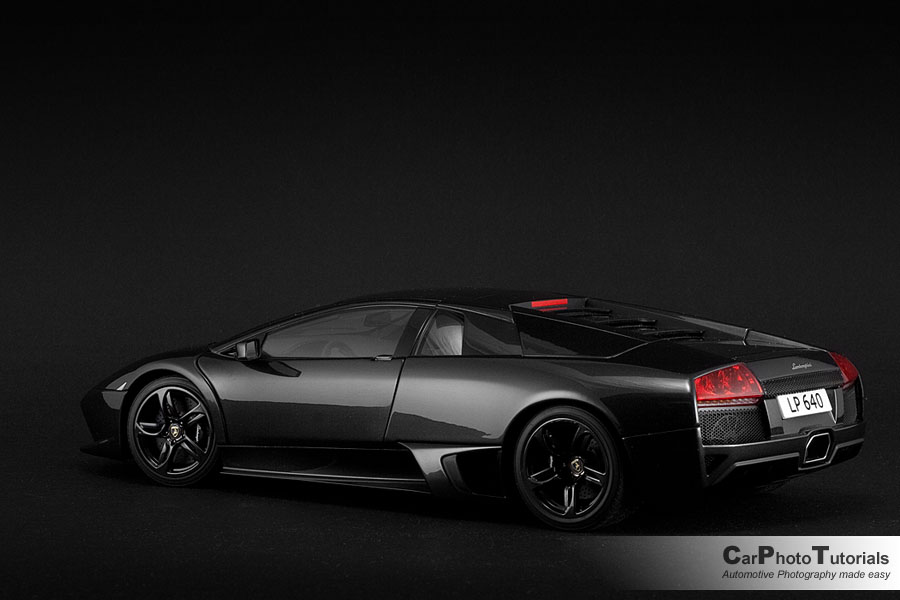
Naturally bright shades and black work very nicely together with glossy photo paper, but even a silver metallic car like this Diablo looks great on white ... again a white car will pose some strain on you during post processing when you put it on a white sheet of photo paper like this, but it can be done.
3.5 A large sheet of black paper
Just to experiment a little I went to a local office equipment shop and bought a large sheet of black paper, and it works really good as a background for scale car photography to be honest, especially on glossy cars as the cardboard paper has a matte finish.
I am a big fan of the black paper backdrop like this one, it fact it has a nice satin gloss so you still see a hint of a reflection on the photo, especially with brighter shades. And it isn't made of plastic so there is no static charge that attracts dust particles like the glossy black plate does, so time spent on post processing is seriously reduced ... but I still love my glossy black reflections.
4. Setup and camera settings
Once you get some experience in scale car photography you will note the setup stays more or less the same for each car, the shutter speed changes depending on the shade of the car, but the light cube has become a fixture in fact, there is a background (in this case black velvet), a supporting plate (high gloss black here) and three lights: one overhead the cube pointing down to spread light from the top, one on the right of the cube that is moved to get the light to point to the correct area ... in this shot low and onto the rear bumper. The third light is always on the left, but it too changes position, here it is also sitting low but pointing to the front wheel ... the 'spread' caused by the material of this light cube will still have enough light reaching the left rear wheel.
4.1 Camera settings
Because the light remains more or less identical for every scale car shoot with this three light setup I can use my camera like this:
Camera setting: full manual
Aperture: f22
Iso rating: 100
Focus: Auto
Lens: 50mm prime
Shutter speed: from 0.5 seconds up to 5 seconds depending on the shade of the car.
A black car will require a longer shutter speed while a white car can do with a faster shutter speed ... eventually this will come down to experience, but at first you can just try different speeds and see which one works best for that specific model in combination with a specific background.
4.2 Knowing what shutter speed to use
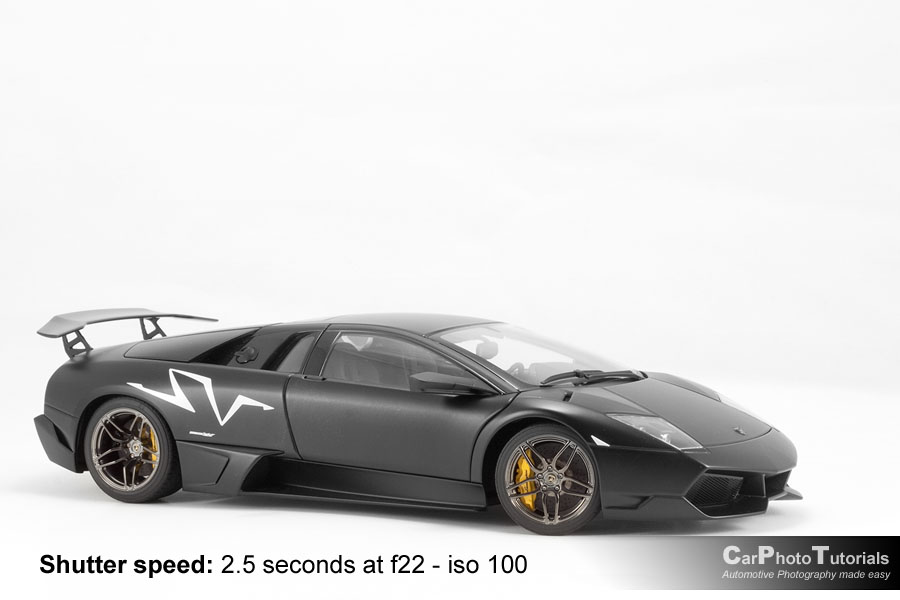
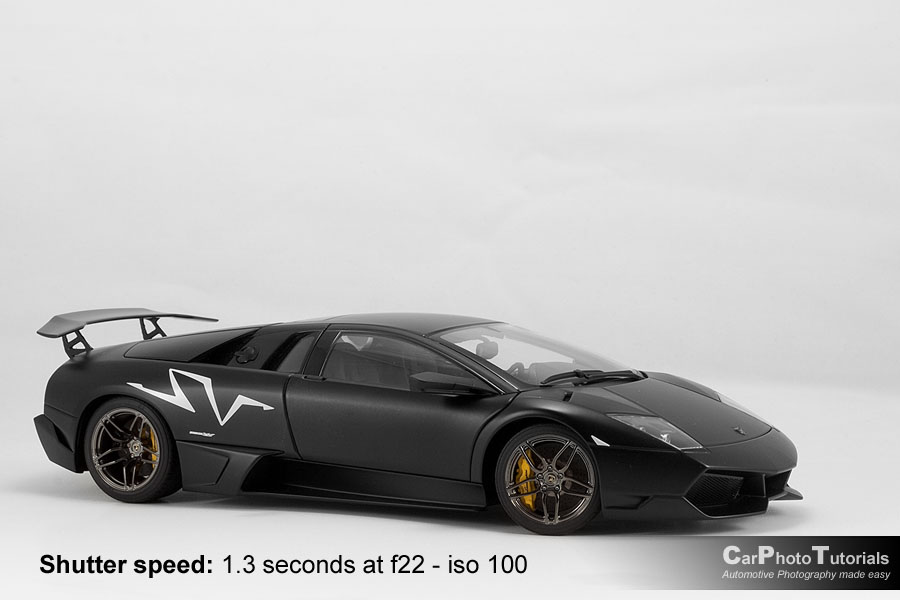
The three shots above clearly show the difference in shutter speed settings as every other setting remained the same during all three exposures ... and this is also the problem most of the time when you photograph cars like this.
You see a white background, now the trick is to have that background completely white and that means exposing the white backdrop two stops more than the foreground, and this works perfectly in portrait photography, but in a small light cube like this things get a bit more complicated, so you'll have to get it straight in post processing.
From the three shots above I would start with the left one to be honest, and take the car itself from the middle one as it has a nice black tint to it while in the left shot the car is grey, or you pull the black in the left shot up with a curves adjustment ... there are a lot of different ways to get to the result you need, it all depends on how good you can do your post processing to get the image looking right.
4.3 Mind the details
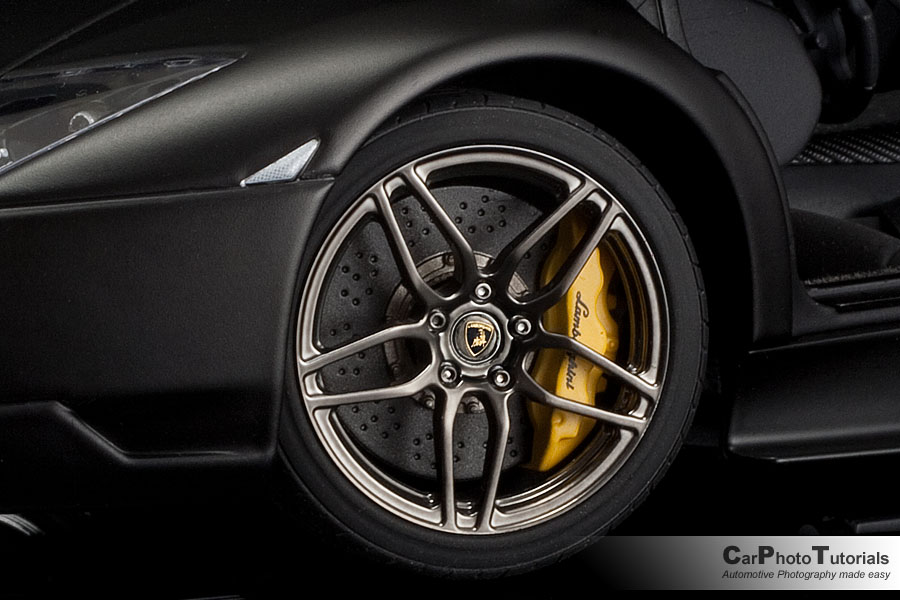
Identical to shooting a real car you have to keep the details in mind when you photograph scale cars ... like the logo on the wheels, make sure it is positioned at the right angle, on a scale car this is actually a lot easier compared to a real car, you just pick it up wearing the white gloves and turn the wheels until they are exactly how you want them.
You can always turn the logo in post processing, but you'll be spending enough time getting the shots processed without the added work to get the logo straight ... something that could have easily be avoided during the shoot itself, a few seconds work before taking the shot will safe a lot of time in post processing.
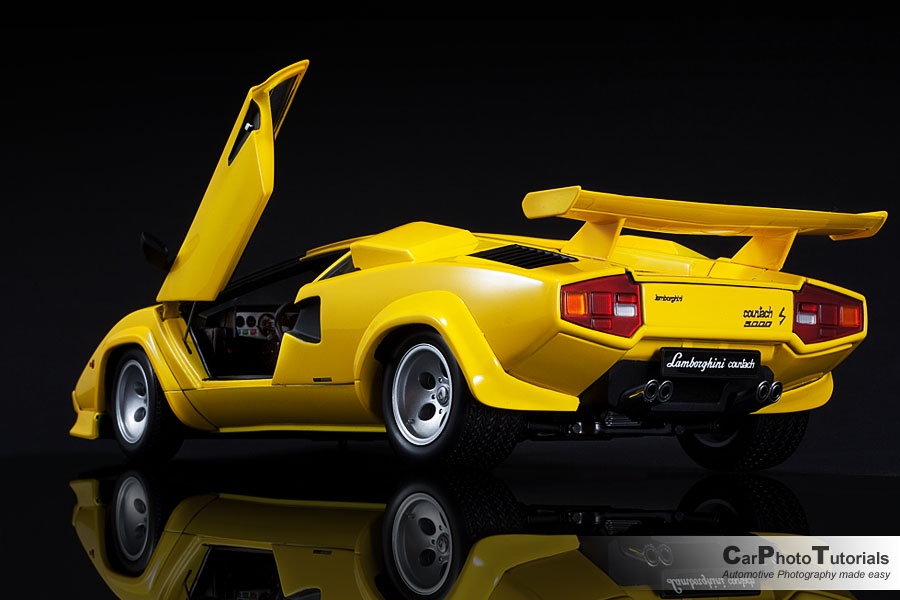
This photo featuring a bright yellow Lamborghini Countach in 1/18 scale might look right at first glance, but it actually shows a typical rookie error ...
The front wheel is turned in the wrong direction, from this angle we have a great view of the thread on the Pirelli tire ... now we might be interested in that too, but check out the rear tire ... yes, we are seeing the thread there too, so we now know how it looks, hence we want to see the wheel itself at the front, it should have been turned in the opposite direction.
The same error can be seen in many real life car photography too ... try to avoid this, most of the time we are not shooting an ad for a tire manufacturer but we want to show the car itself the best we can, and that includes showing the beautiful wheels instead of a black rubber section of tire.
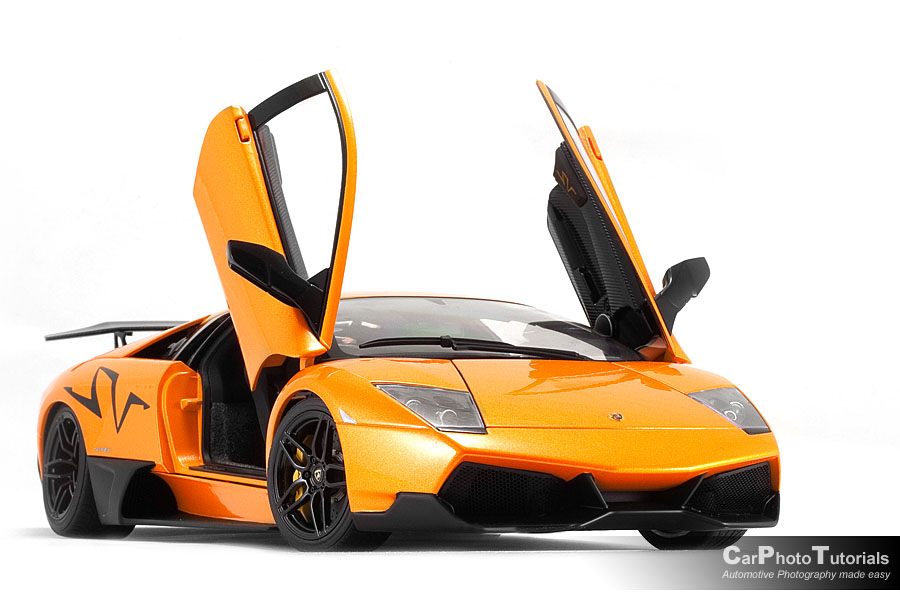
Having an original OOC reflection in your scale car photography does look very nice, and with the right material it isn't too difficult to obtain ... there is however one catch to this kind of photography.
Try to get the entire reflection in the crop, it looks a bit sloppy when you cut just a hint of the reflection, problem is with some angles it is next to impossible to capture the reflection, or in case of a Lamborghini with upward opening doors it limits your possibilities too, just look at the yellow Countach shot ... I would have to put the car so small in the frame to have the entire doors open reflection in the crop it would be lost in the photo.
So there are exceptions, but remember the general rule about reflections is to have the complete mirror of the car in the final photo, try not to cut the bottom away.
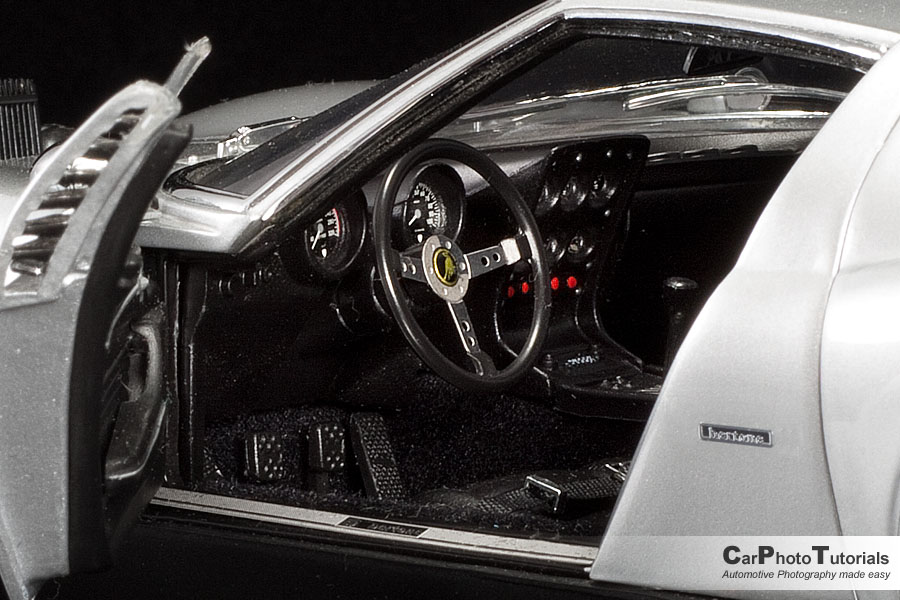
This tip applies to real cars too ... whenever you shoot an interior of a car, and it shows the steering wheel you have to make sure it is straight and not at an angle.
It might seem totally logical, but you will not believe the number of times I've seen near perfect interior shots being ruined by a steering wheel blocking the dials ... just try to avoid that. It is impossible to rectify in post processing and only takes a second to avoid during the shoot itself.
When you photograph a dashboard it is important you can see the dials, and usually when the steering wheel is at the center position with the front wheels straight ahead you will not have any of the spokes blocking view of the dashboard cluster ... problem is you are taking exterior photos with the wheels nicely turned toward you and it is easily forgotten to straighten the wheels again when you take shots of the interior.
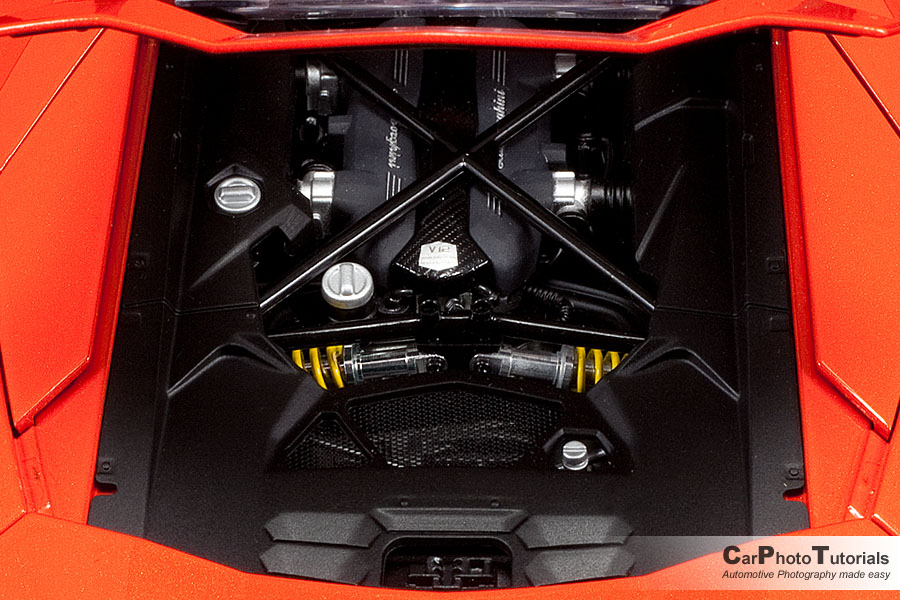
Some of the high end scale models these days have really nicely replicated engines mounted, combined with opening covers it would be a shame not to get some shots of the engine too, so make sure you get a few exposures showing the source of power on these beautiful models.
This might pose a challenge as most engines are dark while the surrounding bodywork could be really bright, in that case just take two exposures, one to get the engine nicely lit and a second that has the rest of the car in the correct light ... just impose them on each other in post processing just like we would do with a real car in fact.
Conclusion
If you take the advice given in this tutorial and try to apply it to your own car photography I'm sure you'll be able to get some very nice photos of any scale car you might get in front of the camera ... but think about some of these points when you go out and shoot a real car ... several of the pointers given for scaled down photography can perfectly be used for the real deal too.
Photography is all about light and reflection, especially when it comes to shiny painted cars ... if we are talking about a 1/18 scale model or a 1/1 real car, the only difference is the amount of light needed, if the light bounces of a chrome bumper it will do so in 1/18 and in 1/1 scale ... and as it is easier to practice on scale cars than on real cars I think this tutorial might be a great push in the right direction for all of us.
 |
CPT Premium member BONUS : 92976 Our valued CPT members can download this scale car photography tutorial as an easy to read eBook in pdf. |
Note : commercial use or publishing of our tutorials in any way, written or electronic, is strictly forbidden, we present these for your personal development only. None of our material may be published in any way without prior, written permission from the Car Photography Tutorials founder. All workflows and photographs are copyright protected and owned by the Car Photography Tutorials team unless stated otherwise
Advertisement
Become a MEMBER
Premium Membership
Become a CPT Premium Member and download all our tutorials including a PDF for printing and the result as a PSD file with layers if any.
Interesting articles

Car photography that sells the car
Selling a high performance car isn't easy, but as they say : a picture speaks a thousand words. We'll show you how to get the winning shot that will sell the car quickly by selecting the correct background and perform the right post processing.
Photographing a major motorsport event
Motorsport like car races are always very interesting events to capture as an automotive photographer, we explain how to make the best of your experience.

Outdoor car show - Best practice tips
one of the best opportunities to get a nice, exotic super car in front of your camera is during one of the many outdoor car shows during the summer, we take you over some tips to get the best shots.

Case study - deTomaso Pantera
I take a reasonably good shot and put it through some extensive post processing to create a photograph
Background replacement made easy
There are times you've managed to photograph a great looking car, but the background is far from good looking ... no problem, just replace it with a different one.
Keep up with CarPhotoTutorials
Why not follow us, become a fan, get our RSS feed or mail a link to a friend ?
![]()
![]()
![]()