COMMON MISTAKES WHEN SHOOTING A CAR
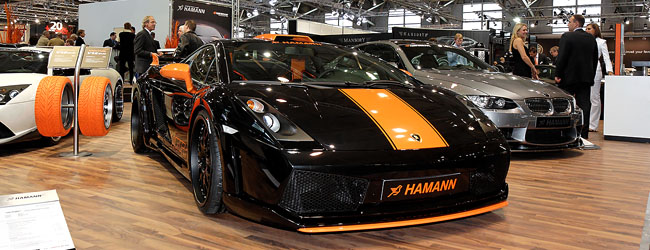
Canon EOS 350D - Canon EF-S17-55mm f/2.8 IS USM - 17mm 1/50 f5.6 ISO 400
Basic level tutorial by Mark
In this basic tutorial we will go over some of the usual mistakes you are bound to make when first starting in this magnificent niche of photography, go over our list and learn from mistakes both we and other made in the early days, try to avoid them on your next photo shoot.
The image above actually combines various mistakes, among other things the background is too distracting, the car is put right in the middle of the frame, you have a white plaque drawing attention to it in the left corner ... so it is not really a picture worth publishing other than to demonstrate how not to shoot a car at a car show.
Distracting background
 This is probably the most common mistake all of us make, and it has several reasons in fact, one of them being that when we shoot an event or a car show for instance we can’t ask the owner to move his (or her) car, we will have to work with what we have. We do have a detailed tutorial on how to replace a background, but it always involves a nice amount of work afterwards. As stated in our basics tutorial the more preparation you do the less amount of work you’ll have behind your computer. If you can change the position of the car, please do so, and always remember what the frame behind the car looks like, select your position carefully and you’ll have very little tweaking to do after you’ve taken the image.
Garbage
Make sure there is no rubbish on the floor around your car, small pieces of paper, crushed soft drink cans, cigarettes, etc … they have no place in your car photos, either put the car somewhere else or do a quick clean of the grounds in the immediate vicinity of the car, no need to start a spring cleaning either, just get rid of the clutter. Again it can all be done is post processing, but that is not the way you should look at taking car photos, do not think ‘I will clean that in Photoshop’, think how to clean it beforehand.
Clutter
 You shouldn’t only note the rubbish on the floor around the car, but also look inside the car itself. Look for anything on the dashboard that will be visible in the shot, a sheet of paper on top of the dashboard or behind the wipers can be difficult to edit out in post processing, ask the owner to remove it before you take the shot. Stickers on the windscreen are really distraction, unless they add to the look of the car you should consider having them removed, do get rid of the remaining glue.
When shooting the interior the same applies, have the owner (if he’s around) remove any clutter from the seats, between the seats, in the door pockets … they all distract from the main thing, the interior. Inside those classic cars the seat belts will need to be arranged before the shot as they don’t roll automatically, the same applies when a four-point racing harness is installed; make it look nice, have the logo in the front so it shows in the photograph. If you take a shot of the dashboard there are also a few points to note, make sure the steering wheel is straight, remove the keys from the ignition, don’t have anything hanging from the rear view mirror, close the glove compartment and put the car in first gear.
Detailing
 Get the car clean ! Unless you are shooting an off road vehicle and want to show off it’s mud capabilities, have the car thoroughly cleaned, either have the owner do it or hire a professional to do it. In the beginning you could do this yourself, but it takes time to get a car clean to a level worth photographing, expect to spend up to four hours to really get a mid size car clean inside and outside on your own. I personally wouldn’t touch a car that isn’t mine, you never know you might scratch the paint or something, unless it’s a demo car naturally, but for a privately owned cars ask the owner to have it cleaned before the shoot.
Wheels
 Just about every car you will shoot has some kind of logo on the wheels, either the make of the car or the logo of the custom rims. It is a small detail, but make sure it is level, nothing worse than shooting a Ferrari were the Prancing Horse is sleeping on it’s back on the wheels, again you could put it upright in editing, but avoid it by moving the car a few inches forward or backward. Forget about aligning both the front and rear wheels this way, you will have to jack the car up and move the wheels manually to achieve this in real life. When shooting a three-quarter front view of a car make sure the wheel is turned towards you and not the tire, differentiate from this only in case the tire has a special feature that makes it interesting to shoot (special tread or something like that), but than you would make a close up shot of this.
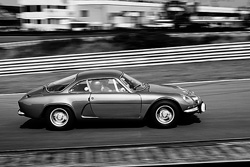
Sharpness
 A photograph is all about getting the correct parts of the car ‘in focus’ or to explain it in simple terms; sharp. If you want a three-quarter front shot of the car to be completely sharp from front to rear you will need an aperture setting of 5.6 to 8.0 depending on the distance to the car when using a standard lens (18-55 or something similar).
Also note that you will need a shutter speed of 1/125 to make sure your own movement of the camera doesn’t blur the image, if possible use a sturdy tripod and a remote shutter (more on these two items in our intermediate tutorials)
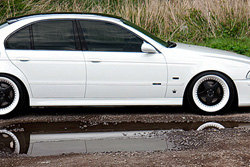
Black and white
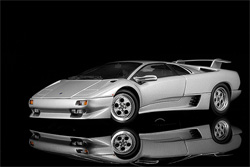
 Both colors have their own problems, when you shoot a black car it tends to be exposed too bright, on the other hand when you shoot a white car it tends to be exposed too dark, think about what happens when you shoot both side by side. The trick is to under- and over expose your shots in this case, we will go into this in our intermediate course, but for now try to stay away from these colors (yellow isn’t too simple either by the way)
The bottom line is that there shouldn’t be any full white or full black in your photograph unless you really want it to be there for a special effect … a dark mood for instance, getting there takes practice and a lot of mistakes, believe me. However most current DSLR can actually cope with this problem rather well if you include some of the background into the shot so the camera can calculate an average for the entire shot.
Noise
Nope, this isn’t some sound you can hear in a bad recording, it is actually a grain that appears in your photographs when you go up into the higher ISO settings of your camera, or if you’ve under exposed a shot. These days just about all the decent DSLR can take virtually noise free images up to ISO 400 or ISO 800, above that you should perform a noise removal in post processing.
 As a general rule of thumb try not to go over ISO 400 for most of your photographs, only go to ISO 800 if you really need to. Deciding what ISO setting to use is part of our intermediate sessions too, so feel free to explore it further in that section.
Smack in the middle
This is a common mistake when first starting to shoot cars, you put the car right in the middle of the frame. Sure it looks nice, but try putting it somewhat lower or higher in the frame, perhaps even a bit to the left or right of the frame … you’ll notice that the overall photo looks so much better. This is called the Rule of thirds which is often used in portrait photography, but it can also be applied to automotive photos.
Cut !
 When you shoot a car make sure it fits inside the frame entirely, nothing more frustrating to notice the rear bumper is cut from the image. Also avoid things in front of the car like garbage cans, trees, plants and all other kinds of things that have nothing to do with the car. A silver cup or other prize can be in view, but still try to put it somewhere so it doesn’t intersect with the lines of the car itself. At an event there will probably be cords or some other kind of fencing around the cars to avoid having people climbing into the cars, you could ask the owner of the stand to remove them temporarily for the photo … won’t work all of the time, but if you don’t ask you’ll never know.
Flash
Do not use flash ! It’s as simple as that, flash photography requires a lot of experience to get right, so for now just don’t use it, it will ruin your shot if you don’t know exactly what you are doing. Flash photography related to cars received a special tutorial from us, please feel free to read it if interested, but most of the time you can get away with natural light for the time being, later on we’ll show you how to make your flash work on the shiny, very reflective panels of a car.
These are just a few of the things you should consider when photographing cars, naturally there are many more details important before you’ll be making your first cover shot, but if you can handle all of the above without having to think twice you’ll be very close to taking award winning automotive shots.
Several of these items will return in our intermediate sections when we take a closer look at the most important setting for a car shoot, but for now you’ll be able to make photographs instead of snapshots if you take into account the above list of helpful tips.
 |
CPT Premium member BONUS : 67839 If you would like to print the Common Mistakes article you can download our special PDF which is optimized for hardcopy layout. |
Note : commercial use or publishing of our tutorials in any way, written or electronic, is strictly forbidden, we present these for your personal development only. None of our material may be published in any way without prior, written permission from the Car Photography Tutorials founder. All workflows and photographs are copyright protected and owned by the Car Photography Tutorials team unless stated otherwise
Advertisement
Become a MEMBER
Premium Membership
Become a CPT Premium Member and download all our tutorials including a PDF for printing and the result as a PSD file with layers if any.
Interesting articles

Case study - deTomaso Pantera
I take a reasonably good shot and put it through some extensive post processing to create a photograph
Scale car photography explained in detail
In this article I guide you into scale car photography, from the preparation over the setup including lights, aperture, shutter speed and then taking the shot ... a lot of these tips can be used on full size cars too.
Our TOP 10 tips for post processing using PhotoShop
In this tutorial we present you with 10 interesting and quick tips that will make your post processing automotive photographs in PhotoShop a bit easier.

Must have base equipment
In this article we talk you through the large amount of camera's you could buy to get started well in automotive photography.
Behind the scenes of a professional car shoot
You've managed a nice exotic super car for a private photo shoot, but how do you manage an outdoor shooting ? We will explain 10 of the best tips for you.
Keep up with CarPhotoTutorials
Why not follow us, become a fan, get our RSS feed or mail a link to a friend ?
![]()
![]()
![]()