OLD FASHION DIGITAL PHOTOGRAPHS

Canon EOS 350D - Canon EF70-200 f/2.8L IS USM - 70mm 1/160 f8.0 ISO 200
Intermediate level tutorial by Johan
Back to the good old days ...
 These days the DSLR we are using are highly sophisticated pieces of equipment with powerful processors that will try to reproduce the image we take as correctly as possible, but there are times when we do not really want this slick look.
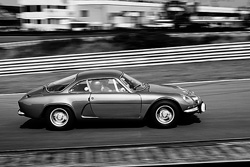
 For instance when we shoot a classic car like the Porsche or the Fiat on this page, both of these cars are considered classic cars that have been around for several decades, it would be nice if we could photograph them like they would have been shot all those years ago, when they just came of the assembly line in Germany or Italy.
Some would go for a black and white look, perhaps even a full sepia look, but we think that our process will come closer to how it would have looked in the Sixties or Seventies, when saturated colors were not as much appreciated as they are today.
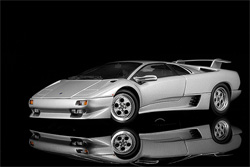
So we set out to re-create this old-fashion look on our brand new, digital photographs, it will only take you about one minute to get this rather special look on your images, however we would like to warn you that it works best with cars of a certain age, a brand new Corvette or Lamborghini will not work as nice as a Sixties Stingray or a Miura … at least that is our idea, you are free to try this out on whichever image you would prefer.
We start by selecting a great photo depicting a classic car, like the really nice Fiat we’ve photographed last summer during an old-timer event in the Netherlands.
 As always we start by applying a small amount of USM (UnSharp Mask found in the 'Filter' menu under 'Sharpen') in PhotoShop on the image (50%, 1.0, 1). After that we make sure our white balance is as good as it can be on a processed image (you should have corrected this when you were developing the RAW file (check out our standard workflow on automotive photos) by using the levels option.
 Just in case you've got an incorrect white balance in your shot and you couldn't fix it when developing the RAW file (you've shot in JPG by mistake ?) you can always use the Levels option in Adobe PhotoShop to correct it, take a look at the histogram of this shot, it does not cover the entire range, especially at the right there is room for improvement, particular for the highlights.
A complete explanation of the Levels adjustments can be found in our Our 60 second workflow on automotive photos tutorial, so we won't go into the details here, we've adjusted the sliders so that the image now has a correct white and black point.
Just in case you've got an incorrect white balance in your shot and you couldn't fix it when developing the RAW file (you've shot in JPG by mistake ?) you can always use the Levels option in Adobe PhotoShop to correct it, take a look at the histogram of this shot, it does not cover the entire range, especially at the right there is room for improvement, particular for the highlights.
A complete explanation of the Levels adjustments can be found in our Our 60 second workflow on automotive photos tutorial, so we won't go into the details here, we've adjusted the sliders so that the image now has a correct white and black point.
 After getting the colors in the shot corrected we've made a slightly different crop of the image, as this is a panning shot we want to remove some space from the rear of the car and have mode space in front of the car to give a better impression, in panning shots you should always try
to have more space in front of the car to allow it some room in the direction it is driving, this results in a more balanced shot, remember the Rule of Thirds ? Check out our Secrets behind a great car photo for more info on this.
After getting the colors in the shot corrected we've made a slightly different crop of the image, as this is a panning shot we want to remove some space from the rear of the car and have mode space in front of the car to give a better impression, in panning shots you should always try
to have more space in front of the car to allow it some room in the direction it is driving, this results in a more balanced shot, remember the Rule of Thirds ? Check out our Secrets behind a great car photo for more info on this.
 Next step is to make a layer to use for the de-saturation, we use an adjustment layer for this which does not touch our base image, so we do not ruin it and can return to it at any step in the process if we don't like the result. Just use Layer – New Adjustment Layer – Hue/Saturation… for this task, give this layer a name you like and click ‘OK’, on the next option you pull the saturation level all the way to the right, creating some sort of black and white version of your original layer.
 Now this isn’t what we are looking for, so we’ll change the opacity of the entire layer, something like 50% or 60% should work out nicely depending on the original image, the impression you are looking for is seeing some color but not too much … practice a little on this step to get it just right.
 Now comes the best part, putting a slight sepia look over the entire image by applying a color layer on the image, which is not as difficult as you might think, just add a new fill layer on top of the de-saturated layer (Layer – New Fill Layer – Solid Color …), select a name for this new layer (something you can recognize later on) and make sure to put ‘Mode’ on color, after you click ok you will be asked to select a solid color, here you go for either FFD700 or EED400 depending on which look you prefer. The effect is probably too strong right now, it usually is for our taste in fact, so we continue by changing the opacity of this new color layer like we did with the de-saturation layer. Something between 15% and 25% works best for us, but you are free to select a different opacity level.
 Your old fashioned photo should be just about ready now ! We always add some vignetting to these shots, that's what happened back in those days too, and it emphasizes the car even further by putting more saturation on the surroundings.
We add some vignette to the image with a new, empty layer, set the blending mode to ‘soft light’, then select a black color and the gradient fill from black to transparent, draw from the top of the image to just at the edge of the car, repeat the same thing from the bottom and both sides, them add this from the four corners and you have a very nice looking vignette on your photo. Too strong for your taste, change the opacity of the layer until you are satisfied with the result.
One extra tip, put this vignette layer underneath the Color Fill layer, not on top of it, try changing it’s position among the layers to see the difference.
Some extra material
 The same workflow can be applied to shots of much more modern cars, like this Lancia, but it works best when there is a nice classic car in the frame, on these more recent cars it just looks a bit out of place in our opinion, but you are free to try it on any image you might have in your collection.
 On the other hand, when you've got the chance to shoot a stunning Jaguar like this one it is a perfect subject to be turned into a more classic looking image. The owner of this car was very pleased with this photograph and actually liked it more than the original one we've presented to him.
 Just in case you want to play around with this type of modifications we've added the original PSD file with the Fiat in it for you to download, you can take a look at the different layers and modify their transparency settings, change the colors ... just get to know this way of working.
And what's even better, if you replace the 'background' layer with your own image it will be transformed into an old style photograph immediately as all the layers above actually work on the background layer anyway, you can see the result with your own material at once.
 |
CPT Premium member BONUS : 44732 If you would like to print the Old Fashion photograph tutorial you can download our special PDF which is optimized for hardcopy layout. We even included the necessary PSD files to get you started. |
Note : commercial use or publishing of our tutorials in any way, written or electronic, is strictly forbidden, we present these for your personal development only. None of our material may be published in any way without prior, written permission from the Car Photography Tutorials founder. All workflows and photographs are copyright protected and owned by the Car Photography Tutorials team unless stated otherwise
Advertisement
Become a MEMBER
Premium Membership
Become a CPT Premium Member and download all our tutorials including a PDF for printing and the result as a PSD file with layers if any.
Interesting articles
Off camera flash car photography, part 2 of 2 : the shoot
You managed to buy the necessary items to get into off camera flash photography, in part 2 of our tutorial we explain how to use it.
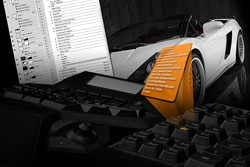
Running PhotoShop actions with a G13 or G510 gaming keyboard
I am a big fan of automating workflows in PhotoShop to speed up post processing, after a while I had a lot of ctrl and alt key combinations so I bought a gaming keyboard, first the Logitech G510 and later on I added the Logitech G13
Our TOP 10 tips for post processing using PhotoShop
In this tutorial we present you with 10 interesting and quick tips that will make your post processing automotive photographs in PhotoShop a bit easier.
Scale car photography explained in detail
In this article I guide you into scale car photography, from the preparation over the setup including lights, aperture, shutter speed and then taking the shot ... a lot of these tips can be used on full size cars too.
Off camera flash car photography, part 1 of 2 : the shopping list
In this first part of the off camera flash tutorial I take you over the required equipment to get started using additional light sources.
Keep up with CarPhotoTutorials
Why not follow us, become a fan, get our RSS feed or mail a link to a friend ?
![]()
![]()
![]()