OFF CAMERA FLASH CAR PHOTOGRAPHY, PART 1 OF 2 : THE SHOPPING LIST
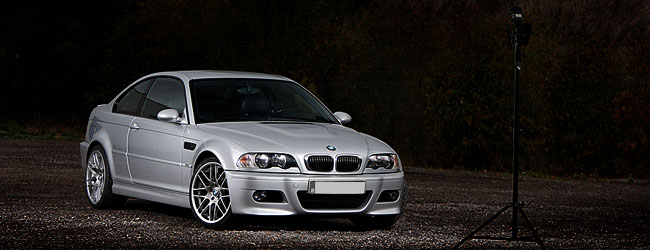
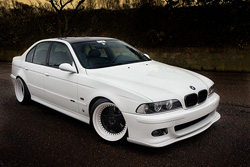
Canon EOS40D - Canon EF70-200mm f/2.8 L IS - 70 mm 1/250 sec f2.8 ISO100
Advanced level tutorial by Mark
I know lots of people have been asking about this tutorial for a long time now, but trust me, it isn't as easy as it looks ... well that's about the case in most car photography anyway, but adding one or more light sources into the equation makes things a lot more difficult, not only do you have to keep an eye on everything you've learned up to now, but once you add a flash to the shoot you have to know exactly how that extra light behaves too.
And light is a strange thing, it can make or brake a photo, trust me, try to get to grips using natural light before you even consider adding artificial light sources into a shot ... and I specifically didn't say 'flash' here because on many occasions you can get even better shots by just using a reflector ... a flash can give some harsh light, a reflector is smoother most of the time.

First let me ask you this:
'Why would you consider adding light sources into your car photography' ... if you don't have a clear answer to this, or the answer is 'because it looks cool' or 'others are doing it' ... please stop for a minute now. When you photograph a car it is your shoot, you are taking the decisions on angle, distance from the car, polarizing filter or not, tripod or hand held ... you are in charge. So don't think you 'need' to add lights just because you've red about them or you've seen someone else using them ... the first thing I always tell people who want to take their car photography skills one step further is: 'develop YOUR style, don't copy someone else, it doesn't work that way'.

Now I'm also the first to say you need to look at photos from your fellow car photographers (I specifically don't call them competitors, we're all in the same business here right) and learn from them ... but read that last part again ... 'learn from them', it doesn't say 'try to copy them'. So now that we have that sorted out I know you are here to learn about flash photography, so let's get down to it.
Initial shopping list for flash photography
Lights please
Well an external flash would be nice right? But which one to get could be a totally different question ... I for one always try to get the best I can afford ... or justify as a reasonable investment, so I went for a couple of Canon EX580 II units.
I know these are expensive, but I'm also using them on camera for other types of photography, so the e-TTL is an added bonus on these together with the power, and I love the fact they have a PC Sync connection built in ... I just hate those triggers were you have to put the flash into a hot shoe and put the entire thing onto a stand.

I can tell you this right from the start: 'it will wiggle around and scare the living daylights out of you when it decides to check out the floor ... smashing the flash into pieces.' Trust me, been there, done that ... it will happen, it can take days, weeks or even years, but at one moment in time your stand will fall to the floor and crash that expensive flash on top of it.
You have already red it above, getting a flash is the first step, so try to go for the best one you can afford ... and remember for one shot flash photography you will need three of them ... that's right: 3 flashes, so it gets expensive quickly now, and we still have lots of other stuff to get.
I know people are doing multiple exposures with only one flash they move around and take extra shots, some even use a technique called 'light painting', walking around the car during a long exposure when it is dark outside and fire the flash manually several times, but we are talking about making things easier here, so at least two, but even better three light sources are a minimum to get the shot in one exposure.

Think about this: you will be using the flash on manual mode for most of your shots, so it isn't necessary to get an expensive, e-TTL automatic flash if you only intend to use it for off camera photography, feel free to check out units from YongNuo for instance, they cost a lot less and work almost as good anyway, just make sure there is a PC Sync connection on the unit itself, that will safe you some serious grief later on.
Triggers ?
Second thing on the list are triggers, those nasty little things that allow your camera to control the flash from a distance, because the entire trick about flash photography in cars is to get the flash away from the camera ... now you can try to yell at the flash to make it light up, but somehow I never got that working on my Canon units, so I bought a wireless trigger setup, and that's exactly what you should be doing too.

And here again it all comes down to money, you could decide to get what is considered the best of the best, wireless triggers from PocketWizard ... just about every professional photographer will have a set of these, and they are considered to be the best on the market with a massive range and a very, very low fail rate ... but check out those prices. Do make sure you are sitting down, these units cost a small fortune, most likely even more than your flash itself ... so I couldn't bring myself to spend that kind of money and decided to go the cheap skate route for once ... bummer.
Just like most people starting out in this niche I got online and checked out eBay for those famous 'Cactus' triggers people are raving about all over the internet, they are ridiculously cheap so you can't be suckered too bad I guessed, I ended up ordering a multiple unit PT-04 set just to be safe ... they arrived quickly all the way from Hong Kong and behold, they actually work ... well most of them.

Right from the start I had one receiver that didn't work beyond a few meter, same thing with a transceiver, worked perfectly up to about 5 meter, after that it only triggered the flash sporadically ... so in my eyes useless, but I planned ahead and ordered two transceivers and a total of five receivers (two different models), hence no problem, I had two flashes at that time so I was ready to go.
NOT ... sure they triggered the off-camera flash, that part worked perfectly, but after a while using them I noticed something really strange ... at the top of the photo I got some distortion that was mostly visible on a dark background ... turned out the frequency used by these low cost triggers actually influenced the sensor inside my Canon EOS40D at that time, and also my newer Canon EOS5d MarkII ... so I sold the entire set to a guy using a Nikon who apparently didn't have this problem.

So once again looking for a wireless trigger setup I bought the Elinchrom Skyport system, they offer a Universal kit that has one trigger and two receivers, the basics I needed at that time ... mind you these aren't cheap, but they work perfectly and I love them, bought a second kit to have two triggers and four receivers for my entire setup, and never looked back or had any regrets spending a fair bit more compared to the Cactus set up.
Cabling
Here things can get a bit tricky too, it all depends on what kind of wireless triggers you are using. If you are happy with the Cactus like system you will not need a cable I guess, the flash just sits on a hot shoe connection and gets triggered using the central contact point. You have PT-04, PT-16, RF602 ... all of those work nicely and allow you to put the flash directly onto them ... but as I mentioned my set caused some interference with the sensor in my camera, so I bought the SkyPort system from Elinchrom ... and those don't have a hot shoe connection.
And here the cabling come into view, and remember I've been insisting on having a PC Sync connection on your flash ... here is why: you connect the trigger with a PC Sync cable directly into your flash, and if you are lucky you even have a 'Screw lock' connection like I do on my EX580 II units, this allows you to fix the PC Sync cable in place by screwing it onto the flash ... hence no false contacts or a cable falling from the connector. On the other side of the cable you have a standard head phone jack that goes into the receiver ... a perfect, flawless connection every time, today, tomorrow and in a few years time.

I ordered the Screw Lock PC Sync cables for my units from www.FlashZebra.com by the way, not too expensive and they offer custom cables for just about any combination of flash and trigger you can imagine ... and customer service is great if you need it, so I wouldn't hesitate to advice you from getting your cables from them too.
Light stand
You probably already have a camera tripod right? If like me you were too broke down to get a decent one the first time around you probably have an old, useless one lying around too ... now you can use it again, it might not be able to hold a camera rock steady, but a flash shouldn't be a problem.
However, as I advised you to get at least two, of not three flash units, you'll also need the same amount of stands for them, so at least two more to buy. Now you could get some low cost, or even second hand tripods again ... most flash come with a nice thread that allows you to screw them onto a tripod anyway, but you can also get some cheap stands for them.

I actually got me three stands for less than 100 Euro, sure these aren't the best around, but they don't have to carry any kind of weight anyway, and who cares if they aren't solid as a rock ... they have a light on top, so what if it moves a few cm, you won't be seeing that in the shot anyway. Just make sure you have a few sandbags with you to keep them from falling over, to be on the safe side.
The most important thing about the light stand you are considering to buy is the length it takes when packed, the height it can reach fully extended and how low it can go when set up ... that's all that matter, you might want to consider getting a light stand that can go above 2m and as low as 40 or 50cm to get most angles of flash photography on cars covered.
If you need to set a flash lower than 40cm you can just put it onto its own stand that is usually shipped with it, or put a book or a brick under it, and any higher than 2m50 would be stretching safety anyway, so don't bother with that, it isn't needed anyway as you will be able to read in our setup later on.
I found a nice shop in Germany that sells low cost stands that offer very nice quality for their price: www.Foto-Walzer.biz ... they have just about everything in stock and ship very fast, so feel free to take a look at them ... or visit your local shop, I'm sure they will have some entry level light stands too.
Light modifiers
I've tried them all: umbrella in shoot through and reflection form, soft box both small and large, massive diffuser sheets with multiple strobes behind them… all very nice, and they do work perfectly don't get me wrong ... but for studio based glamour photography.
Out there in the field, close to a rare exotic car they just don't make me happy, most of these modifiers will create large reflections in the paint anyway, which makes me spend hours cloning them out in post processing ... I don't like that, it doesn't make me money spending hours on one shot only, the customer isn't always willing to pay for such extensive post processing.
The only one that does work is that massive diffuser sheet with multiple light sources ... but it has to be so big it covers the entire car in one go, and subsequently you will need some serious power in the strobes to get any light onto the car in the end ... the result is stunning, but the setup and cost of getting this is ridiculous for most of your shoots anyway.

We are talking about up to 24 light strobes and a diffuser the size of a little truck, it has to extend beyond the width and length of the car you are shooting, and such a sheet will have to be fixed very tightly to avoid it from falling if there is even a small gust of wind ... so very nice in a studio setup but next to useless out in the open if you ask me ... and more importantly totally not reasonably priced no matter how you look at it.
So bottom line: I shoot bare flash, no modifiers on them so I have no loss of power too, just use the wide angle deflector fitted to most flash units to have a big spread of light and go for it ... as an added bonus of going bare flash you don't have an umbrella that catches every small force of wind that comes along or a soft box that makes your entire stand really top-heavy and prone to falling over.
And the most important thing to remember: using a flash in its bare form like this will also have a very small reflection in the paint, so less work in post processing too ... and if you follow my lead in setting up a car shoot using external flash units you will most likely not be cloning out any reflections in the end.
The final shopping list
If you've managed to get to this point you probably have spent some serious money already, let's take a look at the shopping list we've racked up until now:
Flash: two, but preferably three units, their power output has to be manually adjustable and in as much steps as possible and have a PC Sync connection built in, preferably a 'Screw lock' version. Wireless trigger/receiver setup: at least one trigger and two or three receivers, the latter should have a PC Sync output. Light stands: two or three depending on the number of flash units, adjustable from about a low 40cm up to a 250cm height. Cables: two or three 'Screw Lock PC Sync' cables, I would even advice using cables when you wireless receiver has a hot shoe.
And now for the little extras that will make you life so much easier in the long run:

Weights: needed to avoid the light stands from falling over, so get the same amount of weights as the number of stands you've got. By the way, you can also use sandbags for this, whichever is easier to locate in your region.
Flash holder: these are also called swivels, and allow you to point the flash up or down in several angles, they are not really necessary I guess, but they are very useful anyway, and don't cost too much either.
Bag: get a nice bag that can hold your entire set in it, that way you don't forget stuff at home. Do make sure the light stands either fit into the bag or can be easily attached on the outside of the bag.
Reflector: sometimes an additional flash is just a bit too expensive, so you can try using a reflector instead ... or make one yourself using a plywood sheet covered in aluminum foil.
Batteries: it might sound trivial, but keep in mind not only do your flash units need batteries, the wireless trigger/receiver set also needs power, and some of them use AA or AAA batteries too, so get enough rechargeable batteries for your entire set ... if you go for quality these can cost some serious money too, I always use GP ReCyko units now, they keep their charge when not in use nicely.
Battery Packs: nothing worse than having to replace the batteries in your flash unit just when you've managed to setup the shot perfectly ... so I spend some extra money on the CP-E4 Battery Pack for my EX580 II flash. These units hold an extra 8 AA batteries and allow me to take up to 1000 shots without having to replace any batteries ... do note you'll be able to find these on eBay too for a lot less than the original.
I think that about covers the initial requirements to start using additional light sources in your car photography. The first thing to do now is to get acquainted with the new equipment.
Hands on
Put batteries in the flash, mount it onto a light stand, position the flash head somewhat downward onto a concrete floor using the swivel and connect the wireless receiver using the Screw Lock PC Sync. Now power on the receiver and the flash and try the trigger ... does it activate the flash? If not check channel settings, most likely the trigger and the receiver aren't listening on the same channel.
Once you get the trigger to activate the flash put it on your camera and take a shot of the concrete you've pointed the head on ... verify the photo on the camera display. Now start modifying the power output of the flash ... you did remember to put it in manual mode right? Just kidding, start playing around with the flash and see how it influences the shot right on the camera LCD.

You understand what is happening when you lower the flash output but keep the same settings for shutter speed and diaphragm? The amount of ambient light that creeps into the shot when using the flash is very important, so try different settings here, lower the shutter speed, change the f-value of the shot ... it does not have the same effect on your shot once you add a flash into the equation.
Do you know how to influence your shot with one flash? Now add a second one and try it again, things changed dramatically right? Try adding the third flash into the shot ... again different no? It takes some time to understand how much power you'll have to set on the flash, which shutter speed to use (most triggers only work from 1/160 to 1/250 anyway) and very important: how to select the right f-value to dial in ... you will be working in full manual mode from now on ... you might even need an ND filter to get the effect you are looking for.
Conclusion
You now have the material, in a while you will also have the experience using the additional light sources and how they influence the shot you are trying to make. When using off camera flash units for car photography you will be going into full manual mode, both on the flash and on the camera, so get to grips using that mode and how shutter speed and f-value determine the final outcome of your shot. Once you get to grips with all this material and settings it is time to attack your first real car with the new flash units ... and you will learn how to position and set up everything on this shot in part 2 of our tutorial on flash car photography ... that went live on June 15. 2012.
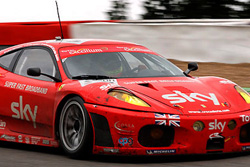
Just one little piece of information for you ... take a look at this shot :

Do not feel forced to get into off camera flash photography, sure it can get you some amazing shots, but if you know a little about light and have the time to wait for that Golden moment in the evening you can get some truly stunning shots using ambient light only ... and to be honest, I actually prefer no flash in real life, I always feel that using a flash should be to help lighten some of the dark areas in a shot, not to create dramatic looks ... I can do that in post processing to a certain extend ... still off camera flash photography is so much fun to do ... a lot of trial and error at first, but once you nail that perfectly balanced shot you know it paid for the long and steep learning curve.
 |
CPT Premium member BONUS : 63512 As a member you can download the text from this turorial in an easy to print PDF for offline reading. |
Note : commercial use or publishing of our tutorials in any way, written or electronic, is strictly forbidden, we present these for your personal development only. None of our material may be published in any way without prior, written permission from the Car Photography Tutorials founder. All workflows and photographs are copyright protected and owned by the Car Photography Tutorials team unless stated otherwise
Advertisement
Become a MEMBER
Premium Membership
Become a CPT Premium Member and download all our tutorials including a PDF for printing and the result as a PSD file with layers if any.
Interesting articles
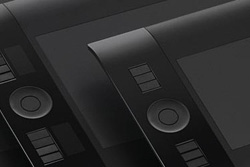
Use a mouse or a tablet for post processing
Perhaps a mouse isn't the most appropriate option when working on automotive photos in post processing, so let's take a look at a pen and tablet.
Post processing automotive event photographs
We all know the drill, we’ve been to a car show or outdoor event and we’ve encountered some amazing cars but our shots have bad backgrounds so we'll have to revert to post processing to get it right.
Creating a photo from a showroom snapshot
Sometimes you just don't have the option of setting up a nice area for a shoot, for instance when you are in a showroom, but fear not, we show you how to make a photograph out of a snapshot in post processing
FAST TIP : a polar filter in car photography
In this tutorial I show you just how to use a polarization filter correctly and combine multiple layers together
Make panning shots like a pro
We all made these mistakes at first, but after gathering some more experience we could pinpoint these mistakes and share them with you so you can avoid them.
Keep up with CarPhotoTutorials
Why not follow us, become a fan, get our RSS feed or mail a link to a friend ?
![]()
![]()
![]()