BUYING A DUAL SCREEN SETUP MIGHT BE THE BEST IDEA YOU EVER HAD
Canon EOS5D Mark II - Canon EF24-105mm f/4.0 L IS - 24mm 3.2 sec f8.0 ISO100
Advanced level tutorial by Mark
When it comes to investing in a new workstation to process your photographs on you quickly run in to a few basic dilemmas. For one you'll have to get enough storage space, your new computer should be good to go for a few years into the future, you don't want to end up buying a new one every year so you'll have to get a decent processor right from the start that won't feel slow too soon and you'll need a good monitor ... only problem is: all these things cost money, and if you aren't careful you'll end up with a massively expensive workstation that will take months if not years to break even on.
1. The first decision to make: Mac or PC ?
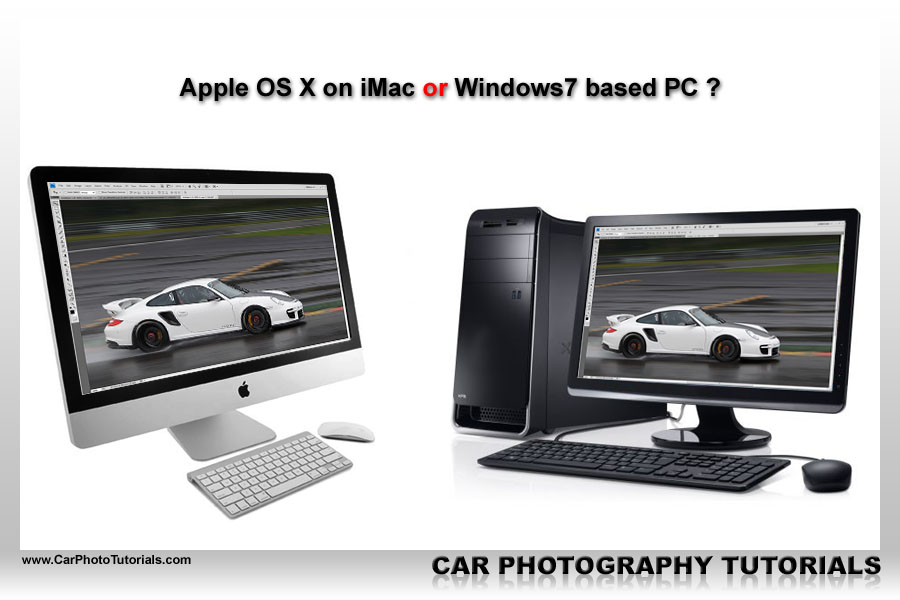
If you think the choice of your camera gear was difficult, think again, deciding on a new workstation might be the hardest choice you are being faced with as you'll have to make a choice between a Mac based system or an MS Windows based computer ... and as much as I would love to advice you on this ... in the end it remains a personal choice.
You will have to look at your budget for one, don't think you'll be in the clear buying just a computer, the software you'll need will be just as expensive, if not even more expensive ... take this into account when deciding between Mac or PC. One thing that really helps out these days is the fact most of the software we as car photographers need is available for both systems, so at least that will not be an issue ... up comes the money again, whichever way you look at it an iMac will set you back more money than a normal desktop PC with a separate display, sure there are MS Windows running all-in-one systems now, but if you need some serious processing power you'll end up with a regular 'tower' PC configuration ... and I have to admit the iMac does look cooler on your desk.
1.1 Compare iMac vs desktop PC ... talking money
I know this is probably going to cause some major discussions, it always does on the forum I post on ... the battle between Mac and PC is ongoing forever I think, but when it came to replacing my old PC with a new workstation for post processing I made a lot of calculations ... and I'll make them here again.
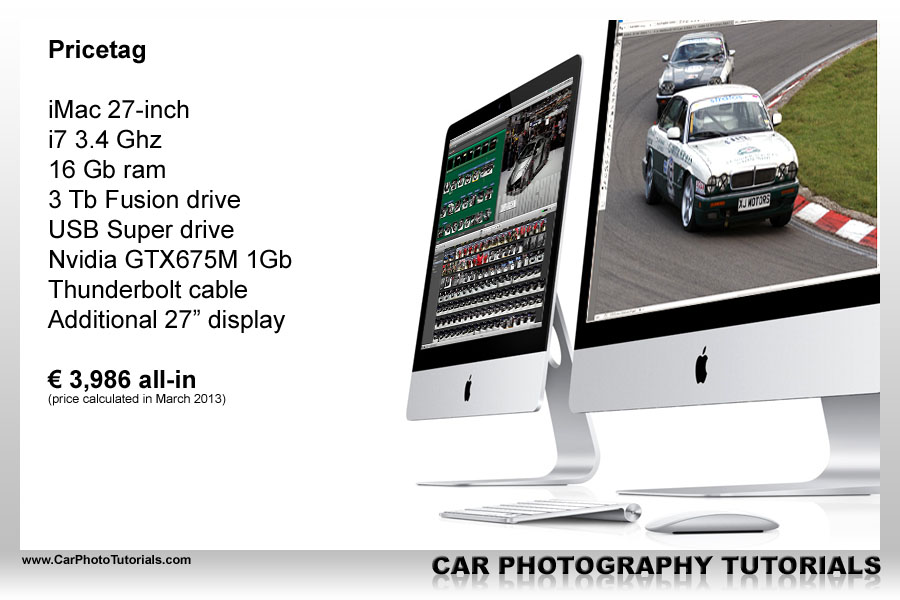
The iMac I'm going for the big 27-inch unit with the optional 3,4-GHz quad-core Intel Core i7 processor, upgraded memory to 16 GB 1600-MHz DDR3 SDRAM, the 3-TB Fusion drive (Combines 128Gb SSD drive with a regular HD) and naturally the Apple USB SuperDrive as the new iMac doesn't have a DVD anymore, I'm keeping the standard NVIDIA GeForce GTX 675MX with 1 GB GDDR5 graphics card but get an Apple Thunderbolt cable and an additional 27-inch Thunderbolt display (I want a dual display system).
Totals at € 3,986 all-in, note this is just for the hardware, I haven't even added the price for an Adobe CS license and other applications I need, but this gives an indication of what kind of money we are talking about here.
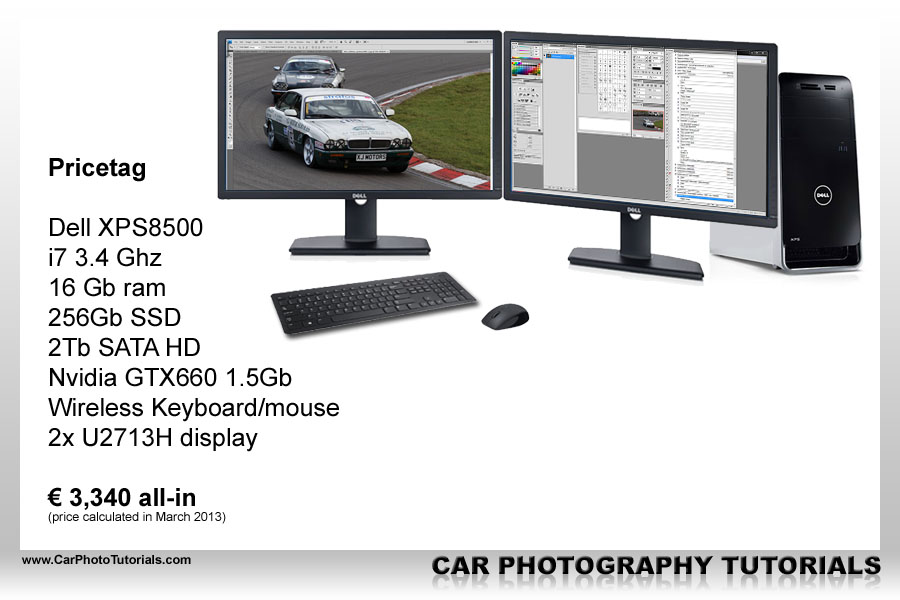
The PC I've been happy with my DELL computers, so I'm going back to them. Right now the XPS 8500 looks good enough, I go for the i7-3770 (3.40GHz, 8MB processor), 16GB Dual Channel DDR3 SDRAM at 1600MHz, 256GB SSD +2TB SATA (7200RPM) hard disk and the NVIDIA® GeForce GTX 660 1,5 GB DDR5 graphics card, just to come closer to the iMac I select the optional wireless keyboard and mouse and go for the Win8 Pro version ... totals at €1.304 ... but there is no monitor yet. So I add two Dell UltraSharp U2713H 69 cm (27-inch) unit, the same size as the iMac display, which adds €2036 to the price (there are cheaper monitors, but the iMac display and the additional Thunderbolt display are high end, so I went for a similar high end display to play it fair.
The entire PC configuration totals at €3,340 all-in, again without any software installed, just the plain computer.
Bottom line: the PC configuration is almost €650 cheaper than the iMac system, which converts into a 16% difference for a similar setup, although the iMac still looks really sleek and modern ... but is that worth €650 to you ? To me it isn't to be honest, so I would go for the MS Windows based computer and buy Adobe PhotoShop with the difference.
If you want to start out with only one display you can deduct about €1,000 from the prices mentioned above, but I would seriously advice you to go for a dual display setup ... I'll explain why:
1.2 My first dedicated post processing workstation
When I started my photography business I went for an MS Windows based system because of the aforementioned reason ... budget, I bought an Intel Core2 Duo E8400 machine from DELL with 4gb of ram, a 1Tb hard disk running on 32-Bit Vista combined with a 20-inch Dell LCD monitor at a resolution of 1680x1080px, bought an Adobe Creative Suite CS3 version and DxO Optics Pro Standard license at the same time and started working on my brand new computer.
But I quickly ran into a small problem, the resolution of my monitor just didn't cut it while working in PhotoShop I had the Tools overlapping large parts of the photo, and that just didn't feel right, so I started looking around for a larger monitor ... and behold DELL had a nice UltraSharp available in a massive 30inch diameter ... resolution: 2560x1600px, now we're talking, only one small problem: it was more expensive than my entire PC setup put together.
2. A dual display setup was just what I needed
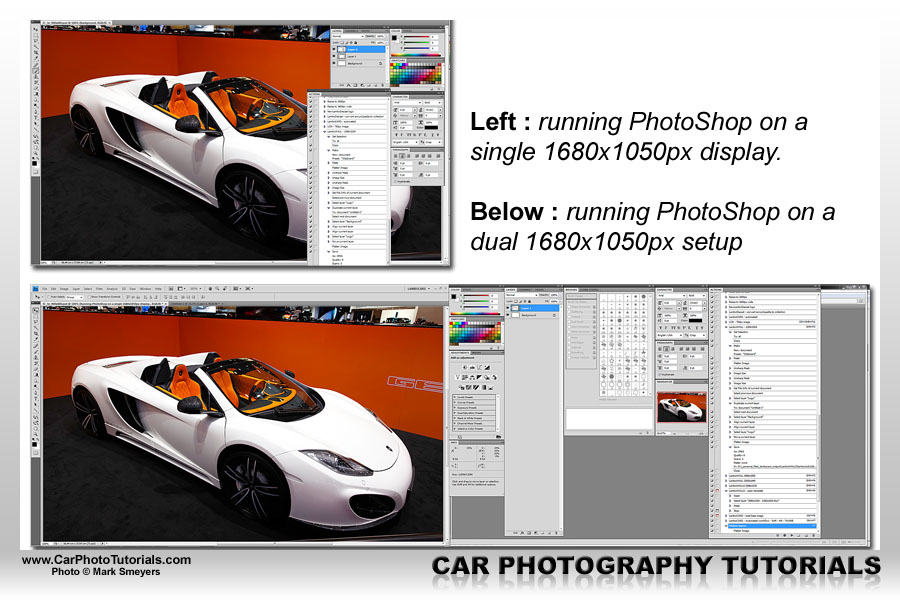
I wasn't going to spend nearly €1,500 on a single display, so I took a closer look at the rear of my computer and noticed the graphics card featured two analog VGA outputs ... that would mean I could connect two displays, so I bought another Dell 20-inch unit, this time from the UltraSharp series as they had an IPS display panel which would offer me better color display, and the best part of it: this second screen was only about €350 at the time, way less than the €1,500 price tag for the large 30-inch unit.
Thinking about it I put some figures together, I now had two displays with each 1680x1050 pixels of 'screen real estate', this comes to a total of 3,528,000 pixels ... the massive 30-inch unit showed 2560x1600px or 4,096,000 pixels ... so for about 500k pixels more the price almost triples (I added the price of the original 20-inch unit I got to the new 20-inch UltraSharp, which totals at around €500)
3. Just when I think two displays will be perfect
So now I had my setup the way I wanted it, I could post process photos full screen on a 'calibrated' monitor while still having all the necessary tools and menus displayed on the second monitor ... after a while business took a turn for the better and I quickly ran out of processing power and hard disk space with my initial setup so after buying two external 1Tb hard disks for a mirror backup system I decided it was time to invest in asecond, more powerful PC ... naturally again with two displays.
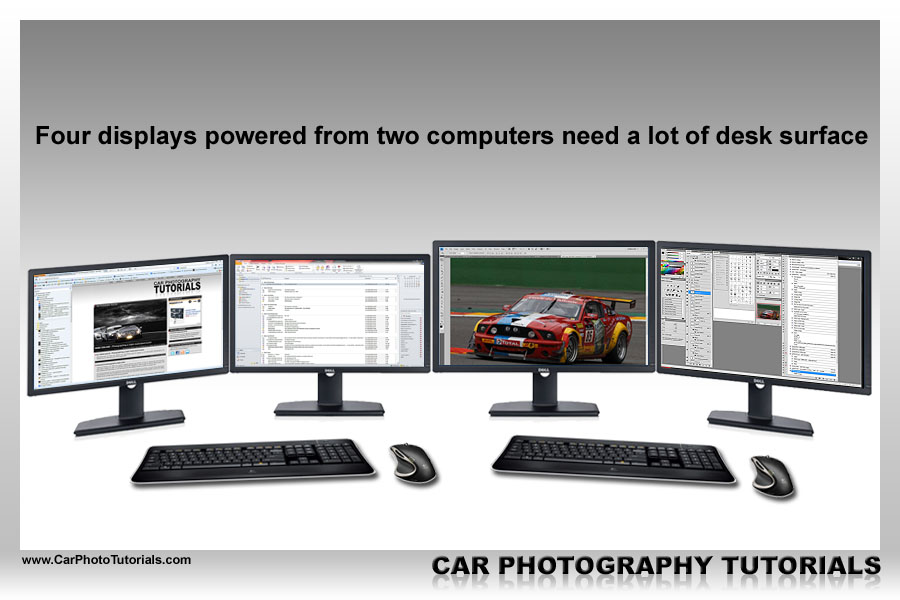
So I again looked at an iMac, but again went for a more powerful Intel i7 processor running Windows7, double the memory at 8Gb and not one but two internal 1Tb hard disks ... and two more 1Tb external HD's for backup purposes. An unforeseen issue came up when I unpacked my new system ... desk space.
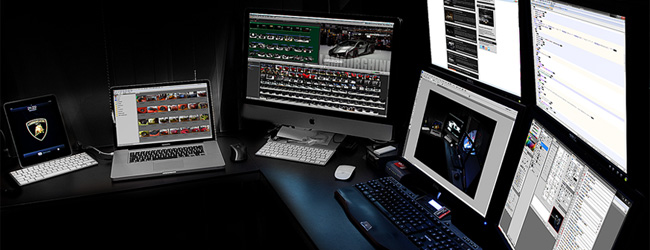
Running four displays on two computers might sound great, but it takes up a lot of space as I kept the two 20-inch displays on the 'old' computer and got two 22-inch displays for the new one, naturally two keyboards, two mice and a tower of four external HD ... that didn't look too good on my desk, so things had to change.
4. Putting the practicality back into the picture
I never said car photography would be cheap, so after investing in a second computer setup, an additional license for Adobe Creative Suite (this time the CS4 version) I found myself being forced to spend even more money to make it all work together a little better, having two computers with four displays might sound cool, but it actually looks totally horrendous side by side ... I ended up with four displays in a row, two keyboards and two mice ... and I really didn't like it one bit to be honest, my eyes had to travel way too far to work comfortably, and I always managed to use the wrong mouse ... back to the drawing board.
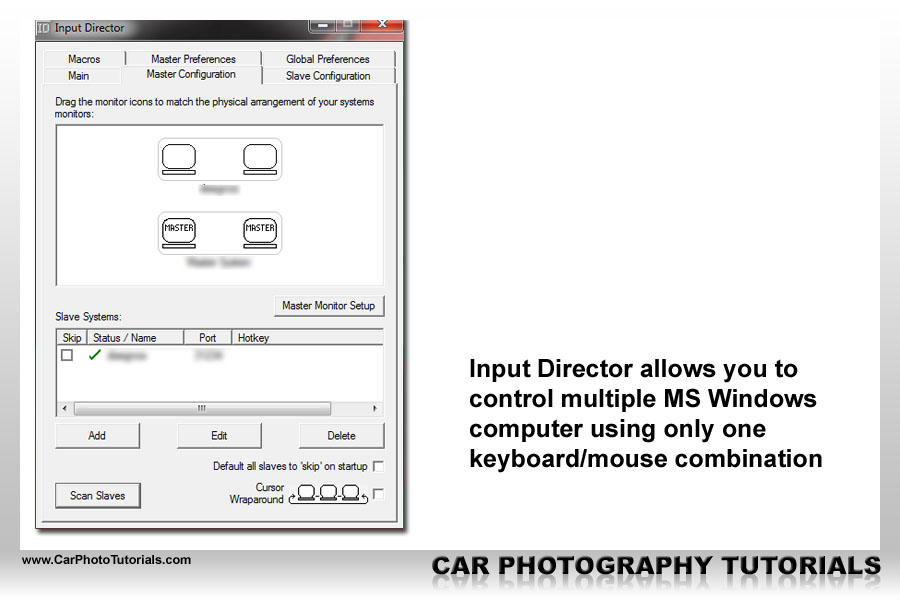
A bit of internet searching led me to a nice little application called InputDirector (or ID) that can be installed on MS Windows running computers and once setup in a 'master-slave' configuration allows the use of one single keyboard/mouse combination to control multiple computers, just what I needed ... and it gets even better ... InputDirector can be downloaded and used for free, although you can make a donation, which I sincerely advice you to do, this little application is too cool not to show some respect to the programmer.
In a very simple yet powerful configuration panel you can determine which computer is the master system, how the displays are organized on it and put the slave computer with both screens (in my case) into InputDirector ... now all it takes is to move the mouse cursor to the edge of the screen on the master computer and it goes onto the display of the slave computer. As long as all the computers can 'see' each other on your network the InputDirector allows you to save a lot of desk space by having to use only one keyboard/mouse. Still just to be on the safe side I keep a small keyboard and a wired mouse on my 'slave' computer ... you never know right ?
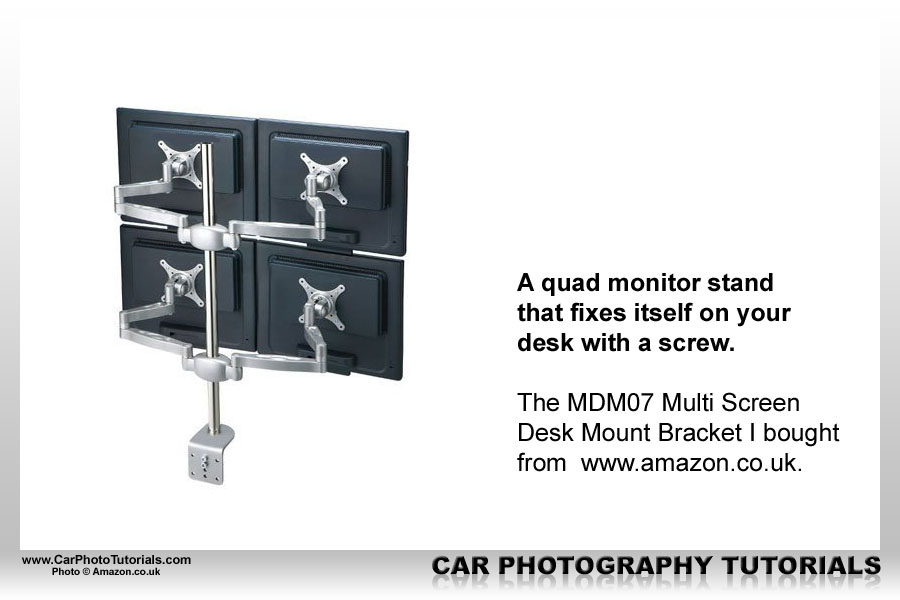
I quickly found out those nifty multiple screen brackets were very, very expensive and beyond what I wanted to invest into it actually, until I found a really great one that fit right into budget, the MDM07 Multi Screen Desk Mount Bracket I found on www.amazon.co.uk. It might not be the best one on the market, but it suits my needs perfectly, allowing a 'two up - two down' setup saving me even more valuable desk space.
I have to admit the weight of my two top displays (the 20-inch DELL units) seemed just a bit too much for this bracket, but the two lower units (22-inch DELL UltraSharp units) actually sit on the desk with their sound bar, so the top displays rest on the lower ones ... hence no problem and it all sits rock solid.
If you are looking into a similar setup make sure you install it all the way it should be, ergonomics are very important if you are spending hours each day behind these screens, so in my case to lower row is tilted slightly upwards so they perfectly perpendicular to my eyes while the top row is tilted down and are also at the perfect angle when I work on them ... this is very, very important to keep it all healthy.
5. Why would I need two computers and four displays ?
I know most people would be really happy with just one computer and two displays, and would call my setup totally overdone, but adding a second system with two screens actually made a lot of sense for me, it increased productivity tremendously and lowered my frustration levels considerably throughout my post processing workflow.

I tend to use DxO Optics Pro to 'bulk process' my RAW files into JPG whenever I come back from a major event and have hundreds if not thousands of photos to process, an almost impossible task to do manually, so I created a few presets for DxO and have this software process the shots for an initial upload ... but DxO isn't known for its blindingly fast processing speed, it takes about 30 seconds to a minute to process a 20mpixel RAW file, and while DxO is running you can't do much more on that computer.
So while one of my computers is busy processing the batch of photos I selected and performed initial settings on I can use the second system to prepare the article to go with the aforementioned pictures, check my emails, take a look at my social network pages or even do in depth post processing in PhotoShop on the more important photos taken at the event ... hence I actually really use both computers at the same time.

And that's not even the best part, as I am also programming websites I have configured my older system as a local webhost, so I can test drive websites on my own without uploading them onto a host, and while I'm writing code I can still have a full screen preview of the site open next to it ... and have Adobe PhotoShop open on the second system to create graphics on the fly without having to switch windows.
Since both systems are on the same network I can write onto network drives and access php code and graphics from both computers while having a life preview of the website in view all the time, it just saves time and I keep a perfect overview of it all ... I even keep my Outlook open on both systems as they cater for different email addresses, it might look cool or overdone, but it actually works for me.
6. Taking the home office to the next level

At a certain moment in time you'll have to take a step back and look at your setup to reevaluate things, and perhaps change it, in my case I had two MS Windows stations running with a four display setup, a special gaming keyboard (which I never play games with but use for PhotoShop), an A4 tablet with a drawing pen and a wireless mouse.
But when I wanted to program an app for the iPhone and iPad I decided to add a 27-inch iMac to my setup so I could write XCode on it, these days I'm also using this iMac for movie editing, my Canon EOS5D Mark II does record some really nice, full HD movies, and I prefer using iMovie, Adobe After Effects and Adobe Premiere on the iMac instead of using my Win7 box ... only downside to this: I had to buy a new license for the Adobe Creative Suite to be used on the Mac as my PC license doesn't allow a second installation on a Mac OS X system.
The iPad actually doubles as my digital portfolio, showing photos and movies on the iPad is so much more professional than lugging around a printed portfolio, and as the iPad is fully digital I can rotate photos much easier and at a lower cost ... even when I print A3 myself on nice photo paper it costs a lot more than downloading a photo onto the iPad, so the latter is used intensively and still the screen looks really good and the battery holds up for hours on end.
The 17-inch MacBookPro I take with me on site when I do a shoot, and I have it configured for tethered shooting too, that way your customer can see the result of the shot you've just taken on a large screen, it also allows me to do some quick editing right on the spot and deliver a first photo to the customer right on the scene ... call it a little teaser of things to come, but rest assured your customers will love it.
BOTTOM LINE
I'm sure you don't need to get drawn into multiple displays and computers like I did, do take into account it took many years to put together the home office like it is today and you really can live with only one computer to post process your images, but I do hope you see the sense of having a dual screen setup.
Two displays allow you to have your photo in full view without it being obscured by tools or other items, which can all be moved onto the second display, and it doesn't even have to be the same size or make. I would however advice you to buy a good IPS display for your post processing, have it measured and profiled so it displays the correct color while you use a low cost display as the second unit ... it will only hold the tools, your email program, coding ... or stuff like that, so color rendition isn't a priority for the second display.
I for one like the DELL UltraSharp screens, they offer 99% cover of AdobeRGB and even 100% sRGB, so perfect for post processing photos both for print and for display so do take a look at them when you shop around, another piece of advice: try to have your keyboard right in front of your main display, I had mine right in the middle of the two screens, and whichever monitor you want to look at you'll have to turn your head.
If you have the main display in front of the keyboard you'll have a much more natural working position, with the secondary display to the lef or right, whichever you prefer. I have it to the right as I also have my trackball and drawing tablet on the right ... so a totally natural feeling setup, remember you are spending many hours behind your computer, so let's make it as pleasant and comfortable as possible.
 |
CPT Premium member BONUS : 65875 Become a CPT Premium member to download eBook on this tutorial as an easy to read and printable PDF document. |
Note : commercial use or publishing of our tutorials in any way, written or electronic, is strictly forbidden, we present these for your personal development only. None of our material may be published in any way without prior, written permission from the Car Photography Tutorials founder. All workflows and photographs are copyright protected and owned by the Car Photography Tutorials team unless stated otherwise
Advertisement
Become a MEMBER
Premium Membership
Become a CPT Premium Member and download all our tutorials including a PDF for printing and the result as a PSD file with layers if any.
Interesting articles

Case study - Countach
In this specific case study we will take a look at how to remove unwanted clutter from the backdrop of a shot.

Using actions to add a watermark to your photos
We show you a way to add a custom watermark to all your photos, no matter if they are in landscape or in portrait orientation using actions that require no manual intervention.
Photographing scale cars
Scale cars are really magnificent, they allow you to admire cars you would normally rarely see in real life, photographing them is an art on it's own however.

Action photography using a car rig with suction cups
Suction caps are commonly used to attach a boom onto a car so you can position a camera at a fixed point from the car and take a photograph while the car is moving to create impressive action shots.
Background replacement made easy
There are times you've managed to photograph a great looking car, but the background is far from good looking ... no problem, just replace it with a different one.
Keep up with CarPhotoTutorials
Why not follow us, become a fan, get our RSS feed or mail a link to a friend ?
![]()
![]()
![]()