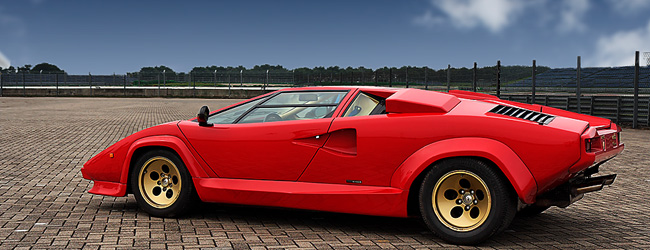
CASE STUDY - COUNTACH
Canon EOS 350D - Canon EF-S17-85mm f/4.0-5.6 IS USM - 24mm 1/250 f5.6 ISO 100
Case study by Mark
Shooting this special Lamborghini Countach Quattrovalvole posed some serious problems, we couldn't take it of the grounds of the Italian Car event where it was shown for security reasons, so we had to make do with the surroundings on hand, which weren't too attractive to say the least.
On one side we had some ugly buildings while on the other side we were faced with a big black truck and a crowded parking lot, not exactly the ideal backdrops for such an exotic car, so we took it to an open section inside the paddock area and worked with what we could.
 At least there weren't any other cars in the immediate vicinity and we could control the crowd so they didn't walk into the shot, however it was a rather cloudy day so the really nice red paint of this Raging Bull didn't look too bright while the sky looked really bad, so we had our work cut out for us in post-processing.
Our location did have poles in the background that were sticking out of the car from this angle, and some strange contraption in the background, but we knew these could be easily edited out afterwards, so we took the shot anyway and went to work when we got home (after a four hour drive).
Step 1 : get the composition right
 We made a serious mistake when composing this shot, we put the car right in the middle of the frame, so our first business at hand would be to put the car in a better position in the overall frame, which is very easy as we always take the shot at the highest possible resolution so we can afford to get rid of some of them to get the crop just right.
For this specific shot we put the car in the lower right corner to make it look better in the overall shot, you can see the difference in looks at once compared to the original shot, it looks much more balanced this way.
Don't forget to duplicate this layer so you are not working on the original image by clicking Ctrl-J/Cmd-J
Step 2 : Sharpening
 We always sharpen our photographs a bit to start out, using Adobe PhotoShop's UnSharp Mask with a setting of 100% amount, 1,0 pixels radius and a threshold of 1 levels is a good setting to begin with, you don't want to 'over' sharpen the image at this early stage, remember you can always perform another sharpening step at the end of the workflow, when you size it for the use you are going to make of it, for printing you would use a more heavy sharpening than for web display because you are working with a lot more pixels when you are going to press.
There are countless other methods of sharpening your original image, and we will go further into these our special tutorial on how to sharpen images professionally, but for now you can work with the well known USM to make your shots pop a little more. USM actually works on increasing the contrast between light and dark pixels in your image giving the impression of a sharper photograph, which is just what we need for this purpose.
Step 3 : Color
 There is still something seriously wrong with the color of this shot, the red should 'jump' of the screen actually, so we will use a special Curves adjustment to make it look right. We will actually use an adjustment layer for this, more specifically the 'Curves adjustment layer' (Layer >> New Adjustment Layer >> Curves ...)
 We've used the black eye dropper to select a shade inside the wheel arch of the car, the white color dropper to select a bright section in the sky and then pulled the curve down to create a more intense red on the car itself, giving it a much better look overall, you might want to play with these settings until you like them, after all it remains personal taste most of the time.
As the effect was a little too much to our taste we lowered to opacity of the Curves Adjustment Layer a bit, which made the red shade just about right for us, we did add a Saturation Adjustment Layer (Layer >> New Adjustment Layer >> Hue/Saturation ...) to make it pop a little more by adding 12 points to the Saturation slider.
Step 4 : Clean up
 Now comes the tricky part of this Case Study, we will be removing some of the artifacts in the background that we really don't like, like the poles, the artwork and several other details. But we will begin slowly, by removing the reflection of the flash on the rear wheel arch extension.
 We will be using the Clone Stamp Tool a lot in this Case Study, as it allows us to 'paint' over something in the shot using a sample from another part of the same shot, thus effectively erasing parts with the use of an area close to the part we want to remove.
At this stage it is important you are working on a view of at least 100% but preferably 150% or even 200% so you can work in detail, this takes precision, but it isn't hard at all, a little patience and following our technique is all it takes.
 The first order of business is selecting an appropriate sample point, we think that the area just to the right of the large reflection on the wheel arch would be just right, so press the 'Alt' key on your keyboard (you'll see the cursor changing shape) and click on that part, after that you can 'draw' over the reflection by using pixels 'borrowed' from your sample point.
We do the same for the reflection point close to the taillight and the one on the side sill where it touches the wheel arch extension, with this we removed all trace of us using a fill in flash for this shot.
 However we've only just started, as we will also clean the pavement around the car, some clutter in the background and naturally those annoying poles in the background, and we will do this using this exact same method we used for the flash reflections : sample a point of reference on your shot and just paint over the parts you no longer want.
Now this will take time, and a lot of errors, so do not paint large areas at once, work in small sections, remember you can always Ctrl-Z/Cmd-Z to undo your last few actions in PhotoShop, which will come in handy when you are cleaning up your shots like this.
 For these precise pixel editing actions in PhotoShop we actually don't use the mouse as it isn't really suited for this, we use a tablet for this kind of post-processing, these exist from several makes but the Wacom ones are the very best. A tablet actually allows you to use a pen, which is much more logical to work with as you are already used to drawing with pencils since kindergarten.
After a while you should get to this result, the surroundings have been nicely cleaned up and the poles in the background are gone, our image is nearly finished now, only thing that remains is that dull sky, we will have to fix that too.
Step 5 : The sky is the limit
The trick now is to find a suitable sky that you've shot earlier, perhaps even at a totally different location, it doesn't really matter actually, just make sure you get the shadows on the clouds right, that is all that matters in this case.
 The nice blue sky and a few little clouds would be just right for our Countach shot, so we use the selection tool to draw a rectangle around the top part of this photograph, hit the Ctrl-C/Cmd-C to copy the contents of the selection into the clipboard and close this image again.
On our Countach shot we paste the selection on top of everything using Ctrl-V/Cmd-V, it will not fit correctly, but we'll handle that now. Hit Ctrl-T/Cmd-T (transform) and locate the lower right handle of the sky (this is a small rectangle, you should have eight of them in total, one on every corner and one in the middle of every line).
 Click and drag this lower right handle until the sky covers all of the original sky in the Countach shot, as you see in the image to the right. Only problem is that our horizon isn't a perfect line, so we will have to work on the parts were the new sky touches the horizon in our underlying image, hence we create a mask on the sky layer.
Step 6 : Masking the sky
 We will start by creating a Layer Mask on the 'Sky' layer (Layer >> Layer Mask >> Reveal All), this will allow us to paint over the sections that actually touch the original horizon in our Countach shot, hence making the impression complete the sky was there in the first place.
 Painting in mask mode is somewhat different than normal painting, here you will only use black and white, the black sections will show the underlying layer while everything that is white on a mask will show the upper layer, you can even work with gradients to have a smooth transition from top to bottom for instance.
Step 7 : Blending in the new sky
 Our sky is now nicely touching the horizon in our shot, but it still doesn't look very good, the intensity of the blue in the sky is too much for the lighter shades in the background of our original shot, so we will be adding a gradient to blend it better.
To make sure we are only 'painting' this gradient on the sky we will use a clipping mask, just create a new layer above our masked sky (Layer >> New >> Layer or Shift-Ctrl-N/Shift-Cmd-N), then make a Clipping mask of this layer (Layer >> Create Clipping Mask or Alt-Ctrl-G/Alt-Cmd-G)
 Select the gradient tool and make sure you have a white to transparent gradient selected at the top of the screen, now drag the mouse from just underneath the sky to somewhere along half of the new sky, this way we'll paint a white gradient only on the section that is actually touching the original horizon, making it blend in much better. Problem is that the effect is a bit 'over the top', so we'll lower the opacity of this clipping layer to around 50% which gives the look we wanted.
Step 8 : The Soft Light layer
 To create the impression of a gradient ND filter we will add a new layer (Layer >> New >> Layer ...) on top of all the others and set it's blending mode to 'Soft Light', filling this layer with a gradient from black to transparent running from the top to the bottom of the picture wil effectively darken the top of the image, thus intensifying the blue sky but still leave the bottom part of the image alone.
 As usual the effect was a bit overwhelming so we lowered the opacity of the Soft Light layer to about 50%, you can play around with the opacity to make it more to your liking, this again is a personal setting which can be very different for various images.
Step 9 : Final touch
 Most likely the image would have been finished now, but we wanted to emphasize the red Lamborghini Countach even further by darkening the surroundings, this is easily done by adding yet another Soft Light layer over the entire shot and using a mask to leave the car itself untouched.
As the result might be too dark we again play around with the opacity of the layer to make it look just right, it gives a totally different look to the shot, making the bright red Lamborghini really pop while the background is no longer distracting us because it has no light colors anymore.
 One final process we always perform on our automotive shots is removing the license plate on the car, just for privacy reasons, if it is a special plate we might consider leaving it on, but most of the time we cover it with one of our own custom plates. In this shot we didn't have the opportunity to do this so we will edit it in PhotoShop.
And we are finished ! It took nine steps to go from a rather dull looking shot to a nice, saturated photograph that could be used inside a magazine. Modifications like this take time, but the end result is worth it, the stunning late 1988 Lamborghini Countach Quattrovalvole looks so much better now.
 |
CPT Premium member BONUS : 52791 If you would like to print this Case Study you can download our special PDF which is optimized for hardcopy layout. We even included the PSD file for this specific image so you can take a look at our settings. |
Note : commercial use or publishing of our tutorials in any way, written or electronic, is strictly forbidden, we present these for your personal development only. None of our material may be published in any way without prior, written permission from the Car Photography Tutorials founder. All workflows and photographs are copyright protected and owned by the Car Photography Tutorials team unless stated otherwise
Advertisement
Become a MEMBER
Premium Membership
Become a CPT Premium Member and download all our tutorials including a PDF for printing and the result as a PSD file with layers if any.
Interesting articles
Do I need a fistful of dollars ?
We get this question on a regular basis : how much do I have to invest to get started as a car photographer ? We explain our vision in this article : don't go for the cheapest way but get it right from the start.
Buying a tripod for car photography
A lot has been going on about tripods, do you really need one when your main objective is to photograph cars ? We go over the advantages and the problems and help you to select the best one.
The secrets behind a great car photo
Ever wondered why your shot doesn't look as good as the one of the same car in that magazine in front of you ? We give you a few tips to take better photographs here.
Photographing a major motorsport event
Motorsport like car races are always very interesting events to capture as an automotive photographer, we explain how to make the best of your experience.
FAST TIP : a polar filter in car photography
In this tutorial I show you just how to use a polarization filter correctly and combine multiple layers together
Keep up with CarPhotoTutorials
Why not follow us, become a fan, get our RSS feed or mail a link to a friend ?
![]()
![]()
![]()