POST PROCESSING AUTOMOTIVE EVENT PHOTOGRAPHS
Canon EOS5D Mark II - Canon EF24-105mm f/4.0 L IS - 65mm 1/60 sec f5.0 ISO200
Advanced level tutorial by Mark
We all know the drill, we've been to a car show or outdoor event and we've encountered some amazing cars during the day, we've been able to get some decent shots but as usual during these venues the background is really bad and distracting … and to make things worse, the cars are always parked too close to each other to get high quality shots.
 So what can we do about this ? Well you have two options : one is to ask the owner of the car to take a little drive with you to a better location, but this isn't always possible at an indoor event and you'll have to locate the owner of that specific car. A better approach would be to ask for a one on one photo shoot at a different time, but with the larger shows chances are the owner is a foreigner that came to the show as a one time stop, and he'll be leaving the country soon.
So we are left with option two : take the best shot you can get and worry about the rest in post processing. Do note that we don't like this approach, we always advice you to avoid as much post processing as possible, you have better things to do than to spend hours behind the screen of your computer right ? However sometimes you have to play the cards as you receive them, and the only option is to trust your Photo Shop skills to get the shot you want.
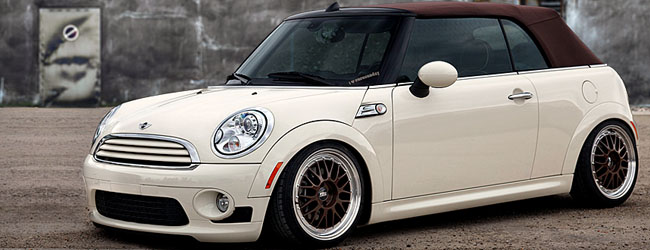
 We'll use one of the shots taken during a really nice outdoor meeting showing a low riding Mini Convertible, as you can clearly see the building in the background isn't doing us any favors and the black Mini to the left is really bothering us … to be honest that decal on the windshield is drawing way too much attention too, so we'll be tackling all these issues in post processing now.
The background
 First things first, the biggest issue with this shot is the background, so we'll replace it with another one from our collection (it is always nice to put together a selection of buildings, skies and backdrops without any objects in the foreground, this way you can use them later on to replace horrid backdrops on shots like this one, you can also locate several hundreds of backdrops like this online by the way, just make sure they aren't copyright protected !)
 We feel a nice industrial building would look perfect behind this clean Mini, so we went for a gray structure, naturally it covers the upper parts of the car, so we'll apply a mask (don't erase parts of the background, but mask them instead, this way if you make a mistake you can always step backwards).
The trick to a perfect background replacement is patience, it takes a lot of patience and a steady hand to draw the mask so it nicely cuts out the car from the background, we use a tablet to be honest which makes things a bit easier, but it can be done with a mouse too, don't worry, it does help when you zoom in to at least 200%.
Other cars in the picture
 With the background nicely cut out we have another issue to handle, the black Mini at the left, it has to go so we'll clone it out using a part of the original setting. Now we've always told you to use the Rule of Thirds when composing a shot, but when you know you'll be post processing the shot you can get away without sticking to this rule, in this shot we knew we were heading for trouble so we took into account some extra space at the right of the car to have something to clone over the black car at the left.
And that's exactly what we'll be doing, creating a new layer and selecting an origin point at the right and just paint over the black car (remember to select 'current & below'). Close to the bumper of the Convertible you'll again have to work at 200% zoom at least to get it right, but with a bit of patience we're sure you'll manage.
 Using the clone tool in Photo Shop CS4 is rather easy because it actually shows the 'origin' when hovering the Clone Brush over the section we want to paint, make sure you get this right to get the impression needed, if it looks artificial it isn't working, the trick is to make it look like it was there all along. Some might call it a day now, the image looks good, but not yet good enough for us, so we'll continue to fine tune it.
Reflections
 Take a closer look at the side of the Mini, you'll notice the reflection of a wheel from the car at the right of this one, we'll clone it out just like we've removed the black Mini on the left. Again create a new layer and start cloning the disturbing reflections away with a soft shaped brush, just a few strokes here will go a long way to make the image look a lot cleaner.
Upon closer inspection we also noticed the black car we removed at the left of the frame cast a reflection on the front bumper of this car, another wheel just had to go ... again using the Clone Stamp Tool to paint over the section and get a nice, clean bumper.
Darker bumper on one side ?
 We're almost done in this part now, but what really makes an image stand out are those pesky little details, and we've found one that just had to go : because of the black car that was parked at the right we've got a darker reflection on the left side of the bumper on our main car … adding a soft light layer and painting some white over it will clean this one up instantly.
Naturally the effect was again too harsh, so lowering the opacity of the layer to about 75% made it look nearly right, it still isn't perfect so a bit of cloning and fine tuning to get it just right and we can move onto the next step.
Rims and tires
 Note how dark the wheels actually are on this car, because it is a bright shade the exposure measurement on your camera could be fooled into a rather dark exposure to get the bodywork right, no problem, just add a soft light layer and paint a bit of white over the tires, the wheels and the front grille … it might be too light now so let's lower the opacity of the layer to get it just right, in this case a setting of 30% came out just perfect.
Brightwork
 We are fine tuning here, so let's tackle the brightwork (or chrome) in this shot too, again a soft light layer, but now we'll paint black over the headlight and the chrome surround around the headlight and the grille to intensify their color. This method is also a nice alternative when you've forgotten your circular polarizing filter, up to a certain extend you can get a similar look without actually using a filter.
Decals
 One thing that has been jumping into our eye from the start is that bright decal on the windshield, it draws way too much attention if you ask us, but again there is a very easy remedy for this : put a black&white layer over it and mask everything but this decal, that way it will turn dark gray and won't stand out so much.
We could go for a complete erase by using the clone tool, but that's not what the owner of this car wanted, he was rather proud of this decal, so we decided to tone it down a bit, it's still there but it doesn't scream for attention anymore.
Straight lines
We noticed one more thing straight from the start … take a look at the road, it isn't level in the shot, it looks like the car is bound to be rolling of to the left because our road is a bit tilted, we'll have to correct this, even more so because the backdrop we've selected is perfectly lined up.
 This isn't as hard as it sound actually, just make sure you've selected the background layer (with the original photo on it) and use the 'Polygonal Lasso Tool' to select the curb on the road (use the tool with the straight lines to make your life easier), now do a copy/paste so we'll have an extra layer right on top of the image (underneath all our previous editing layers) and hit the Ctrl/Cmd-T option to transform this selection.
We will now bring down the left corner a bit and raise the right corner so it looks like the road is level on our shot, don't worry about small stone chips that are duplicated now. Once it's level we will use a soft eraser to make the transformation from the lower background into this new curbside layer a bit smoother … if there are still a few stones that don't look right hit the Clone tool again and clone them away until you are totally satisfied with the look and feel of your brand new, straight road.
Window tint
Ok, this is a personal thing, but we just love cars with dark tinted windows, and we tend to include this into our post processing workflow when we are happy with the overall look of the image, it just makes a car like this one look even more impressive, and it covers up the fact that the background visible through the windows isn't really the same as the new one we've mounted behind the car.
 You've red it before : add yet another soft light layer and just paint over the windows with a black brush, again the effect is too harsh and lowering the opacity of the layer to 60% or so made it look just right. The trick here is to keep the reflections in the windows and leave them just a bit transparent while still giving the impression of a dark tint. Check out the result by making this layer invisible and visible again … of you don't like the look lower the opacity further or remove this layer completely, we actually liked it at 60% to be honest.
Vignetting
Oh no ! We've bought some of the most expensive lenses to avoid this and now we'll put it back in using post processing ? What have we been eating lately you might wonder.
 Putting in a carefully chosen vignetting will draw even more attention to your car (or model) and it is a method we often use, especially if the background isn't a lot darker compared to the car in front of it, but don't overdo this effect or it will ruin your shot.
In this case we added a new soft light layer and pulled a gradient fill over it from black to transparent starting at the very top of the image right up to the lower part of the building in the background … problem is that now the top of our car is too dark !
 Not a problem, remember we had to carefully mask out the new backdrop around the car … we can now use this very same mask to lighten up the car but still keep the building underneath the soft light gradient … just 'alt-click' the mask of the backdrop and drag it onto our new vignetting layer, accept the mask replacement and we're done, the building has a nice, dark look to it and the car remains light and fresh.
Add a new soft light layer and draw a similar gradient from bottom up to the wheels of the car and we'll darken the lower section of the frame too. We've kept both 'vignetting' layers at 100%, but again, if you don't like the looks lower the opacity until you do appreciate it.
Overall color balance
You might be wondering when we would come up to this section, the color balance of an image is very important and we would normally start out by using 'Levels' to correct any White Balance issues that came through our raw to jpg workflow.
 Well there is a very good reason to keep this one until last, because it has to level out everything in the shot, the new backdrop, the section that was drawn over the black Mini, the removal of the reflection on the side … etc. So why bother with it earlier, our shot is just about ready, so finish it with a Levels Adjustment layer, select the 'Black Sample point' and find a part of your shot that should be black (inside the front wheel well for instance), subsequently activate the 'White Sample point' and go for an area that should be neutral white (inside the headlight perhaps ?) … notice how the image totally changes and gives us a much warmer impression … take into account this shot was taken on a very cloudy day, no sun in sight, but with this little extra effort we managed to get a much better feel about this photograph.
Conclusion
There you go, about an hour of work and we've turned a snapshot taken at a local, outdoor car show and transformed it into a photograph … just to show you that you shouldn't discard your event shots too quickly, sometimes with a bit (or a lot) of post processing you can still create small masterpieces from shots that you were about to toss into the trash.
 |
CPT Premium member BONUS : 134586 As a registered member of CarPhotoTutorials you can download this tutorial in a format for easy offline reading and even printing, we have also included the layered PSD file for you to check out. |
Note : commercial use or publishing of our tutorials in any way, written or electronic, is strictly forbidden, we present these for your personal development only. None of our material may be published in any way without prior, written permission from the Car Photography Tutorials founder. All workflows and photographs are copyright protected and owned by the Car Photography Tutorials team unless stated otherwise
Advertisement
Become a MEMBER
Premium Membership
Become a CPT Premium Member and download all our tutorials including a PDF for printing and the result as a PSD file with layers if any.
Interesting articles
Off camera flash car photography, part 2 of 2 : the shoot
You managed to buy the necessary items to get into off camera flash photography, in part 2 of our tutorial we explain how to use it.
Lenses, what do all those characters actually mean ?
Looking for a new lens but got at bit confused with all those terms ? We explain them in understandable English for you.
FAST TIP : a polar filter in car photography
In this tutorial I show you just how to use a polarization filter correctly and combine multiple layers together
Scale car photography explained in detail
In this article I guide you into scale car photography, from the preparation over the setup including lights, aperture, shutter speed and then taking the shot ... a lot of these tips can be used on full size cars too.

Adding authentic looking motion to still images
Sometimes you just have to get a sharp image of a car, but spinning wheels would be nice, we explain you how to achieve this in post processing.
Keep up with CarPhotoTutorials
Why not follow us, become a fan, get our RSS feed or mail a link to a friend ?
![]()
![]()
![]()