BEHIND THE SCENES OF A PROFESSIONAL CAR SHOOT
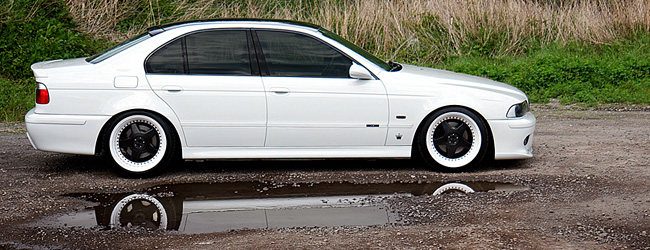
Canon EOS40D - Canon EF-S17-55mm IS f/2.8 - 33mm 1/250 sec f2.8 ISO100
Intermediate level tutorial by Mark
 In this article I will take a look behind the scenes of a professional car photo shoot, one that I recently had the possibility to attend during a model shoot actually, now the model might not be interesting (however ...) but the cars that were gathered were really nice, for one the white BMW 5-Series Fat Boy and a black BMW 5-Series with full Hamann Motorsport bodykit.
The first one being a white car while the Hamann car was a black one, not the easiest shades to photograph (there is no fun in shooting a red car now is there ?) so I will show you just how to take a decent shot in the first place and make it an outstanding masterpiece ready for publishing in post processing.
STEP 1 : setting up the shoot
Your first order of business is naturally to plan the shoot, you have to get in touch with the owner of the car (or owners in this case) and decide on a date, time and place you will encounter each other, note that this doesn't necessarily need to be the spot for your shoot, most of the time a parking lot that is easily found would be best.
 Once you've made an appointment it is time to decide on the equipment you are taking to the shoot, for starters make sure you charge all your batteries the day before the shoot, also check the memory cards you intend to use, format them inside the camera to make sure you can take as many shots as possible (after you've copied the photos that are still on them onto your computer naturally).
I usually take two camera bodies with me, one with a wide angle on it and the other one with the Canon EF70-200 f/2.8 IS USM for those shots where you have the space available ... why such a telephoto zoom lens you might ask ? I will get into that later on.
 As a wide lens I usually put the Canon EF-S17-55 f/2.8 IS USM on my Canon EOS40D, but I also pack the EF-S10-22 f/3.5-4.5 USM and the EF24-105 f/4.5 IS USM lens in the bag, just in case. Don't forget your circular polarizing filter, a cloth (just in case) and a remote shutter control for those longer exposures.
Also think about your tripod, you might not need it, but remember that every professional car photographer will use a good tripod for the static shots, it is indispensable in fact, so take it along anyway. I also pack all my external flash units compete with radio triggers, stands and umbrellas, just in case I need some extra light to bring out the details in a shot, again you might not need these, but if you do and you've left them at home you're in trouble.
STEP 2 : the shoot itself
It is really important to take your time for an automotive photo shoot, if you rush things it will show in the photographs, Rome wasn't built in a day, and your award winning shot will most likely not be taking without decent preparation either, so make sure both you and the owner of the car have time to spend.
 First decide on a location for your shoot, indoors or outdoors, it all depends on the end result you are trying to achieve, personally I would tend to take as many shots as possible outside, if weather permits, but sometimes you are forced to work indoors, and in this case those flash units will come in handy.
Flash photography on cars is a totally different technique that I will unveil in a future tutorial, so for now I will focus on the outdoor shots, make sure you've taken a look at my 10 tips for your first outdoor car shoot tutorial for the basics on a car shoot in daylight.
When you are looking around for a location make sure it suits the car, this black Hamann tuned BMW 5-Series was just perfect on a gravel pit with some industrial siding behind it, the black nicely contrasts with the light shaded background, take this into account to make the car 'visible' on the background, a dark background with a black car would be a difficult shot.
STEP 3 : photographing the car
 Once you've decided on a place and a time (preferably in the late afternoon on a sunny, but cloudy day) it is time to start photographing that stunning looking car in front of you, so you start thinking about which angles you would like to have in your shots, this is where your relationship with the owner comes in handy.
He will have to move his car around several times during the shoot, so the better your relationship with him (or her) the better you will get away with asking him to move the car just a few inches more to get the shot you want, as it is better to move the vehicle than to take another angle in some cases.
Because you will be keeping an eye on the position of the sun (preferably on your back, remember ?) the car will have to be positioned just right so there are no harsh shadows visible when you take that award winning photograph.
STEP 4 : the angles
A lot has been said about which angles you just have to take when photographing a car, and I will repeat myself again in this section. These are the most important angles you just have to take during a professional car photo shoot : Front three-quarter shot from headlight level, Rear three quarter shot from taillight level, Full frontal and full rear view, Full side view from a low level and if possible a front and rear three quarter view from a higher level.
 This latter shot might require you to bring a ladder, fortunately the location I selected for this photo shoot had some other options, I could go up a slope on one side while large containers were parked on the other side, with a ladder on the side to get on top of them. Always keep in mind that you might not be allowed to climb on top of a container, so a nice stepladder might be a great idea to add to your equipment list.
Normally I also include some interior shots in my shoot, these require some very different settings, and most of the time extra light equipment, so I won't go into details in this article, a full tutorial on 'car interior photography' will be available next.
QUICK TIP : take multiple exposures
If you take your car photography serious you should have lots of shots when you finally come home after this type of photo shoot so how about an additional tip from me : take two or three exposures from every angle you work on, especially if you are hand holding the camera .
 This is a small trick I always use, especially when photographing the interior or engine of a car. You might ask yourself why bother with more than one exposure ? The answer is very simple, and totally logical at the same time : if you only take one shot and it isn't perfect you are in trouble, if you take two or three chances are that at least one will be perfect ... just delete the others when you get home, that's the joy of using digital cameras, it doesn't cost a dime more to take a few extra shots.
For instance : if you only take one shot at say a 1/10 exposure you will have to need a very stable hand to avoid camera shake, however when you take two or three successive shots (with the camera in burst mode) you will end up with at least one tack sharp shot, a great way to get that dark interior shot done just right.
Another option is to 'Bracket' the shots, this will put the camera in a mode that will take three shots in a row, one exposed normally, one under exposed and one over exposed a pre-set value (up to -2/+2 on a Canon for instance), this allows you to get your exposure wrong and still be able to get the shot right afterwards. You will probably only use on of these three exposures (or combine multiple exposures in a HDR shot) but at least now you can select the one that turned out best.
STEP 5 : wrapping it up
A nice car photo shoot with one or two cars shouldn't take all day, you don't want to test the owner's patience too much, especially when you notice them taking a look at their watch ... which should be your queue to wrap it up.
 During this particular shoot I had the luck that both cars were owned by really nice people that let me take all the time it would take ... which ended up being about three hours actually, and I stayed on the same location all the time.
If you plan on taking the car (or cars) to various locations you should count on at least 4 to 5 hours, or sometimes even an entire day, remember that the cars could get dirty if you drive them over public roads, keep this in mind when you plan your locations, if it rains try to think about a nice big garage lot.
Make sure to leave your business card with the owners, normally they should already know you from when you arranged the meeting, but better be safe than sorry, also get their address so you can share your work with them afterwards, every owner I ever worked with was really pleased to receive at least some of the shots taking during the day.
STEP 6 : coming home
You probably come home with hundreds of shots from this kind of car photo shoot, so first order of business it to copy all your memory cards onto your computer, which takes time and space, once you get serious about photographing cars you will notice that you never have enough space on your computer, so external hard disks are a necessity these days.
 Copy all your photographs onto your internal hard drive, if you've worked your way through all your cards copy every single shot onto a back up disk, preferably an external hard disk, so you will be safe when things go terribly wrong with your computer, once the original photographs are copied onto your backup disk power it down (remove it correctly from your system) so they stay safe.
Now it is time to go over your pictures and select the good ones, I use Adobe Bridge to organize my photo shoots, actually before I copy my cards I create a directory on my PC with the full date and a small description of the car or event I've covered, this way the shots are ordered by date and I can quickly find the images I need. Once inside Bridge I can work with the rating system to quickly select the good shots.
 I use from three to five stars to select the shots I want to keep, three stars for the good shots, four stars for the really nice ones and five stars for the near perfect shots ... after going over all the shots (I know, this can take some time) I ask Bridge to order the shots by rating and actually delete everything I didn't attribute a rating to, no use in keeping all the images if you will never use them, and remember you still have a backup of each and every shot anyway.
I always shoot in RAW, so now it is time to start developing the photographs that remain (you should have 'trashed' the snapshots in the previous step), normally I always use Adobe Camera Raw for this step, however I've been using DxO Optics Pro for some time now, and the results are more than adequate for most purposes anyway.
After DxO worked it's magic on the photographs I run them through an action in Adobe PhotoShop to resize them to 1800x1200 and put a watermark in place, after that I burn all these shots on a DVD, put it inside a nice box complete with inlay and give it to the owner of the car so he can select the images he really likes.
STEP 7 : post processing
 To explain the post-processing I usually perform after a photo shoot I've selected one shot that I will go over the entire process with you so you can gather ideas from this workflow.
This shot shows the car from the classic front three-quarter view, however I have composed the photograph in such a way that the BMW is positioned at the upper right corner of the crop, with a nice reflection in the water in front of the car.
 The original image isn't too bad as you can see, however the background did annoy me a bit, especially that small bit of wall in the background and a wooden frame that I didn't notice while shooting ... however fear not, a little cloning in PhotoShop will get rid of it quickly.
The trick with cloning is that you will need a good starting point, now I knew the moment I was taking this shot that any cloning would be rather easy as the backdrop is a nice metal structure, so I just have to select a point on the siding above the wall and gently 'clone' it on top of the exposed bricks ... a bit of patience around the rear view mirror and minutes later I end up with a complete wall behind the BMW, no more distractions.
Remember to leave just a hint of grass on the section where the siding is touching the ground, otherwise it will look too artificial and you would want to avoid that at all costs.
 Now it is time to adjust the colors a bit, make the image 'pop' more. For this I will use a 'Levels' adjustment layer, just go to Layer > New Adjustment Layer > Levels ... and select a black and a white point on your image, you will see the color change at once, now start sliding the center point to make the image darker or lighter, whichever you prefer.
This should make the white on this car really bright while the black parts should turn to solid black instead of a dark grey, also note that the reflection in the water comes out better now because you've increased the contrast between the colors in this step.
The next step is to take care of the darker section I noticed on the front bumper, in fact the car should have been moved a bit more so the entire front was towards the sun, however this would mean a totally ruined background if I wanted this angle, so I decided to adjust it in post-processing, which is easy as you will see.
 I'm adding a new layer (again), select Layer > New > Layer ... and put the 'Mode' to 'Soft Light' instead of Normal, this way I can Dodge & Burn by simply painting with black or white on this layer, just the tool I need to 'enlighten' the front bumper.
Take a soft brush and 'paint' white over the sections that appear too dark on the front bumper, naturally the effect it too strong, but after I dial the Opacity of this layer down to 50% it is just right and looks just the way I wanted from the start.
I personally always make my object stand out of the photograph better by adding some vignetting to the exposure, and with a white car this is even easier than with darker shades, the trick is yet another new layer, so go to Layer > New > Layer ... and again turn the Mode into 'Soft Light'.
Now select the gradient fill tool and press the 'D' key to set the foreground color to black and the background color to white, also make sure you've selected a 'Foreground to transparent' gradient. Now draw from the top of the image down to about halfway ... this will give a darker shade at the top of the image that turns totally invisible towards the middle.
 Most of the time this will again be too much, however in this case I don't change the opacity of the entire layer (I'll tell you why in a moment) but I will change the opacity of the gradient fill itself, go to Edit > Fade ... and lower the value there until it looks good to you. Now draw another gradient from the bottom of the image towards the middle, making the puddle and gravel look better.
If I would have changed the opacity of the entire layer now it would also make the bottom gradient lighter, and I actually like it this dark, that is why I played with the actual fill opacity for the top section.
Now I did notice that I also made the top of the car itself darker with this gradient, so I select the 'Eraser' tool and just erase the parts where the dark gradient touches the windshield and bodywork of the car.
Most of the time this would be the end of my post-processing, however on this shot I wanted to continue a but further, did you notice the tires on the car, because I was shooting on gravel they got dirty. In this case you have two options, either bring along a towel to clean them on the spot, or handle it in post processing like I will do now.
 This is a trick I've learned from experience : add yet another layer (Layer > New > Layer ...) and select the Brush tool, make sure it is a small, soft brush and that black is still your foreground color (you've selected it when you drew the gradients remember), now just paint over the parts of the tire that are dirty, they will turn completely black, don't worry about it for now.
Once you've covered all the parts it is time for the magic, go to the Opacity setting for this latest layer and start lowering it (select the value and press Shift-Down Arrow for 10% steps), you will slowly see the thread of the tire appear again. If you lower the Opacity too far you will see the dirt again, so the trick is to put the value at a level where you can still see the thread but you don't notice the dirt anymore, in this case I've put it at 60%.
On a white car a dark window tint always looks good, now the owner of this BMW didn't put a black window tinting film on the glass, but I will install it anyway in post-processing. As usual on a new layer (Layer > New > Layer ..). As the side windows aren't really visible from this angle I will only apply if on the windscreen, so I select my brush again and start painting with black all over the parts that I want to apply a dark tint to.
 Naturally now the windows are completely black, which they rarely are, so I will again lower to opacity of the layer to get the impression I'm looking for, at 50% I really liked the dark look that still leaves something visible from the interior. I still wanted one more thing actually, if you take a look around at a tuning show you will most likely see that the side windows are dark but the back window is just about completely black, this was the look I wanted on this car too, so I added yet another layer and 'painted' the rear window black, lowered the opacity to 50% and that's it !
 This high angle view of the same car has been through a similar workflow as described above, some cloning, a levels adjustment to bring out the white shade of the BMW, some Dodge and Burn to brighten up the dark parts and make the dark parts even darker, cleaning the tires and putting window tint in place.
A photo shoot takes some time to get done right, however post processing correctly will take even more time, that is why it is very important to select only the good photographs before you start your PP skills, there is absolutely no reason to start working on a sub-standard image. A good photograph can be turned into a great one, a bad photograph will never become a good photograph, no matter how good you are in PhotoShop.
 |
CPT Premium member BONUS : 82541 If you would like to print this article you can download our special PDF which is optimized for hardcopy layout, the archive also includes the photograph used in this article in layers so you can see the progress ... |
Note : commercial use or publishing of our tutorials in any way, written or electronic, is strictly forbidden, we present these for your personal development only. None of our material may be published in any way without prior, written permission from the Car Photography Tutorials founder. All workflows and photographs are copyright protected and owned by the Car Photography Tutorials team unless stated otherwise
Advertisement
Become a MEMBER
Premium Membership
Become a CPT Premium Member and download all our tutorials including a PDF for printing and the result as a PSD file with layers if any.
Interesting articles
DOF - Depth of Field
In this article we take a look at the different aperture settings you can use while photographing cars, setting your DOF can create some amazing effects.
Lenses, what do all those characters actually mean ?
Looking for a new lens but got at bit confused with all those terms ? We explain them in understandable English for you.
Your second shopping list
You have all the basic equipment, and you feel comfortable working with it ... now it's time to take your gear to the next level.
Creating a photo from a showroom snapshot
Sometimes you just don't have the option of setting up a nice area for a shoot, for instance when you are in a showroom, but fear not, we show you how to make a photograph out of a snapshot in post processing
Make panning shots like a pro
We all made these mistakes at first, but after gathering some more experience we could pinpoint these mistakes and share them with you so you can avoid them.
Keep up with CarPhotoTutorials
Why not follow us, become a fan, get our RSS feed or mail a link to a friend ?
![]()
![]()
![]()