FAST TIP : A POLAR FILTER IN CAR PHOTOGRAPHY
Canon EOS40D - Canon EF-S17-55mm f/2.8 IS - 20mm 1/15 sec f5.6 ISO100
Fast tips by Mark
We all know a decent circular polar filter will be able to safe the day once you get serious about automotive photography, I used to buy UV filters to protect my lenses (don't do that anymore to be honest, the original shade offers enough protection most of the time) ... but have you ever had the problem you were unable to get rid of all the reflections ?
It's either one side that looks good, or the other side ... but never the entire car at once, that's why I tend to take several shots of the car while adjusting the angle of the polar filter in between exposures, effectively eliminating just about all the reflections in the end ... but I end up with at least two shots, now what ? Easy, I will put them together in post processing by using layers and masks to show just those parts of the car from one shot in the second shot.
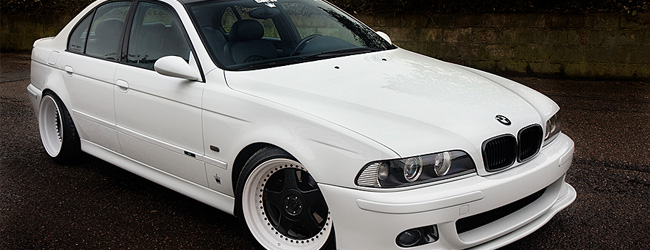
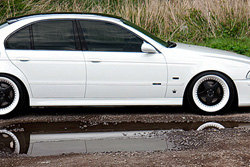
These are my two out of camera (OOC) shots of a white BMW that has been personalized a bit :

Neither shot is perfect, but in one the front windshield is clean while in the other shot the side windows are clean of reflections ... now it's time to put it together.
First open one of the shots in PhotoShop and select the entire image by pressing Ctrl-A, then cut or copy the image into the clipboard (Ctrl-X or Ctrl-C, either will do the trick), now close this image ... without saving ! Very important, we don't want to change the original image file, you never know you might need it again in the future.
Now create a new document (Ctrl-N) and just click 'OK', no need to change any of the settings, they are set to the content of the clipboard anyway so I can leave them 'as is'. Once the blank document is there hit the Ctrl-V to paste the first image into place. Time to open the second exposure, again Ctrl-A to select the entire shot, cut or copy the image (Ctrl-X or Ctrl-C) and close this file again (Ctrl-W)... do NOT safe the changes to keep the original image intact !
With this second image closed again I am automatically returned to my new document that already contains my first exposure, just hit Ctrl-C to paste the second exposure on top of this one and I'm halfway done already. The order of these shots isn't really that important, you will be exposing parts of one shot into the second one, which one lies below doesn't matter anyway.
Now I have two options : I either use the Eraser Tool (hit the E key to select it) to remove parts of the upper layer and show the lower layer through the holes, but that would be 'destructive editing', once I've erased parts and saved the PSD file I can never get things back in case I messed up something, so I will not be using this method, instead I go for a second option : the Layer Mask way.
 So I go to Layer > Layer Mask > Hide all, this way the entire top layer will be rendered invisible for now, if you take a look at the image above you'll notice the windshield is nicely polarized, but when you look at the image below you will see the side windows are now polarized and I have a completely black Layer Mask hiding my upper image completely.

Making sure I have the Layer Mask selected (by clicking on the black rectange) I select the Brush Tool (B key) and I make sure I'm using a feathered Brush and not a hard brush, now I reset the for and background color to standard by pressing the D key on my keyboard (you'll notice white is foreground, black in now background) and I just brush over the parts that I want to be shown from my upper layer. In my case the windshield and the engine cover.
If you make a mistake here, no problem, just hit the X key on the keyboard to swap the colors and brush over the section you missed with black, and it will again become invisible, that's the advantage of the Layer Mask method, you can make errors and correct them perfectly, even after a few days or weeks if you've saved the PSD file with layers in it ... this is what is called 'non destructive post processing' and I always try to remember that.

Take a look at the above image, by painting white over the correctly polarized parts I get a nicely balanced shot that would never have been possible with only one exposure as it would have been totally impossible to set the polarizing filter in a correct angle to remove reflection on the windshield on and the side windows at the same time.
Now most of you might call it a day, but apart from putting one exposure on top of the other this is still an OOC shot with no post processing at all, and I don't have the habit of delivering out of camera shots to my customers and I strongly advice you don't either, so this is merely the starting point for my post processing that I've unveiled in several other tutorials already, but just for you I will quickly repeat the process on this one.
Now this is a nice and clean shot to begin with and with a bit of retouching here and there I will now turn it into a photograph ... let's see if you've caught the issues with this image ... for one I think the engine cover is a bit over exposed so I'm putting a new layer on top : Layer > New Layer ... and I change the Mode to 'Softlight' (a typical thing in my post processing as you might have gathered by now)

With the new layer in place I again select a feathered Brush (hit the B key) and reset the swatches by pressing the D key, time to paint over the engine cover now, you will notice it turns a bit dim and removes the slight overexposure that was apparent to me. If the effect is too much I just lower the opacity of the layer until I'm totally satisfied with the result ... in this particular shot I left the opacity at 100% however as I was quite pleased with the subtle result.
I also feel the side of the car is just a but too dark, so using the same technique as described above I'm adding a new layer in Soft Light mode, but this time I paint with white instead of black, this will lighten up the side of the BMW, but at 100% the effect it too harsh, so I lower the opacity of this new layer to only 65%. Do note that this is a totally personal feeling, and it is different for each photograph you are post processing, for me these opacity settings looked good, perhaps you don't like it, either too bright or too dark, so feel free to experiment with the layer opacity on your own shots until you like the result.
The last step in my post processing workflow is usually a touch of vignetting on the image, I like to have dark corners that make the car in the shot stand out even more, this works especially good on bright cars, adding such a vignetting is easy, I just add yet another Soft Light layer and paint a gradient from black to transparent from the top of th image to the top of the car and repeat the same thing at the bottom of the shot ... here's the result :

The problem is I'm still not happy with this shot, the background is drawing my attention away from the main subject, the white BMW 5-Series, so I will now take the post processing one step further to draw focus to the car instead of the cluttered background (I could replace the background entirely, but I want to show you another way on this shot)
First I will make the background darker, that will automatically keep people from putting their focus on it, the human eye is always drawn to the brightest item in the photograph, and I want to make sure this is the white car in the lower left corner, and this can be done perfectly with a new adjustment layer.

I now have yet another layer, and because this is an adjustment layer it automatically comes with a layer mask revealing all, so all I now need to do is adjust the sliders until I'm happy with the result, only problem : this will darken the entire photograph, but for now I'm concentrating on the background, and the moment I like the way that is looking I will paint with a black feathered brush on the adjustment layer mask to cover the effect on the car and the parts I don't want to make as dark as the background.

So the background is now toned down a bit, but I still get drawn to the top left corner, the sky is white and I don't like that, so I'm going to tackle this right now, adding another Adjustment Layer, but this time using the Black and White option, however instead of leaving the setting on black and white I actually use the 'Tint' option and dial in R225 G211 B179 making the image turn a rather special shade of sepia.
Now don't worry, I will not leave the entire photograph in this 'old style', only the top of this photograph could benefit from this overlay, and as this is again an adjustment layer it already has a mask, just put a black to transparent gradient from bottom to top and I'm done, just the effect I was looking for in this shot.

There you have it, taking a few exposures on site with different polarizing filter settings and putting them together in post processing can give you the reflection free effect we crave for, just one more tip : don't get over excited, a car is still glossy (well most of them are, the mat shades are gaining popularity) so you should leave a hint of reflection in the photograph.
NOTE : do keep in mind that you will be taking multiple exposures, now I don't know about you, but I'm not able to keep my camera still while rotating the polarizing filter in front of my lens, so I put it on a good tripod. And do note I mention a good tripod, you are handling your camera between shots, so the more stable the tripod is, the less motion will happen between the shots. I now use a carbon tripod with a geared head, very stable, but also rather expensive unfortunately.
 |
CPT Premium member BONUS : 142713 Why not download this tutorial in an easy to print pdf document, complete with the psd file containing all the layers I talked about |
Note : commercial use or publishing of our tutorials in any way, written or electronic, is strictly forbidden, we present these for your personal development only. None of our material may be published in any way without prior, written permission from the Car Photography Tutorials founder. All workflows and photographs are copyright protected and owned by the Car Photography Tutorials team unless stated otherwise
Advertisement
Become a MEMBER
Premium Membership
Become a CPT Premium Member and download all our tutorials including a PDF for printing and the result as a PSD file with layers if any.
Interesting articles
Photographing a major motorsport event
Motorsport like car races are always very interesting events to capture as an automotive photographer, we explain how to make the best of your experience.
Virtual tuning in post processing
Sometimes the car you want to photograph just doesn't exist in real life, so you start with a regular model and virtually customize it in post processing ... and this time I show you all the steps in a video
Behind the scenes of a professional car shoot
You've managed a nice exotic super car for a private photo shoot, but how do you manage an outdoor shooting ? We will explain 10 of the best tips for you.
10 tips for your first outdoor car shoot
You've managed a nice exotic super car for a private photo shoot, but how do you manage an outdoor shooting ? We will explain 10 of the best tips for you.
Your second shopping list
You have all the basic equipment, and you feel comfortable working with it ... now it's time to take your gear to the next level.
Keep up with CarPhotoTutorials
Why not follow us, become a fan, get our RSS feed or mail a link to a friend ?
![]()
![]()
![]()