FAST TIP : USING SOFT LIGHT LAYERS
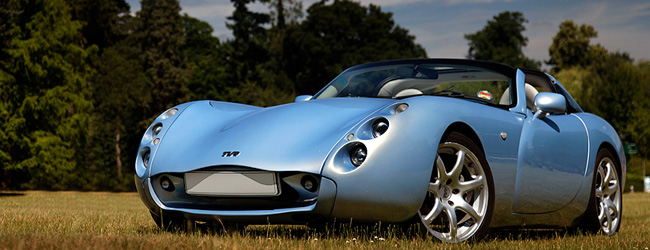
Canon EOS5D Mark II - Canon EF24-105mm f/4.0 L IS - 70mm 1/500 sec f4.0 ISO100
Fast tips by Mark
You've probably red it in just about all our post processing tutorials : using soft light layers to bring out the details in your shots during post processing. Do note that this kind of post processing will not work all the time, but judging by the number of times we actually use it on our work-flow it should be something you master right from the start of your car photography career if you are the least bit interesting in post processing your shots.
 (Move your mouse over the photo above to compare the 'Before vs After' shots)
The post processing steps

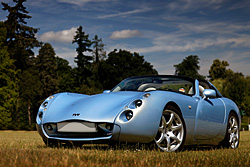
As you can see in this shot of a rare TVR in pale blue, the original out of camera (or OOC) shot looked rather nice, the light doesn't loot too wrong and the color comes out nicely ... but by adding some soft light layers in post processing we can have this car stand out from the background even more.
In this 'Fast Tip' I will explain just how you can improve this kind of automotive shots in a few seconds by putting a layer over the original shot, switching it to soft light overlay and painting in black or white on this new layer ... it sounds a lot more difficult than it actually is, so let's get to it.
You could argue this is a lot like the 'dodge and burn' method used in the good old days when people had to develop film to get a photograph, by putting more or less light during the exposure of certain sections you would actively brighten or darken that area ... just like I will be showing you in this tutorial, but using the digital version of this method.

First things first, open the original image of the car and add a new layer to it (Layer > New > layer ... or use Shift+Ctrl+N) on the option box you now get you can change the Layer Mode into 'SoftLight' instead of Normal.
Once this is done we have a second layer over our original photograph but visibly nothing has changed yet, so select the Brush Tool from the tools on the screen.

Click and hold the mouse on the tool and make sure 'Brush Tool' is selected and not 'Pencil Tool'. Now set the default foreground and background color to black and white respectively by pressing 'D' on the keyboard.
Now look for sections on the car that you feel are too bright, in my case with this blue TVR I would say the corner next to the headlights is a bit light, perhaps even a bit over exposed, but as this shot was taken at a car show there wasn't too much time to fiddle with settings, hence I decided to tackle this problem in post processing ... just paint some black over the 'light' sections like shown below :

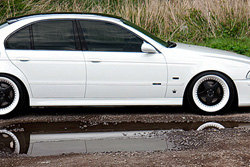
On the above shot I've put the Layer Mode back to Normal to show you were I applied the black brush, if you take a look at the license plate and the front fog lights next to it you will have to agree it looks rater dark, so press 'X' on the keyboard to swap foreground and background so we are now painting in white and go over these sections, and while you're at it, do the same for the white window strut and the roll over bar, they look too dark too :

Now I will switch back the Layer mode to 'SoftLight' to show you the effect on the image, the bright section on the front fender has been toned down while the dark sections on the interior, the front and I also used a light touch on the lower section of the fender ... this is the result :

A nice trick when you feel the 'brush' is doing too much in terms of lighten or darken is by using the 'Fade' option immediately after finishing painting. This option is located in the Edit > Fade Brush Tool ... (or press Shift+Ctrl+F) menu and it allows you to fade the effect from 100% down to 0% ... so I can put just the right force of dodge and burn on my picture without having to change the layer opacity.

By dragging the Opacity slider to the left or by typing in a different value directly into the box I can change the level of intensity my lighten or darken brush strokes on my image. For instance on the lower part of the front fender a full 100% white paint would bring out too much in this section, lowering the opacity of this white brush stroke only I didn't affect any other part of my SoftLight layer, only this lower section of the fender, at about 30% it looked just right.
I could advice you to have a different SoftLight layer for each section you want to attend to, and this is probably the correct way to do this kind of post processing ... always working on different layers making sure nothing you do is 'destructive' on the original image, and having multiple layers allows you to play with the opacity of each section on it's own ... but I tend to forget this too when working on images like this, the customer is waiting for his shots and you have to work as quickly as possible, so sometimes you just forget the basics and end up quickly playing with the 'Fade' of your latest brush stroke.
Almost done by the way, I always tend to put a bit of vignetting on shots like this, not real lens vignet that comes from the corners, but a quick gradient from the top and the bottom onto the car to draw attention even more onto the car and away from the background.

This is probably the easiest part of this tutorial, just create a new layer, again change the mode to softlight and pick a gradient from black to transparent. So after creating the new layer click and hold the Gradient/Paint Bucket tool and select the Gradient Tool.
Now press the 'D' on the keyboard again to make sure we have black as the foreground color, with the Gradient Tool selected you get a special option box at the top of the screen.

Click the drop down button next to the gradient seen in it and now select the one that shows the black shade fading out into the squares ... this means it will fill with black and fade out into transparent, just what we were looking for ...
Now that I have the gradient tool set the way I want it to be I click and hold from the top of the image down to the top of the car which will effectively darken the sky and the trees in the background, making them draw less attention to them and intensifying the blue shade of the sky. To make the grass in front of the car more vivid I will again draw a gradient over it, this time from the bottom of the shot up to the lower part of the fender.
The effect of this little more work to put into your post processing can be just too dramatic, in this case just lower the intensity of the layer or attack the last gradient fill with the Fade option just like I did with the Brush remember ?

Above you see the final result of our little exercise, adding just two layers, painting, fading and filling took less than a minute in total and still the result is much better than the original shot, go out and get some source material and try this Fast Tip on your own shots, I'm sure you'll quickly see the benefits of this little post processing work ... and best of all, you don't need PhotoShop for this, the same workflow can be executed in PhotoShop Elements ... which is much cheaper naturally.
 |
CPT Premium member BONUS : 59011 As a valued Premium member you can download this tutorial so you can read it offline, I've even included the TVR sample file I used. |
Note : commercial use or publishing of our tutorials in any way, written or electronic, is strictly forbidden, we present these for your personal development only. None of our material may be published in any way without prior, written permission from the Car Photography Tutorials founder. All workflows and photographs are copyright protected and owned by the Car Photography Tutorials team unless stated otherwise
Advertisement
Become a MEMBER
Premium Membership
Become a CPT Premium Member and download all our tutorials including a PDF for printing and the result as a PSD file with layers if any.
Interesting articles
Common mistakes when shooting a car
We all made these mistakes at first, but after gathering some more experience we could pinpoint these mistakes and share them with you so you can avoid them.
Photographers need a website and a personal email address
I have seen it a thousand time, people trying to attract business with a general e-mail addres ... don't do this, just get a smal website and a personal email address.
Your second shopping list
You have all the basic equipment, and you feel comfortable working with it ... now it's time to take your gear to the next level.
Behind the scenes of a professional car shoot
You've managed a nice exotic super car for a private photo shoot, but how do you manage an outdoor shooting ? We will explain 10 of the best tips for you.
FAST TIP : using soft light layers
Post processing can be a tedious job that could take hours, but one simple trick will put some extra punch in your shots in a matter of seconds.
Keep up with CarPhotoTutorials
Why not follow us, become a fan, get our RSS feed or mail a link to a friend ?
![]()
![]()
![]()