CASE STUDY - GENEVA 2009 AUTO SHOW
Canon EOS 40D - Canon EF-S 17-55mm f/2.8 L IS USM - 17mm 1/200 f5.6 ISO 400
Case study by Mark
We'll publish our Indoor car show photography tutorial in a few weeks, so you can read all about how to take the best shots at a major car event held inside, but we will give you a preview here with a hands one approach to a major international car show like the one in Geneva.
So when I went to the press days of the most recent Geneva Auto Show I was taking pictures with this tutorial in mind, instead of just publishing a gallery of these images I wanted to make a case study from it so you can perfect your car show skills even further.
A few basic settings I used throughout the entire Geneva auto show : I had my Canon EOS 40D set at aperture priority with a value of 5.6 to get the entire car in focus, you could play around with other values, but be careful, you could end up with an out of focus rear when shooting a front 3/4 view.
All these shots were made with the Canon EF-S17-55mm f/2.8 IS lens, the Image Stabilization really helped out for some of the darker shots, I didn't want to bring along a tripod this time so the IS was a requirement. Because I didn't use a tripod I also left the circular polarizing filter behind, if you take your shots from the right angle you can avoid a lot of reflections anyway.
So let's take a look at some of the shots taken on Tuesday, each one is accompanied by a little explanation on just how this shot was made, and what you should do to either avoid the same mistakes or get a similar result during your next car show ...
CASE 1 : the clean shot
 This overhead shot of a bright blue metallic Bentley GTC Speed has just about all our tips in place, it was taken only minutes after the show opened it's doors (at 8am actually) so not too many people were around, note that there was absolutely no post processing done on this shot other than the normal sharpening needed when shooting raw.
I was actually standing on another stand when I took this shot, on the first floor at the other side of the aisle and saw this Bentley just standing there all alone, a quick shot at 55mm resulted in this very clean shot, no flash was used, just natural light and the camera was set at aperture priority with a value of f/5.6, I did increase the ISO setting to 400 to reach a decent shutter speed of 1/60 to avoid camera shake.
CASE 2 : the high angle approach
 When you actually get eye to eye with an extremely rare car like this white Bugatti Veryron 16.4 Grand Sport you just have to get a few exposures of it, however these high level exotics draw a lot of attention so you will have to get creative with your angle.
I went for a high angle shot of the rear, because on the Bugatti it is nicely rounded, clearly showing the wide wheel arches at the rear and best of all, the engine is nicely visible from this high up position (it does help if you are rather tall like I am ...). Another advantage of this angle is the fact that most onlookers are out of the frame, so they don't disturb this nice shot.
To be able to get so close to this kind of automobile you will have to ask permission to get onto the stand itself, which is a bit easier during the press days. During the regular opening days to the public it might not be possible to actually access the stand of makes like Bugatti, keep that in mind.
CASE 3 : black cars
 A lot of high end tuners these days present their cars in a black livery, which looks nice (I like a black car) but it is really difficult to photograph correctly. You have a few options for a black car :
1. Make sure to fill the frame with the car like our Arden shot of this black SUV, this will however cause a problem with the automatic exposure metering in your camera, just like shooting a black interior you will have to dial in some negative exposure if you want to avoid blown out highlights in the background, I actually dialed down one full stop on this specific shot.
 2. This specific combination is actually a problem : a black car like the Lamborghini Gallardo LP560-4 on display on a white floor. You should under expose to get the black car nicely in the frame, however you do want that floor to remain white and not turn grey ... I actually left the exposure at the standard setting and took the shot 'as is'.
I ended up with a slight over exposure for this shot, but that was quickly rectified by adding a soft light layer in PhotoShop and filling it with pure black, afterwards I lowered the opacity of this layer to a level I was happy with. You are at a car show here, so you don't have time to try different exposures, just get it close and worry about getting it perfect in post processing, especially if there is a model posing next the to the you'll have no time to take several shots.
 3. As I already mentioned I like black cars, and I actually quite liked this TechArt Porsche, however there were a few problems to get this shot right : for starters it was a black car standing in a rather dark floor, so I would have to dial in some negative exposure compensation, but in the background you have a white desk, which would have to be exposed correctly too.
In this case I went for a moderate exposure compensation of only one third stop but added a bit of fill in flash to make the car really sparkle in the shot, it worked out nicely for this picture ... a bit of cloning was necessary to remove the nice hostess behind the desk and this again became a really nice car show photograph.
CASE 4 : white cars
Just like photographing a black car, the opposite, a white car will need some special tricks to get right too, most of the time if you leave your camera to calculate the exposure you will end up with a white 'blob' on the picture, the trick is to show all the lines on the white car without over or under exposing the rest.
 1. This specific photo from a white TechArt Porsche was rather easy actually, I just left the camera at the normal setting because I knew the dark floor and background would counteract the reading of the white car in the frame ... in this kind of framing you should leave some space around the car and crop it in post processing, this way the camera will not focus it's exposure entirely on the white car but take into account the darker surrounds too (don't use spot metering in this case !).
2. This Gumpert Apollo posed yet another interesting problem to photograph right, they parked a white car in a black carpet and even the background used grey and black colors, this would mean the white would be over exposed if I would get the black right, so how did I solve this issue ?
 Actually rather easy ... I took one exposure (couldn't do bracketing because I didn't bring my tripod remember ?) that was exposed for average light, this meant the white was a bit blown and the black was a bit under exposed, but that's no problem because I always use raw for my automotive photography. So when I took the raw file into ACR I dialed in a negative exposure to get the whites back to normal intensity and opened the shot in PhotoShop, then I went back to ACR (Adobe Camera Raw) and took the same file but 'over' exposed it a bit to get the blacks right, again opening it in PhotoShop.
I now have the same picture opened twice in Photoshop, I did a full copy of the 'black' shot (select all + copy) and pasted this over the 'white' shot, then with the mask tool I started 'erasing' the parts in the black shot where the white was completely blown ... which revealed the correctly exposed whites from the underlying layer ... resulting in a perfectly exposed shot.
It would be next to impossible to get this kind of photographs right the first time, you will have to take several shots or 'develop' them differently when taking the raw files into your editing software.
 3. This end the white cars case a nice and easy one, you get a white car posing on a light floor, this is the easiest you can find, just leave the camera to it's standard setting for exposure compensation and take the shot ... it will turn out very nicely most of the time.
Don't worry if the background is under exposed, this brings out the car you are shooting in the shot because it is so light compared to the relatively dark background, I did use a bit of dodge and burn to bring out the black grille and the wheels a bit, but that is personal taste.
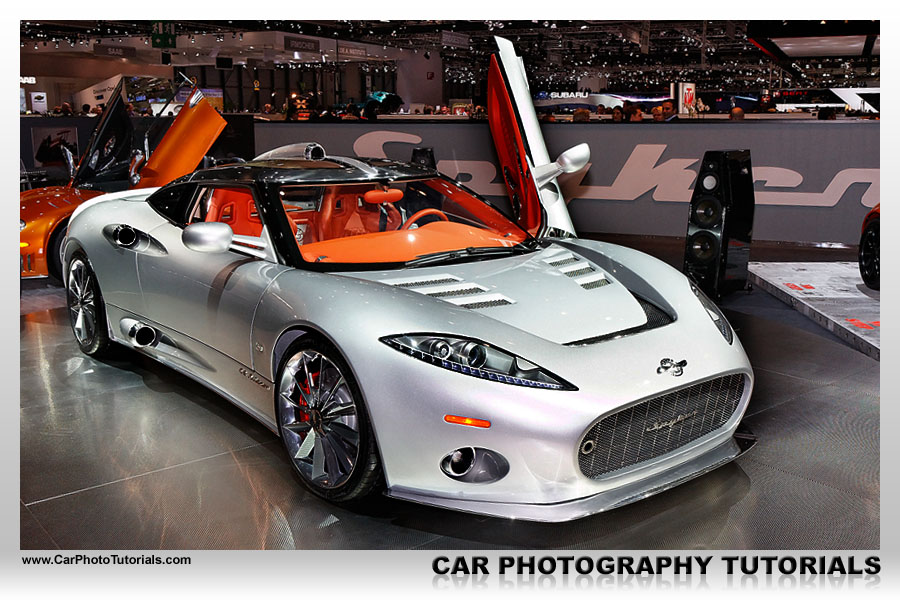
CASE 5 : interiors
 Photographing an interior at a car show isn't as difficult as you might think, all it takes is a bit of technique, there is no mystery about it.
Take a look at the interior of the Spyker C8 here, it is a nice looking, highly detailed interior with some amazing stitching and brush polished sections, so I didn't use any negative exposure compensation, it isn't a black interior. I did however use the flash here because otherwise the foot wells will be too dark, at a car show the spots are hanging above the cars, so their light doens't reach the inner parts of the interior, hence you will need to add your own light there with a bit of flash.
I always dial in some negative FEC (Flash Exposure Compensation) to make sure I don't blow those polished sections on interiors like these, this depends on the car naturally, but most of time just a bit of FEC is enough to get it just right.
 When photographing a light interior like this one with dark carpets you will again run into problems getting an overall correct exposure, most of the time you will end up with a grey upholstery instead of a bright white one, that is why these shots require some post processing to get just right. What I've done in this case was just add a soft light layer and paint with white and black to lighten and darken some areas respectively. Another problem with this kind of photographs is the fact you can see through the windows.
Most of the time the 'background' will be over exposed because the outside of the car is lighter than the inside, so you'll need to apply a darken layer on the windows, just select them with your favorite selection tool and apply a darken filter on a new layer to lower the intensity of whatever you are seeing through the windows.
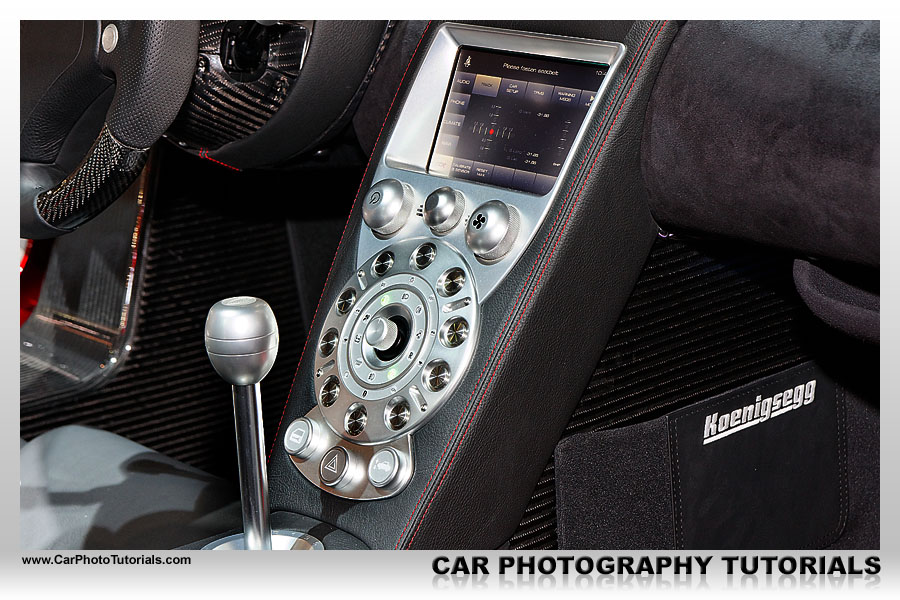
Shooting a dark interior like this one inside a Koenigsegg CCX super car takes a bit of experience and correct preparation, if you would just point the camera and take a shot you will end up with a highly over exposed shot because the automatic exposure system of you dsrl will judge it has too little light because of all the black parts.
So we have to use exposure compensation, I actually dialed in a value of -1.33, that means I will under expose the shot a full one and one third stop, which has two advantages : it will take a rather decent shot exposing the black correctly and it will result in a faster shutter speed, which is perfect as I wasn't carrying a tripod with me this time.
A 1/15 shutter speed might get you in trouble without a stabilized lens, hence I always advice to get one for indoor car shoot, I also applied a bit of fill-in flash for this shot, it brings out that polished console and lights up the foot wells a bit, I did dial in a full negative stop of flash compensation however, otherwise it would have blown out the highlights on the aluminum parts, also note that I use the flash at a 45 degree upwards position for this kind of shots and mounted a StoFen OmniBounce on it to create a softer flash.
CASE 6 : mind the background
 This bright red Wiesmann immediately drew my attention, it was parked on a corner of their stand with black flooring and white walls, a perfect combination to truly offset a red car, I positioned myself at such an angle to the car that I would capture their logo on the wall in the background and get a glimpse of the television playing a movie about the car ... this resulted in a perfectly clean background for this car, a great shot for a magazine article or even a poster.
At a car show like this it is important to always keep an eye on the background, most of the time you will have people standing around the stands, but most likely very little to no people on the stand itself, so position yourself in such a way that you are taking your photograph 'into' the stand and not out of it, the latter will show all the people walking in the aisles and you would want to avoid that.
In this shot I drew attention to the stunning red Corvette by putting it in focus and position it offset to the right lower corner of the frame, an extra bonus in this shot was the blue Corvette in the background and some other possible shades on the black wall, because the red car draws attention better than the blue one this shot is nicely balanced after all.
If the blue Corvette would be in the foreground with the red one in the background you would get a bad balance as the bright red shade in the background would draw away too much attention from the more subtle blue shade in the foreground, you have to remember stuff like this when shooting at a car show.
 I actually liked this car, it is a white Jaguar XF with a tuning package and some good looking wheels, however it was put on a stand in some of the less important halls at Geneva, where the smaller tuning companies were put, hence the light was terrible (even worse than in the main hall number 1), but what really lets this shot down is the background.
Take a good look at the image, if you have red our previous tutorials you must recognize the problems at once ... that white sign in the background immediately draws your view away from the car, also the rims in the background look cluttered and what makes things even worse is that attention grabbing red carpet ... don't worry too much however, this can all be remedied in post processing if you really want this image to work for you, but this is an example of a nice snapshot, I wouldn't call it a car photograph in it's current shape.
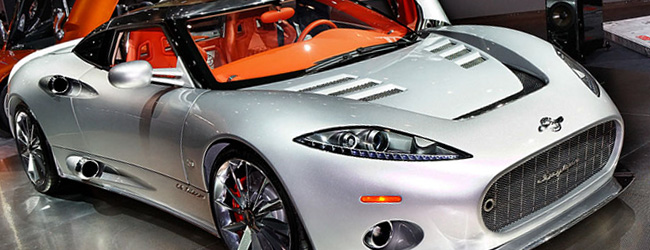
This silver metallic Spyker C8 was actually enjoying it's premiere at Geneva, so I just had to grab a few exposures of it, even if the background isn't all that nice. This is an issue that you must put aside when covering an international car show, with any premiere you are bound to have lots of photographers standing around the car and the stand, so you will not be able to get a clean shot anyway.
In this case your only option is to make sure that no people are actually blocking your view and you try to avoid having them behind the car too, this angle is probably the best I could do in the circumstances, so I'm happy with it, sure it is not perfect and I would have liked to have been able to take a better shot, but this is what I ended up with and I'm sure it could be published as is.
 This Hummer shot is similar to the Spyker shot, sure the stand was clean, no people in the frame, however the background does look cluttered and you can actually see visitors on the stand behind the Hummer stand, what does make a positive note in this shot is the company logo behind the car, always try to find an angle that will show this, it adds a point of interest to the photograph.
There is also a distracting reflection on the rear door ... however all these problems are minor actually, and cleaning this shot up for publishing wouldn't take more than a few minutes. That reflection on the door is easily cloned out and the cluttered background can be a thing of the past with some creative cloning and painting as well, so this shot surely isn't lost altogether, it just takes a bit more work to get right.
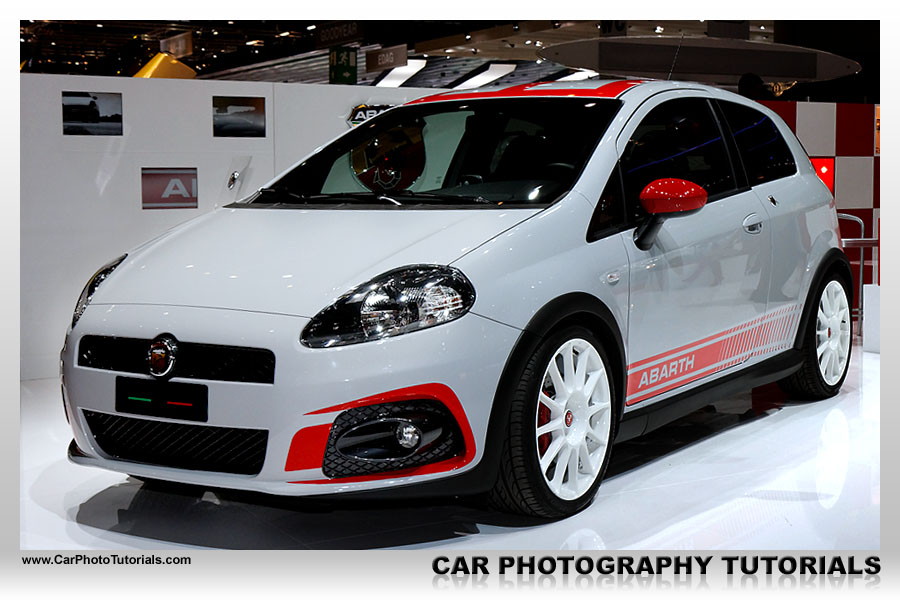
When you actually get to an international car show like the Geneva event you will not only encounter ultra rare, exotic super cars, most of the cars at these shows are actually normal ones you could encounter on the road to the show, this doesn't mean you shouldn't photograph them either, take a look at this Abarth shot, it is a nice image after all, even if you probably see one every day, just because you see these every day doesn’t mean you'll have to dismiss them completely during your visit.
This Hummer shot is similar to the Spyker shot, sure the stand was clean, no people in the frame, however the background does look cluttered and you can actually see visitors on the stand behind the Hummer stand, what does make a positive note in this shot is the company logo behind the car, always try to find an angle that will show this, it adds a point of interest to the photograph.
There is also a distracting reflection on the rear door ... however all these problems are minor actually, and cleaning this shot up for publishing wouldn't take more than a few minutes. That reflection on the door is easily cloned out and the cluttered background can be a thing of the past with some creative cloning and painting as well, so this shot surely isn't lost altogether, it just takes a bit more work to get right.
When you actually get to an international car show like the Geneva event you will not only encounter ultra rare, exotic super cars, most of the cars at these shows are actually normal ones you could encounter on the road to the show, this doesn't mean you shouldn't photograph them either, take a look at this Abarth shot, it is a nice image after all, even if you probably see one every day, just because you see these every day doesn’t mean you'll have to dismiss them completely during your visit.
SOME OF THE MISTAKES
 I have told you this time and time again, use raw to photographs cars, and this image of an amazing Lamborghini Murcielago Roadster GTR clearly shows why ... the white balance is completely wrong in this picture.
Because it was parked in a rather badly lit hall this matte black Lamborghini didn't come out as it should, if you had been taking your shots in jpg this would be a major issue, however since I only use RAW for this kind of photography I had absolutely no problem setting the White Balance correctly.
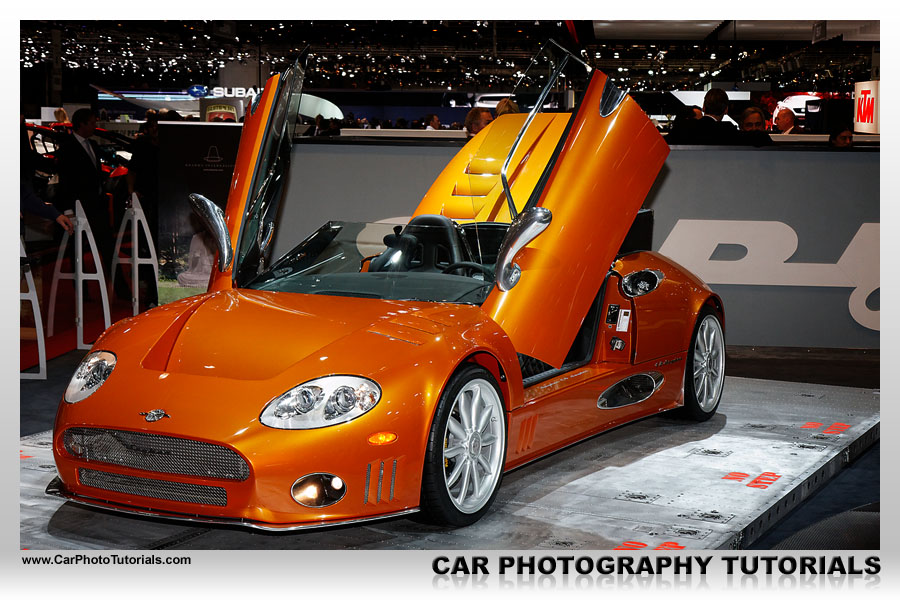
Take a look at this amazing orange metallic Spyker convertible, it is truly an amazing looking car, but this is a mere snapshot unfortunately, I should have positioned myself a bit more to the left so I could frame the car differently in a way that wouldn't show the people on the left and put it better in the frame, now it is located in the lower left corner, but when you face a car like this you should leave some more space in the 'driving' direction to get a balanced photograph.
 Another typical car show snapshot, there is a visitor walking behind the Pagani Zonda, avoid that at all costs, but what's even worse there is another person standing at the left of the frame, and I've actually cut him partly away, if there are bound to be people in the shot, avoid having them only halfway in to picture, in this case it is all or nothing. Another major issue here is the trolley that is in the lower right corner, when taking an exposure make sure to keep an eye on such details, they can be cloned out, but it always takes some extra work.
And last but not least, try to photograph the cars with the doors closed, because of these wide doors on the Pagani you end up with a very bad frame because you can't cut off the door in the shot, so I was unable to frame the Zonda correctly, hence this image got a one way ticket to the trash ...
CONCLUSION
Always keep in mind you are at a car show here, you will probably not be making award winning shots, the lighting is bad with way too many spots that create specular highlights on the bodywork. Too many people around to make those 'clean' shots we all crave for, you will have people walking into your frame just when you press the shutter and you have absolutely no control over the background or surroundings of your photographs.
 I always advice people to take a different approach to shooting an international car show : go for the fun ... and take some pictures along the way. Don't worry if you end up with lots of snapshots instead of automotive photographs, that's all part of the game, just take a look at those car magazines out there that cover the show, they won't be publishing 'clean' shots all of the time either, they will work with whatever they've received from their photographers.
A few final pieces of advice :
- Put the ISO at least up to 400, sometimes even up to 800 to get a decent shutter speed.
- Try to use a lens with some kind of image stabilization.
- Avoid lugging along a tripod, sure it helps but it also gets very heavy after a long day.
- The polarizing filter is nice, but takes away some much needed light at car shows, use it wisely.
- Put the camera in aperture priority and dial in a value of 5.6.
- Bring along your external flash to use as fill in for those interior shots.
- And most importantly ... have fun !
 |
CPT Premium member BONUS : 48206 If you would like to print the Geneva 2009 Auto Show case study you can download our special PDF which is optimized for hardcopy layout. |
Note : commercial use or publishing of our tutorials in any way, written or electronic, is strictly forbidden, we present these for your personal development only. None of our material may be published in any way without prior, written permission from the Car Photography Tutorials founder. All workflows and photographs are copyright protected and owned by the Car Photography Tutorials team unless stated otherwise
Advertisement
Become a MEMBER
Premium Membership
Become a CPT Premium Member and download all our tutorials including a PDF for printing and the result as a PSD file with layers if any.
Interesting articles
Off camera flash car photography, part 2 of 2 : the shoot
You managed to buy the necessary items to get into off camera flash photography, in part 2 of our tutorial we explain how to use it.
Post processing automotive event photographs
We all know the drill, we’ve been to a car show or outdoor event and we’ve encountered some amazing cars but our shots have bad backgrounds so we'll have to revert to post processing to get it right.
Scale car photography explained in detail
In this article I guide you into scale car photography, from the preparation over the setup including lights, aperture, shutter speed and then taking the shot ... a lot of these tips can be used on full size cars too.
Our TOP 10 tips for post processing using PhotoShop
In this tutorial we present you with 10 interesting and quick tips that will make your post processing automotive photographs in PhotoShop a bit easier.
Off camera flash car photography, part 1 of 2 : the shopping list
In this first part of the off camera flash tutorial I take you over the required equipment to get started using additional light sources.
Keep up with CarPhotoTutorials
Why not follow us, become a fan, get our RSS feed or mail a link to a friend ?
![]()
![]()
![]()

