CREATING A DERELICT AT DUSK LOOK IN POST PROCESSING
Canon EOS5D Mark II - Canon EF24-105mm f/4.0 L IS - mm 1/160 sec f5.6 ISO200
Advanced level tutorial by Mark
I know we've all seen those amazing shots of brand new or highly tuned cars in front of abandoned warehouses or factories ... the contrast between a shiny car and a derelict building is such an amazing look many crave to achieve it, and if you manage to do such a shoot at dusk with the warm light from the sun you know you've hit the jackpot.
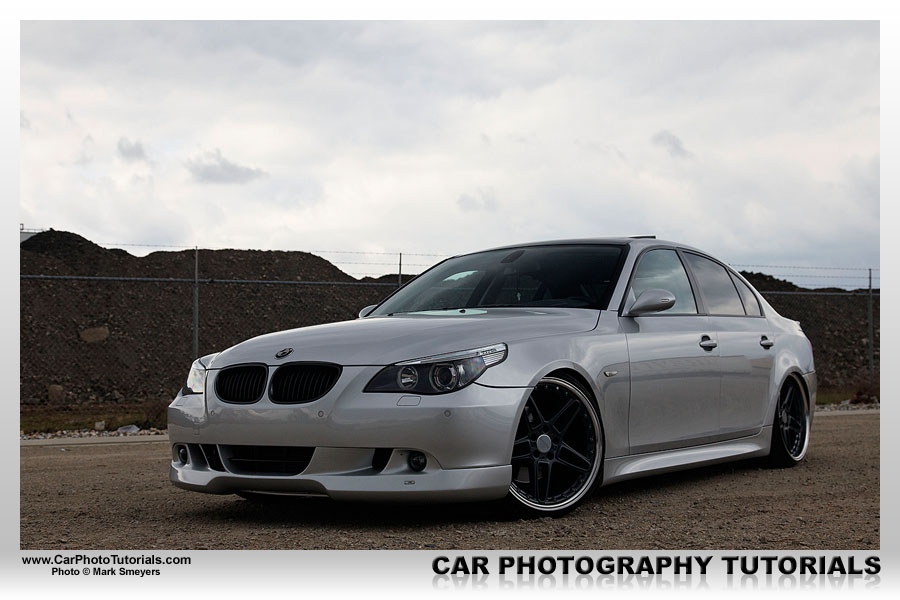
BEFORE and AFTER comparison
 (Move your mouse over the photo above to compare the 'Before vs After' shots)
But there are a few culprits with this setup, for one most of these derelict locations are private property, so you would be trespassing in fact, which happens to be illegal you know ... now you could get permission from the owner, but even with a written paper in hand you have to keep in mind why this building looks so good ... because it has been abandoned for many years, so it might have structural issues.
No problem you think, you're just going to park the car in front of the building right? Guess what, that might not be the best idea either, for one when it is windy you never know that wobbly chimney decides to modify your amazing looking car into a convertible, and getting the car at the location could be more difficult than you think. More than likely the road up to the building has been left untouched for many years too, with holes and bumps that could ruin a low riding car on the first meters you drive into the compound.
In retrospect it might be a better idea to get the look in post processing and shoot that beautiful, very expensive car on a more appropriate location, so you'll need two things: a decent shot of the car and a good looking derelict house to put into the shot, the latter you can shoot yourself, but in that case you are back at trespassing, or you can use a stock photo.
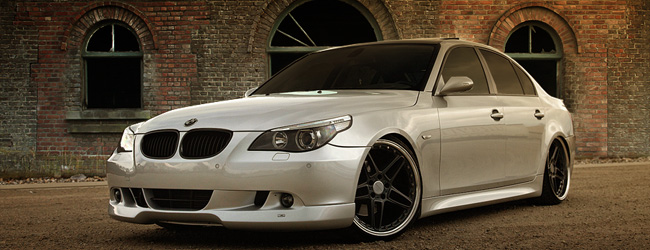
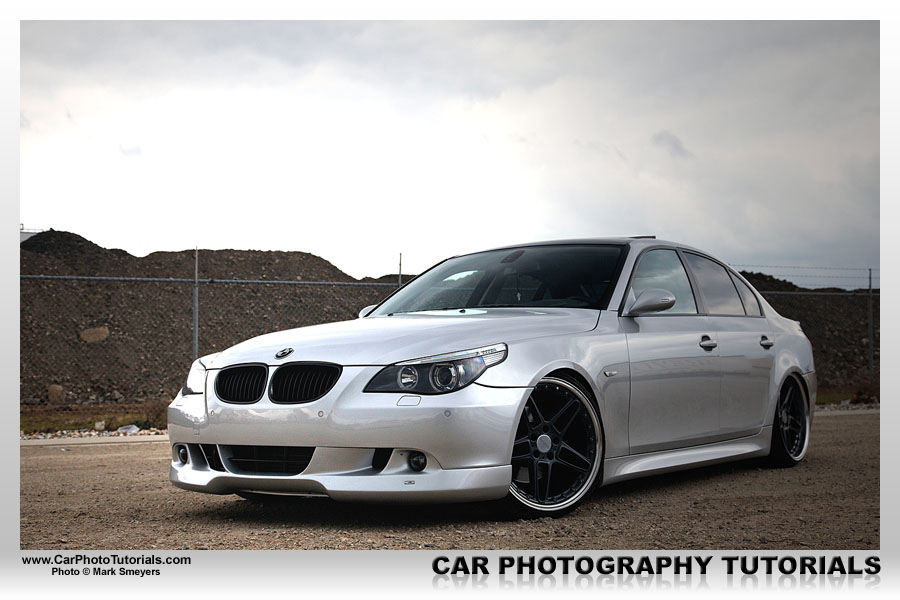
The original snapshot
I am going to make it even more difficult for me by selecting a photo taken during an outdoor event, so no special setup nor time to get the lighting just perfect, just a quick shot of a nicely tuned BMW 5-Series that I am going to pull through post processing into a photograph ready to be put on the wall as a poster.
You can immediately see this isn't the best shot out there, in this form it isn't even worth the term photograph ... I would call this a quick snapshot, one you could like because you admire the car in the shot, not for the technical photography value ... but that's about to change, so let's get to it.
Adjusting the light
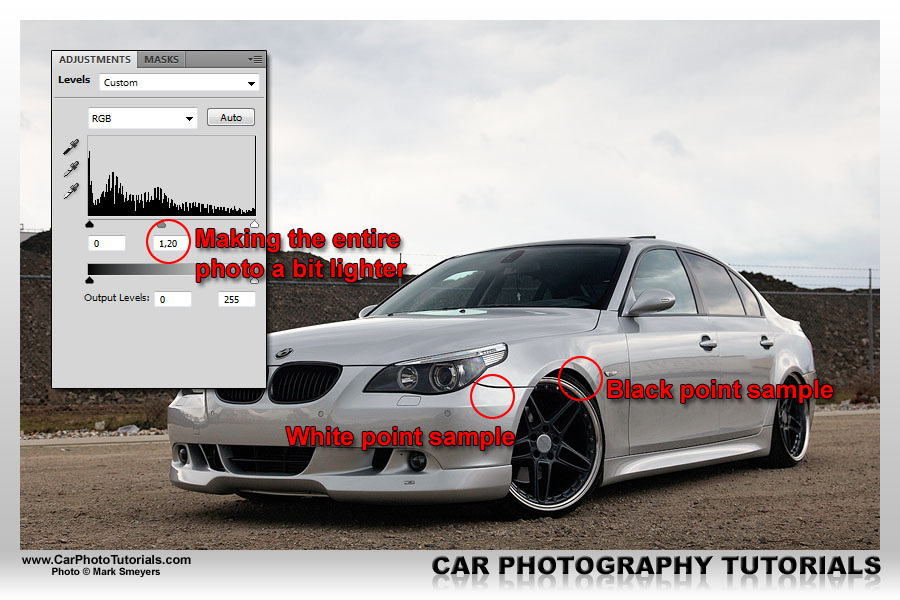
First thing is getting the light better on this shot, and this is done by putting an adjustment layer over the entire shot Layer>New Adjustment Layer>Levels... and select the right spots that you feel should be black and white, in this case the black would be sampled from inside the wheelarch (this is most likely to be the darkest part of the car anyway) while white is most often a highlight on the bodywork, on this BMW I took pure white from the front fender.
But it still looked a bit dark to me, and I knew I would be putting more contrast on the shot later on, so I made the photo lighter overall by changing the center value on the Levels dialog box to 1,20 ... don't worry if the sky looks too bright now, just put a Layer Mask on the Levels layer and apply a gradient from black to transparent to get the sky back to the original, dark look, the same effect is needed on the dirt to make it stand out better.
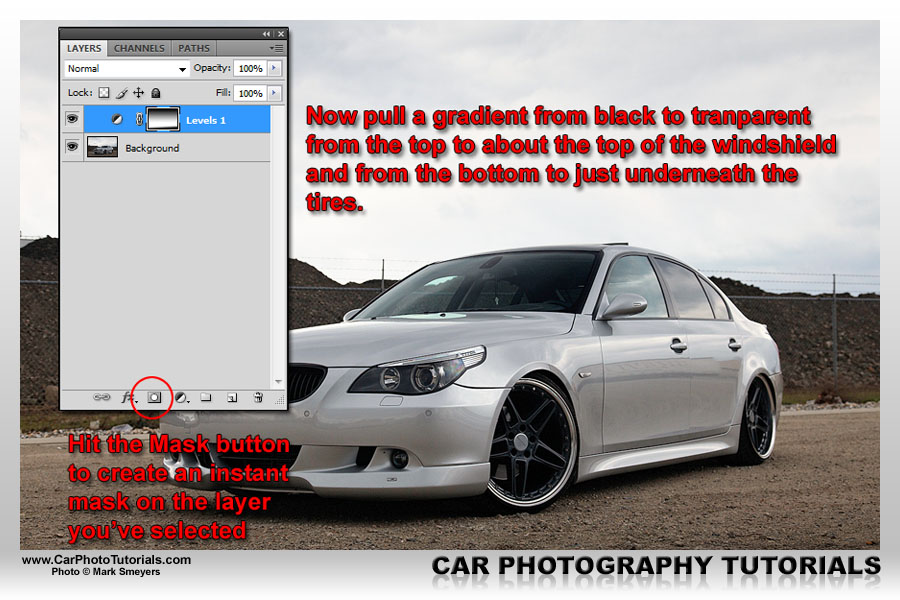
That pulled the light back into the photo, the grey metallic BMW looks bright enough while the sky and floor gets some more detail back by actually deactivating the Levels effect on them from imposing a Layer Mask, however I still feel the front could use a little sparkle, and instead of using a 'Soft Light' layer and paint with a white brush on it I'm going to show you another trick: the virtual flash look!
PhotoShop has a nice render filter that adds some intricate light effects on your photo, so when you feel an image could have been better if you would have used some additional off camera flash units but just don't have the option to do a re-shoot you'll have to try getting a similar look in post processing, and I'm going to show you how.
Add a virtual flash
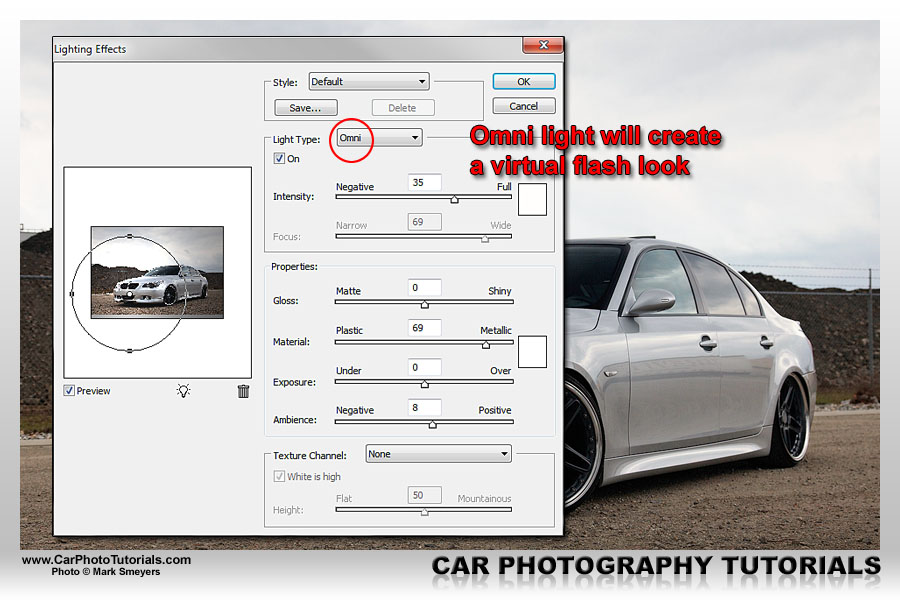
To use this trick we will first duplicate the entire photo onto a new layer, remember we always try to go for a non destructive post processing method, so the Background of our file that holds the original photo is never touched, hence we can always backtrack if we make a mistake, or get another idea later on. So make sure you select the Background layer, select all (Ctrl-A or Cmd-A) and Copy/Paste the entire image onto a new layer ... which we'll call 'virtual flash' so we remember why there is an additional layer on our post processing file.
Go into the Filter menu and select the Render option, from the expanding menu select the Lighting effects option and you'll end up with the dialog box seen here, go for the 'Omni' Light Type and drag the circle you'll see on the preview to the position you should have had to put an off camera flash unit, you can drag the diameter of this circle to change the radius of the effect, when you think it looks right just hit the 'OK' button.
The result is just what you would expect when using a single, off camera flash, the front now has a nice bright look, but the rear has some serious light fall off, so we'll have to rectify this ... with a Layer Mask that hides just about the entire 'virtual flash' layer, only the front section of the BMW will remain 'lit'.

So once again click the 'Mask' option on the Layers palette and start painting on the mask until only the front section of our tuned sedan remains 'filled in'. Somehow I still wasn't satisfied with the overall look of this effect, so I lowered the opacity of the entire layer to only 50% ... keep in mind that the opacity of a layer like this is strictly a subjective matter, what might look good to me might not look right to you.
Now we have a photo of a nicely tuned grey metallic BMW 5-Series, but this isn't the look and feel we want, so time to start looking for a background that fits a whole lot better than this fence and dirt ... a nice derelict building that has been abandoned for many years already, just what we need for our little project.
Adding an urban feel
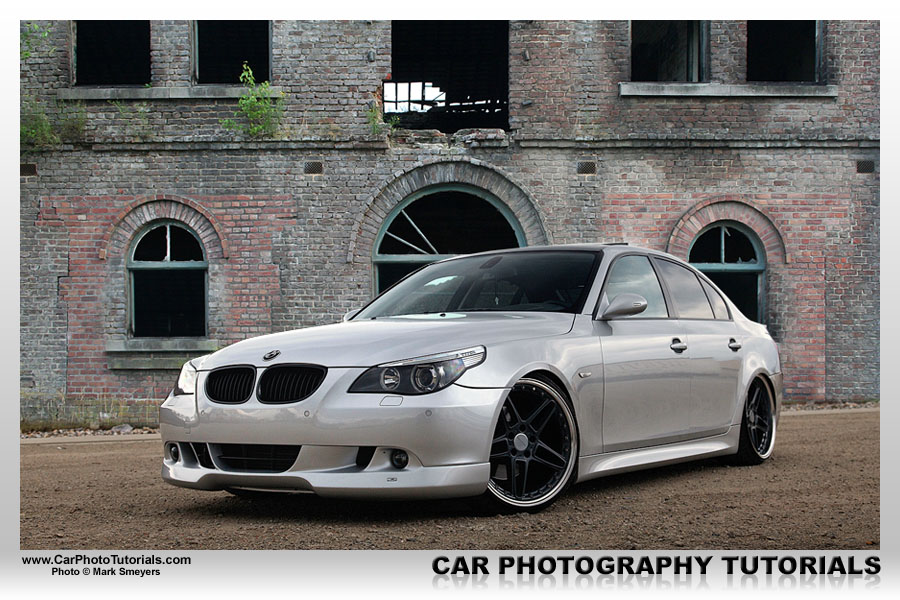
All we need to do is paste a photo of a building that fits our project onto the original image and once again use a Layer Mask to show only the sections we need of the abandoned factory and cover the rather uninspiring background we had on our shot. Do note that masking a background like this might take some practice, and that is exactly why you should use a mask instead or erasing the parts you don't need ... non destructive post processing remember?
The trick is to use a soft brush setting at a rather small size and just 'paint' around the contours of the car, once you have the initial profile set you can use the Polygonal Lasso Tool to draw inside the line you've just painted and hit the 'delete' key to make the entire car visible again.

Keep in mind that the more time you put into painting this kind of Layer mask the better the result will be, so don't expect to be finished in a matter of minutes. This car has a nice, simple profile so it isn't too difficult to mask it, but once you tackle a classic car with tail fins, ornaments and antennas you might spend hours on getting it just right.
Also keep an eye on the details, take a close look at the result we're reached already ... you might think it looks almost done while in fact there are still several steps ahead of us. But one small detail could give it all away ... look closely at the windshield of the BMW.
Taking care of the details
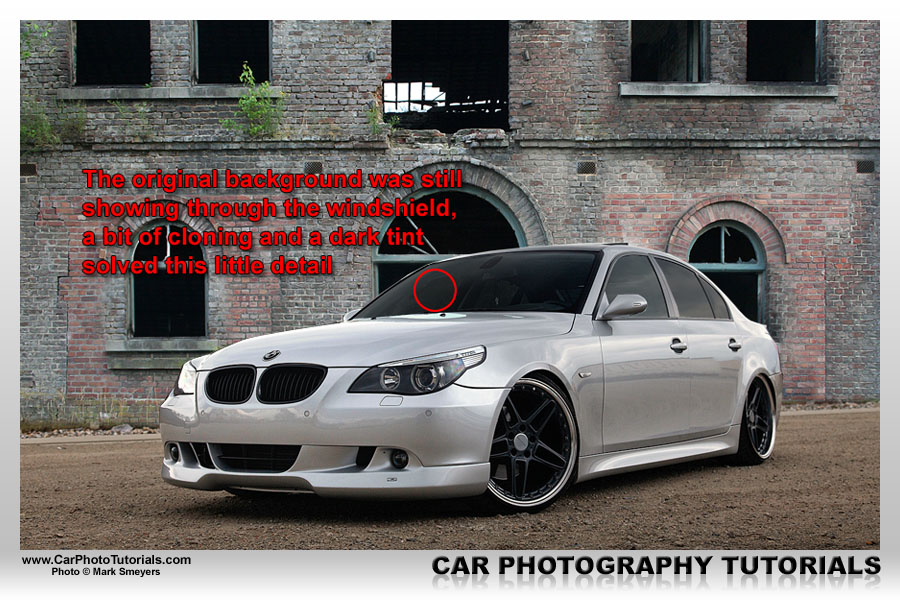
A small detail like this can completely ruin the look you are going for ... you can still see the original background with the fence through the windshield, and that would be a clear indication the image has been composed of multiple shots ... while we would never pass it on as a single shot we sure aren't going to leave it obvious either.
So a new layer just above the original background allows us to clone the fence away while yet another layer will 'virtually' tint the windows on this BMW is just what is needed to remove all evidence of the original, rather dull background ... now the scene has been fully set to create our sunset look.
Creating a sunset feeling
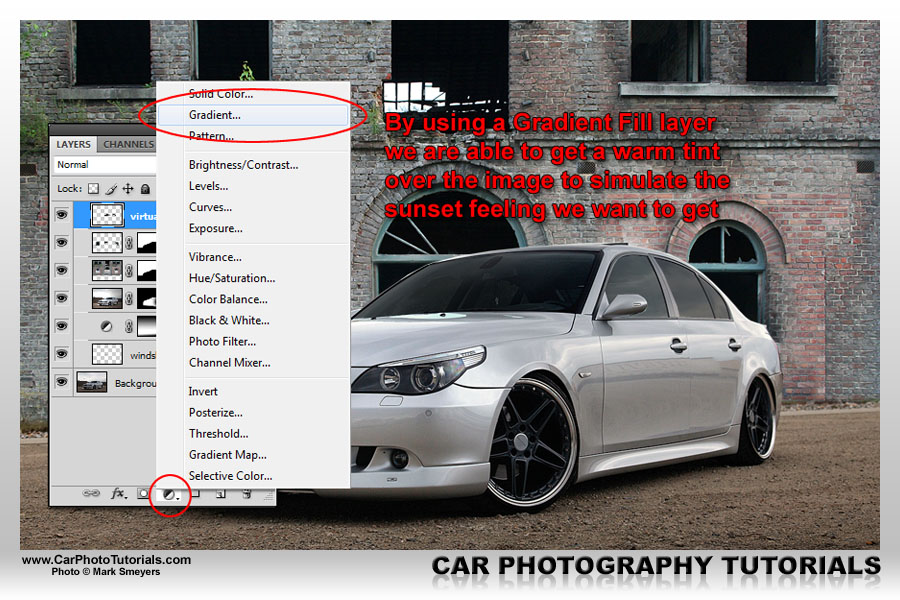
The warm shade of a sunset can be simulated by adding a Gradient Fill layer on top of the entire photo using just the right mix of RGB values, we have experimented a lot with orange, yellow and even gold shades and in the end we've been using #ffa422 to get the right feeling on this kind of photos, so first up is setting this shade as our foreground color.
Now continue by selecting the Create new fill or adjustment layer found at the bottom of the Layer palette, a pop up menu will show lots of options, we'll be using the Gradient ... link near the top of the list.
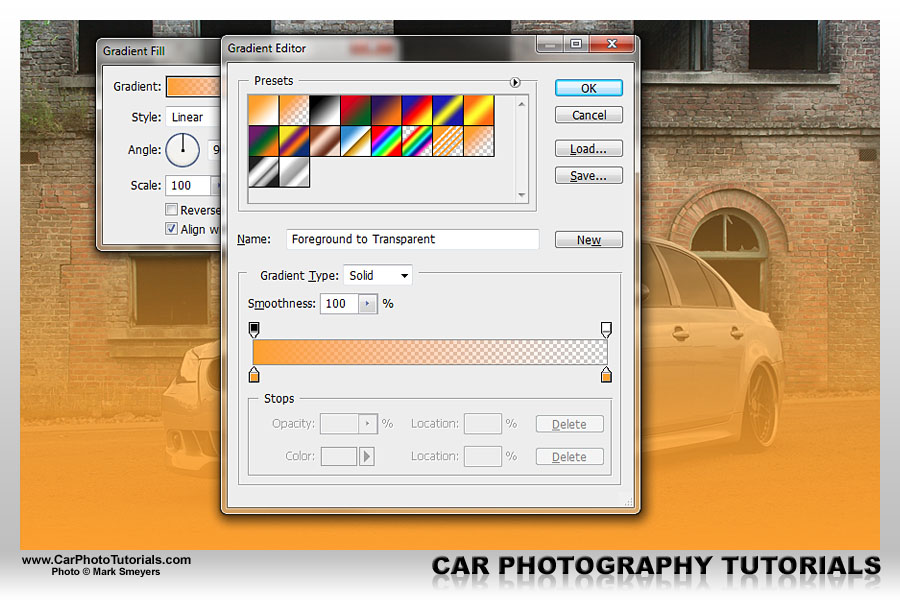
Most likely the selected default gradient isn't the one we want to use for this effect, so just click on the down arrow next the gradient shown and you'll be able to change the settings. For the sunset effect we are using the 'Foreground to transparent' gradient, just like we've been doing on the masks for the earlier adjustment layers ... over time you'll notice we are using this type of gradient a lot in our post processing.
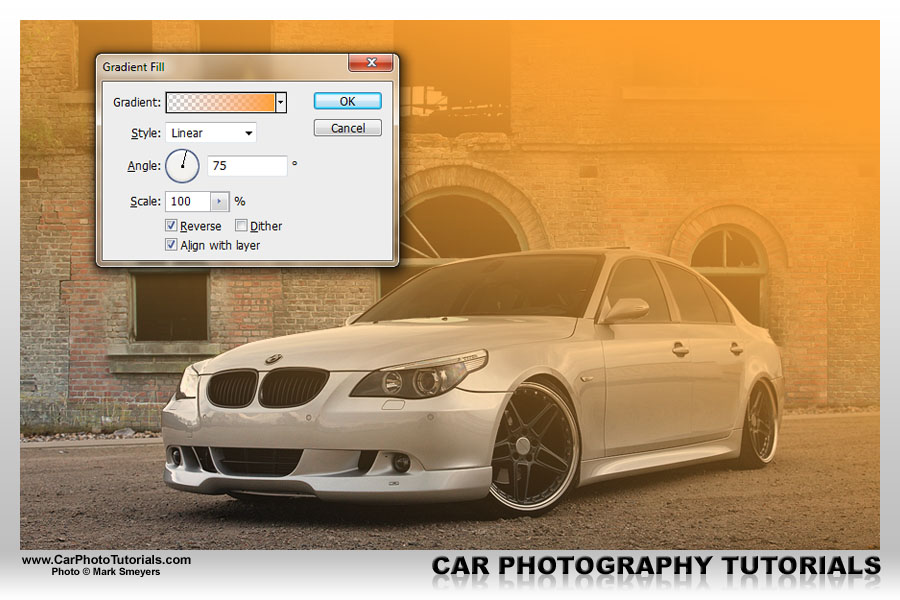
In this specific shot we didn't go for the standard 90 degree angle on the gradient ... instead we use a 75 degree angle that has the light flooding in from the corner, making it look much more natural in the end ... don't forget the 'Reverse' setting to position the virtual sun in the upper right corner, the sunlight doesn't come from the floor you know.
As you can see we now end up with a rather harsh orange tint on our photo, this isn't exactly the look we were aiming for, but fear not, this was only the first step. Step two involves changing the Layer properties to get it right.

The nice thing about using Layers in PhotoShop is the fact you can change how they influence the photo in many different ways, one of them is to change the Blending Mode, and in this case we go for the Color setting, however the effect is still way too strong for this project ... how do you lower the effect of a layer?
Easy, with the Opacity setting ... for this image a 40% opacity looked just right, on other photos you might need a different setting here, so do play around with some values until you think your shot has the look and feel you want, every single photograph is different ... hence the settings can vary a little.
Making it look derelict
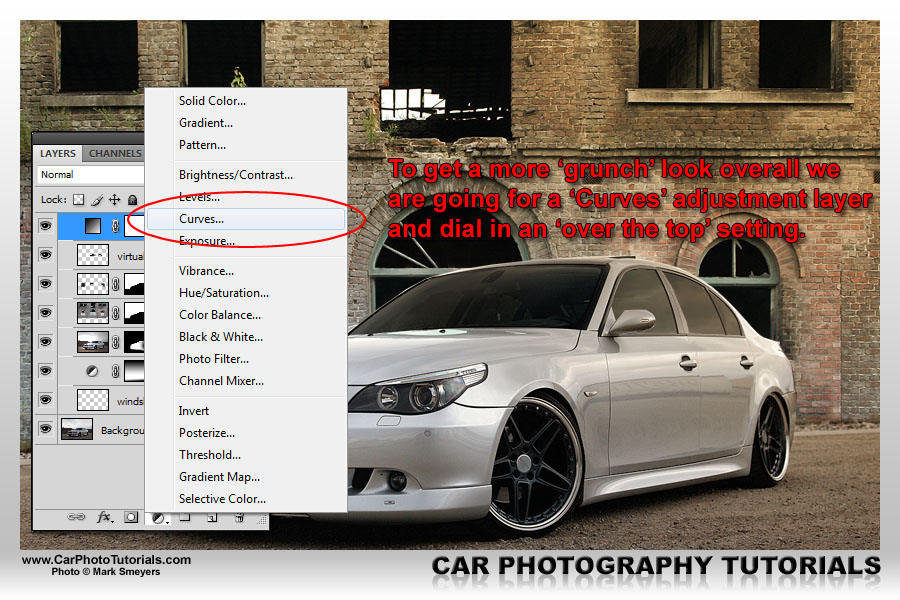
To get the grunch look intended for this image we'll be adding yet another adjustment layer on top of everything else, this time we go for the 'Curves' layer which will allow us to create the rather special atmosphere to fit with the derelict building in the background.
In the past a similar effect could be achieved by using the Brightness and Contrast setting, but these days Curves or Levels allow a better method to get really special effects, on our photo the Curves adjustment is the best option at this time.
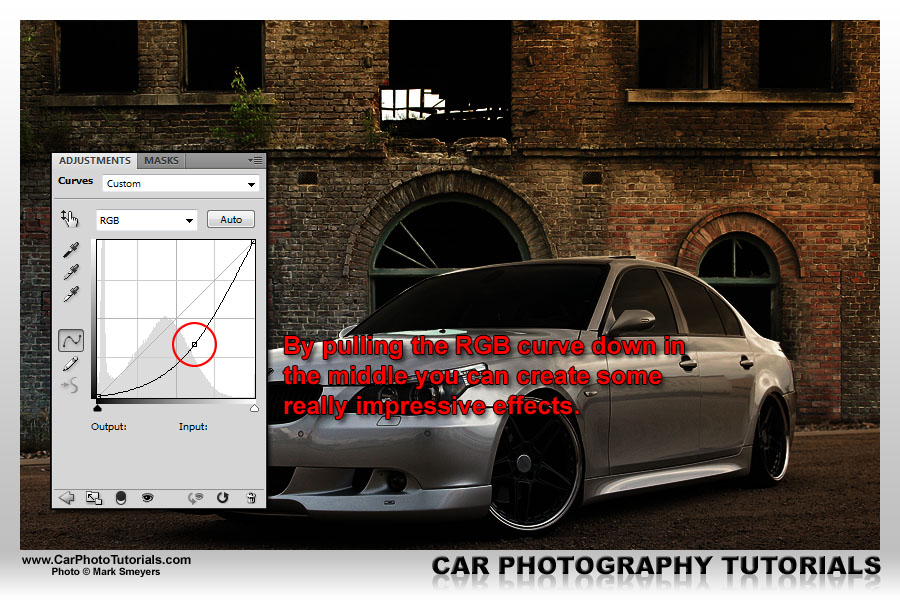
If you start to pull the Curve in the middle downward you can immediately see a dramatic change in the look and feel of the photo, what we are looking for in this case is a more urban impression so the intention is to have the building look even more derelict and rough than it already is.
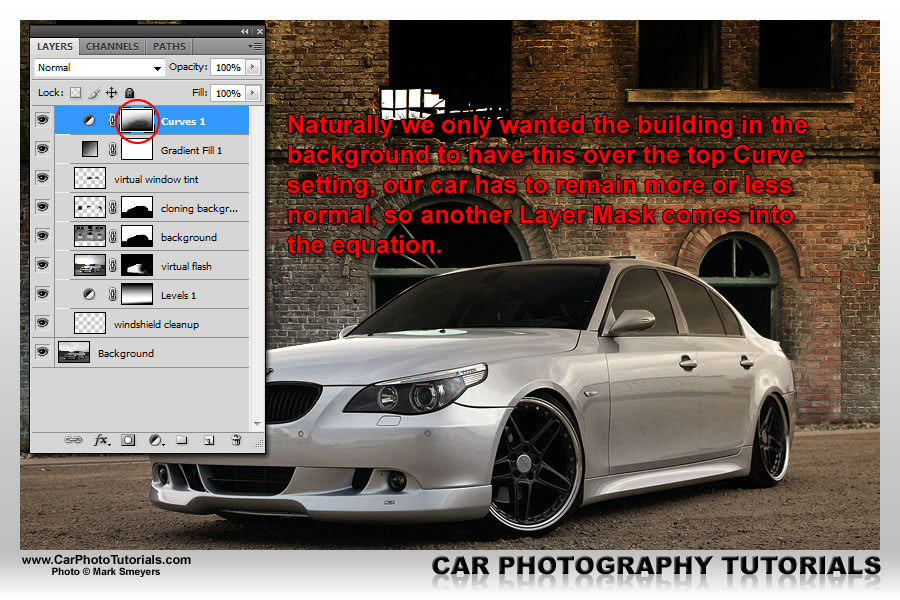
But this means that our BMW in front of the house is going to look very dark, and we've just increased the light on the shot to begin with, which is why another Layer Mask has to be added so we can remove the 'Curves' effect from the car and leave it only on the background.
If you take another look at the photo now you might feel it is just about finished, and you are right, only a few more steps are required to get the result we intend to reach for this specific project. However there is still a little problem with the photo: at dusk you will not have the cold grey tint on that Bimmer, due to the warm hue of the sunlight at that special time of day the grey would be less cool in fact.
Getting a warm feeling onto a photograph is actually rather easy to be honest, you just add another layer on top of everything else and fill it with a nice orange shade.
Pulling it all together
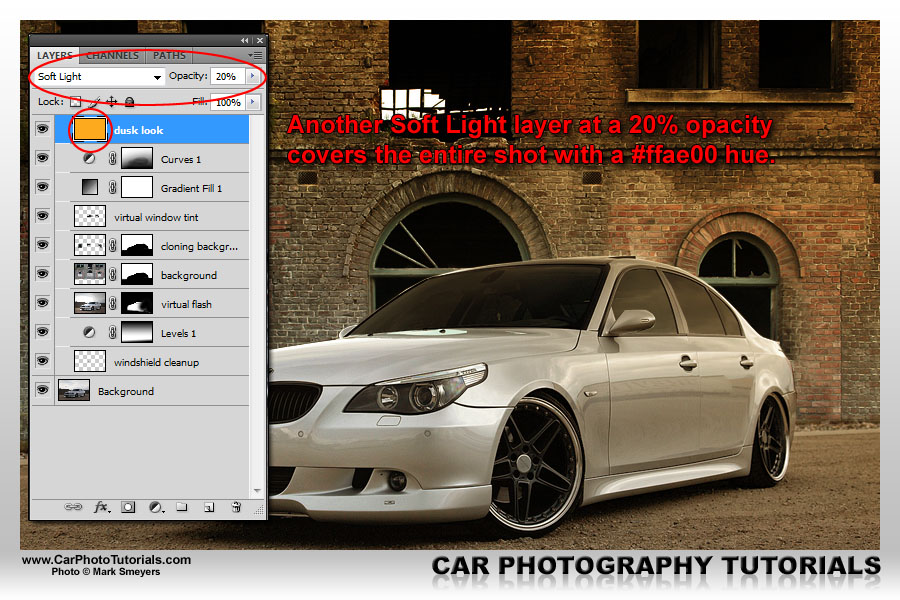
It took a while to get this right, but in the end we've managed to find a shade and a setting that should be looking fine on most of your photos, it sure looks great on this shot. The way to go is adding a new layer on top of everything else, completely fill it with the #ffAE00 hue and change the Blending Mode on the layer to Soft Light ... however the effect is once again too strong, so lowering the Layer Opacity value to 20% was needed in this case.
If you look at the photo now you will notice the car has a nice, warm glow over it, the steel cold grey is gone and instead we now really have the impression the shot was taken at just the right time and in the perfect location ... it is all coming together ever so nicely.
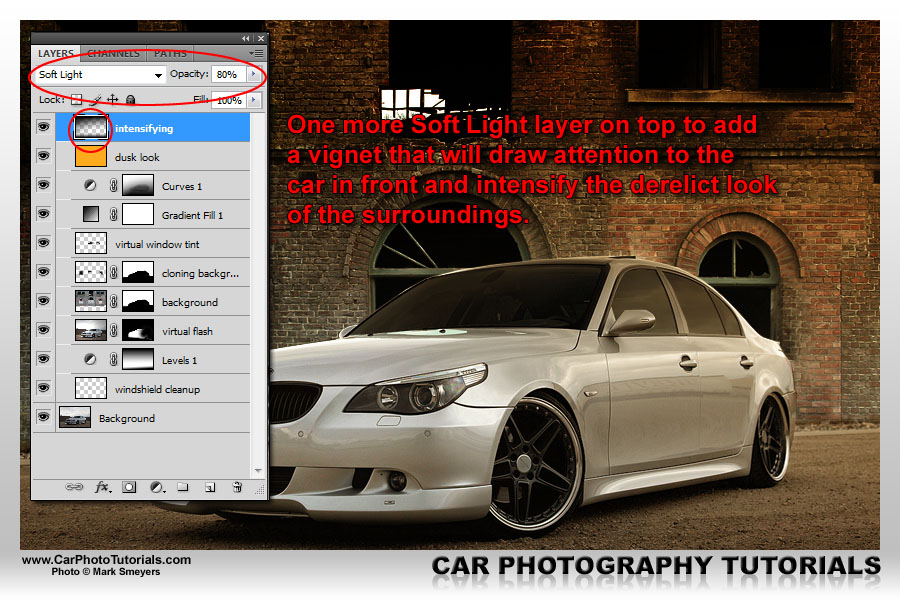
If you have been following these tutorials for a while you probably know our finishing touch already ... an additional Soft Light layer with a gradient from black to transparent which will add a vignette to the photo and make the car stand out even more.
Once again we lowered the opacity of this Vignette layer because the effect was a bit too intense, the trick is to have the surroundings toned down a bit and pull the attention onto the car in the photograph ... but not to make the background completely black in some areas that should still show some detail, like the bricks on the building for instance, so lowering the opacity to 80% was the right thing to do in this specific image.
The final result
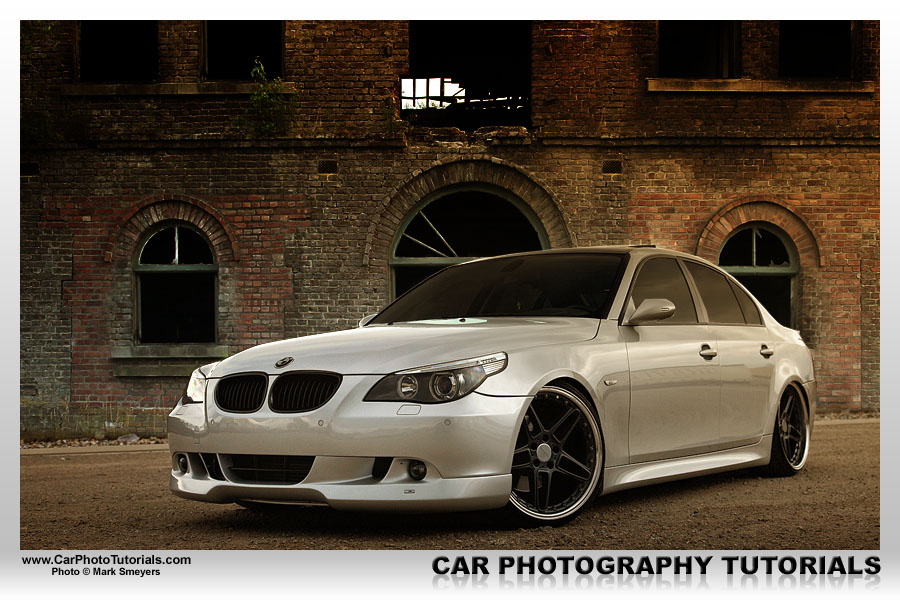
This is the image we had in mind from the start, the car has a nice warm feeling about it instead of the cool grey look on the original image. Also the rather uninspiring background on the snapshot has been replaced by that urban looking, derelict building and we've managed to get that much sought after sunset impression.
Once again this post processing clearly shows that a photograph should be made on location to avoid extensive work on the computer, but as much as we like to have a masterpiece straight from the camera it is more than likely you'll need do tweak the exposure to turn it into a photograph ... and this extensive modification has turned an image we would call a snapshot into a real photograph ... in fact we have put a large print of the final image on our office wall as a sample.
 |
CPT Premium member BONUS : 54096 As a CPT Premium member you can download our PSD file holding all the layers and the necessary background so you can perform the same dusk look on your own photos |
Note : commercial use or publishing of our tutorials in any way, written or electronic, is strictly forbidden, we present these for your personal development only. None of our material may be published in any way without prior, written permission from the Car Photography Tutorials founder. All workflows and photographs are copyright protected and owned by the Car Photography Tutorials team unless stated otherwise
Advertisement
Become a MEMBER
Premium Membership
Become a CPT Premium Member and download all our tutorials including a PDF for printing and the result as a PSD file with layers if any.
Interesting articles
Black and white car photography and selective coloring
We take a look at how you can achieve the best results converting car shots into black and white one, we even take a look at selective coloring to put some color back into the image.

Using actions to add a watermark to your photos
We show you a way to add a custom watermark to all your photos, no matter if they are in landscape or in portrait orientation using actions that require no manual intervention.
Creating a derelict at dusk look in post processing
Brand new cars always look good in an abandoned house location, and even better at dusk when the warm light is available, unfortunately finding both and still being safe enough to put an expensive car in front of the derelict house could be difficult.
Buying a tripod for car photography
A lot has been going on about tripods, do you really need one when your main objective is to photograph cars ? We go over the advantages and the problems and help you to select the best one.
Post processing automotive event photographs
We all know the drill, we’ve been to a car show or outdoor event and we’ve encountered some amazing cars but our shots have bad backgrounds so we'll have to revert to post processing to get it right.
Keep up with CarPhotoTutorials
Why not follow us, become a fan, get our RSS feed or mail a link to a friend ?
![]()
![]()
![]()