MAKE PANNING SHOTS LIKE A PRO

Canon EOS 40D - Canon EF24-105 f/4.0 L IS USM - 70mm 1/160 f10.0 ISO 200
Advanced level tutorial by Mark
Much has been written about how to make the best panning photos of a car, and you could spend hours just reading about it, but what it all comes down to in the end is experience … and a few basic settings.
 A good panning shot will give you a nice blurry background with the car sharp in the frame featuring spinning wheels, that’s the ultimate goal, and you can get there with shutter speeds as low as 1/60 for a race car, even lower on normal cars, but this kind of shutter speed will take a lot of practice to master.
 Just get out there and shoot cars as they drive by, it might look silly, but a highway or busy main road is an ideal practice ground, you are likely to get some strange looks, and in some countries you are bound to be visited by the police if you stand around long enough, but panning takes practice. There are no short cuts when it comes to shooting great looking panning shots.
On a regular basis people ask me what settings I use when I’m track side shooting Formula One, FIA GT or any other kind of high speed car racing series, and as I am a nice guy I give them my setting for shutter speed, aperture and ISO … but that is only a small part of the panning technique.
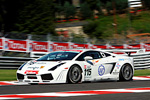 You could very well put the exact same settings on your camera and still not get the same pictures as I do, because I’ve been doing it for years now, perfecting and learning more about shooting high speed racing cars every time I’m standing next to the track.
One point of caution however, races are dangerous places, especially standing along the track when these cars go by at enormous speeds, always stay alert to anything that can happen, from debris flying around to a Saleen hitting the tire wall at full speed just inches away from where you are standing (been there, it’s no fun belief me), so be careful, no photo is worth your life, remember that!
Settings
 Preparing for a basic panning shot is simple, put your camera on Shutter priority AE (Tv on a Canon EOS) and dial in a shutter speed of 1/320 or 1/250 depending on the speed of the car you would like to shoot, don't be tempted to dial in 1/60 or even slower, if the car is doing normal speeds you will not get many images sharp enough and it could discourage you from continuing.
Put the camera on 'Focus tracking' mode (AIServo on a Canon) so it 'tracks' the subject while it passes, and set the iso to 100 on a normal, sunny day, leave the rest of the settings to standard for now. Next find a nice spot that has a clear view of the cars as they approach, while they are in front of you and while speeding away. This is very important as you'll be 'following' the car with your camera as it races by; this is panning in case you've missed it.
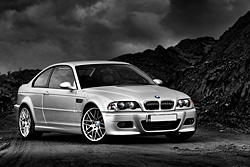
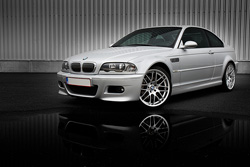
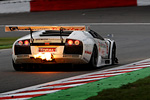
 Things change when you are shooting cars with their headlights on, take a look at the first shot on this page and the one to the left, these would be totally underexposed when you use the above method, however getting these right too isn't as difficult as it looks, you just have to work in manual mode.
The trick is to set your camera as mentioned before in Shutter priority AE and take a metering on the track in front of you, remember the aperture value the camera is giving you, now put the shutter speed, aperture and ISO setting in manual identical to the metering you've just done in Shutter Speed priority.
Holding your camera
 You should capture the car in your frame as it comes towards you, and try to keep it in the same position all the way as it passes you. Panning is mostly done with a telephoto lens to keep a safe distance between you and the car that speeds by. This is a rather big piece of glass which you can easily hold with your left hand to support the weight, make sure your left arm is firmly planted against your body. Hold the camera with your right hand, finger on the shutter, hold your right arm against your body too.
Panning cars is a technique to keep your camera as smooth and horizontal as possible while 'swinging' it from one side to the other using your upper torso, don't just swing your head with the camera, but instead swing your shoulders and upper torso at the hips together with the camera. Both your arms and your eye actually form a kind of tripod in this case if you hold it right.
Make sure your stance is firmly on solid ground, you don't want to slip away while panning (be careful on gravel or mud), both feet should be pointing in the direction where you want your shot to be taken, not in the direction from where the car is approaching, you swing yourself towards that direction and wait for the car to arrive. Some people will put their left foot a little further forward when swinging from left to right, try whichever position works best for you.
Use a monopod ?
 Some people use a monopod (or a tripod) while panning cars, but I never use it for this specific type of car photography, it actually hinders me while swinging from one side to the other, I do on the other hand use an Image Stabilized lens (most of the time either my Canon EF70-200mm f2.8 L IS USM or the 100-400mm f4.5-5.6 L IS USM) and put it into mode 2 which only correct horizontal (or vertical) movements, I have a hit rate of about 95% these days using the technique above with my Canon EOS40D.
Some people will try to convince you that an IS (or VR or OS whichever make you prefer) is of no use when shooting sports, but I strongly disagree with them, most modern stabilized lenses offer a setting like ‘mode 2’ on my Canon that works nicely when you can do a horizontal panning shot on a car (haven’t done any vertical ones actually …) so the extra cost is worth it in my opinion. And putting it into mode 1 to counteract both horizontal and vertical movement is just perfect when taking pictures of the kids, a nice extra bonus to convince your wife (or husband) when you are spending big money on this hobby.
I would use a monopod for taking head on shots, you have positioned yourself with a nice view of the cars coming towards you, if you have enough range you can take stunning head on shots this way, and a stable monopod could safe the day in this case, but for regular panning shots it is of little use I think.
What’s a hit rate ?
 Simple, from the 100 shots you take using this panning technique, how many are usable, or put it differently, how many have the car reasonably sharp with a nice blurred background? That is called your hit rate. Don't be disappointed when you only reach 25% to 50% on your first try, that is completely normal, it takes time to get it right, especially if you are lowering the shutter speeds to 1/125 or 1/60 on race cars, just about nobody will get a 100% hit rate with those speeds.
If you are working on an assignment you would be taking your first shots at a faster shutter speed, say 1/640 or something like that, just to make sure you come home with sharp photographs that can be published, after that you can continue shooting at 1/250 and 1/125 to get some more motion in the shots, but avoid not having any decent shots to deliver to the people paying you in the end.
An actual panning shot
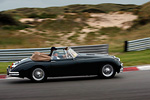 When doing panning shots on a car, one of the things to remember is to keep the camera moving along with the car. You start by tracking the car in your frame, you press the shutter, release it … but keep tracking the car, don’t stop right after you’ve released the shutter button, this will cause your panning shots to be blurry. You will have to finish the ‘swing’ as we say to get a nice sharp car on a blurry background.
The better you master to swing your camera at the same speed as the car, the better your shots will look, and keeping the camera horizontal is a key element here, which is why I prefer a stabilized lens for this kind of work.
 The next thing is often forgotten by people, but you should really practice at 'gently' pressing the shutter when taking the shot during your swing, this is where experience comes into the picture, you hold your finger on the button as the car approaches, you press the shutter release half way down to focus and when the car is in the position you want you gently press the button all the way down, trying not to rock the camera down, that's the trick.
Your swing and press on the shutter release will become one smooth action over time, that's when you will be able to take tack sharp panning shots at low shutter speeds, a good panning shot will have five sections :
1. Get the car in the frame as it approaches
2. Start following the car, keeping it in position inside your viewfinder
3. Press the shutter half way to focus on the car, keep 'tracking' it
4. When the car is in the position directly in front of you, take the shot by gently pressing the shutter release, don't stop following the car !
5. Finish your swing by following the car as it disappears in the distance.
 One of the biggest mistakes people make when attempting panning shots for the first time is to halt their swing when they press the shutter release, do not do this, it will not result in sharp shots, you have to finish your swing after taking the shot.
Some will try to convince you that you shouldn't use Auto Focus in panning but instead focus manually on the track in front of you and wait for the car to reach that point ... this method does work (manual focus has been done for years). However if you have a decent telephoto lens it will be able to maintain Auto Focus on the car as it speeds by, that is one of the reasons why this is an Advanced tutorial, as it requires you to get a high end telephoto lens, something like the Canon EF70-200 f/2.8 L IS USM or the Nikkor AF-S 70-200mm f/2.8 G IF-ED VR (you could go for their non-stabilized counterparts to save some money) but keep in mind both these top of the line lenses will set you back a lot of cash.
A little trick
Most DSLR these days have a nice fps figure, that’s the number of photos your specific model is able to make within one second, some do 3 fps while the top of the line models like the Canon EOS1D III will do as many as 10 fps … that’s almost a machine gun. The Canon EOS40D I’m using will do 6.5 fps, which isn’t too bad.
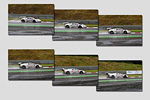 So how do you use this for panning? You start to track your car as it comes towards you, and when you think it is nicely framed you press the shutter … and don’t let go, with the camera in burst mode it will continue shooting several images per second while the car goes by … you let go of the shutter when you’ve lost the car in your frame or when you consider the angle between the car and yourself to be less than optimum.
Now comes the tricky part, the camera has filled his buffer with multiple shots and now needs time to write these to your memory card (CF’s in my case) … do NOT switch the camera off now ! This will erase your photos before they have had the chance to be written to the card, wait until the writing light goes out, then you can shut down if you want to.
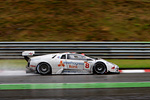 Not all of these photos will be sharp or framed correctly, but chances are that from these ten or more shots, at least a few will be good, as it is digital after all just erase the bad ones and keep the good ones … that’s it.
This ‘burst’ technique should help you out in the beginning, you will be able to get a hit rate up to 50% right from the start this way, especially at 1/320. However later on you will master the panning technique and can rely on taking a single shot as the car comes by, being relatively sure that you’ll end up with a nice, sharp panning shot.
I still revert to the burst method during events, when you will only see a specific car coming by two or three times, so you don’t have a lot of opportunities to get it right, taking about ten shots per round will put you safe, you will end up with several usable shots. During a race, be it a one hour stint or a 24 hours race, you have plenty of rounds to shoot your photos, so I don’t use the burst method on those, you will be seeing the same car passing by countless times anyway.
A great panning shot
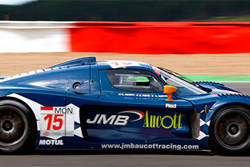
 How should you determine if you should keep your shot or erase it without thinking twice? Easy, a great panning shot has the car sharp from front to end (on a side shot) with a nice blurry background that can still be recognized and the wheels are spinning … add the fact that the car should have some space in front of it and you have a panning shot that stands out. A great panning shot will have a small amount of space behind the car and a reasonable amount of space in front of the car (the direction it is driving in) so it doesn’t ‘hit’ the border of your frame … this is the simple rule of thirds in action again by the way.
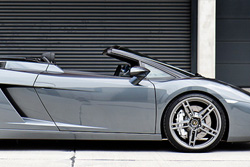
 If the wheels appear to be standing still your shutter speed was too fast (like 1/800 on a regular car for instance), this will give the impression the car was not moving when you shot it. On the other hand, if the background is so blurry you can not recognize anything anymore you’ve selected a shutter speed that was too slow for the speed of the car, like a 1/60 on a race car at full speed. Getting the car sharp with these settings will require a lot of experience … or luck, but it won’t be a great panning shot.
Select your position carefully
 I've been talking about this earlier, don’t stand right next to the track unless you really need to, cars can crash, and most likely when you don’t expect it, so keep an eye on them at all times. Do not get taken off guard by a car hitting you, always make sure you have a place to jump out of the way (if there is time to do so naturally). Ideally you would be having an assistant next to you that can keep an eye out for you, while you are tracking a car in front of you, a second car behind that one could spin and crash into the barrier close to you … you will not know what hit you in this case as there is no way you could have seen this second car in the first place.
While you are photographing a race always ‘listen’ carefully, the tires will make a lot of noise when they loose grip, so you can hear it spinning before it will hit something, also the gravel pits around the track will normally slow it down considerably before it actually reaches you, but still be extremely alert during a race, that’s my only advice if you are working alone.
 |
CPT Premium member BONUS : 155057 If you would like to print the Panning shots like a pro tutorial you can download our special PDF which is optimized for hardcopy layout. |
Note : commercial use or publishing of our tutorials in any way, written or electronic, is strictly forbidden, we present these for your personal development only. None of our material may be published in any way without prior, written permission from the Car Photography Tutorials founder. All workflows and photographs are copyright protected and owned by the Car Photography Tutorials team unless stated otherwise
Advertisement
Become a MEMBER
Premium Membership
Become a CPT Premium Member and download all our tutorials including a PDF for printing and the result as a PSD file with layers if any.
Interesting articles
Off camera flash car photography, part 2 of 2 : the shoot
You managed to buy the necessary items to get into off camera flash photography, in part 2 of our tutorial we explain how to use it.
Your second shopping list
You have all the basic equipment, and you feel comfortable working with it ... now it's time to take your gear to the next level.
Car photography that sells the car
Selling a high performance car isn't easy, but as they say : a picture speaks a thousand words. We'll show you how to get the winning shot that will sell the car quickly by selecting the correct background and perform the right post processing.
Adding authentic looking motion to still images
Sometimes you just have to get a sharp image of a car, but spinning wheels would be nice, we explain you how to achieve this in post processing.
Race photography, a day at the track
You must admit that being track side must appeal to you, but it takes some technique to get the best shots from that position, we explain how to get it right.
