CASE STUDY - DOF, DEPTH OF FIELD
Canon EOS 40D - Canon EF 70-200mm f/2.8 L IS USM - 200mm 1/500 f4.0 ISO 100
Case study by Mark
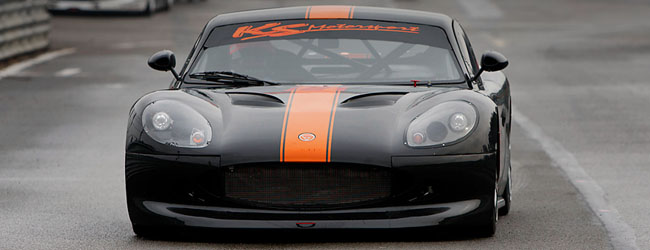
This amazing action shot with a very limited DOF was made while the black Ginetta was leaving the pit lane at a famous circuit in Belgium, it looked really nice when we downloaded it to our computer, but with a bit of tweaking we made it an award winning shot. The owner of the car even put a poster of this shot in his office.
So what did we do exactly to this image to create the look we wanted ? We didn't change the DOF in any way, let that be clear, we only made the colors in the background blend more into the surrounding making the car in front stand out even better, a detailed workflow for this image is listed below.
CASE STUDY : dof
 Naturally we started with the original image as it came from our camera, as we mentioned the shot was already very nice to start with, but we felt it could be perfect with just a few little adjustments in post-processing using Adobe PhotoShop CS3.
We found two problems we would like to change, the color in the background, especially the cars on the left was drawing too much attention away from the Ginetta so we decided to de-saturate them a bit, as it was a black car we felt the front could be a bit lighter, so we would Dodge and Burn the shot a bit with a 'Soft Light' layer as seen in our 60 second workflow on automotive photos
Step 1 : Sharpness
 We always perform a little UnSharp Mask on all our images, this one was no different, so we duplicated the Backround layer by selecting everything and doing a copy-paste operation (Ctrl-A on PC /Cmd-A and Mac followed by Ctrl-C/Cmd-C and Ctrl-V/Cmd-V) this will have us working on a copy and not on the original image, just in case we mess up somewhere.
Now select 'Filter >> Sharpen >> Unsharp Mask ...' and use these settings : Amount 50%, Radius 1,0 pixels and Threshold 1 levels. This should put some more sharpness into the image without going over the top, if you would like to add even more sharpness perform this step again, but this effect is easily overdone.
Step 2 : Color correction
 The colors in this shot were nice, however we decided to use our color correction method once more, select 'Image >> Adjustments >> Levels ...' to get to these options, here you can sample a black and a white color in your image, use the shadows eyedropper (black sample on our image) to select the dark section on the front bumper and the highlights eyedropper (white sample in our image) to select the white of the Renault in the background ... this will slightly shift the white balance of the shot and makes it just right for us to continue working.
Step 3 : Soft Light layer
 Our next order of business was adding a 'Soft Light' layer to our image using 'Layer >> New >> Layer ...', before clicking 'OK' you should set the Blending Mode to 'Soft Light'
If you don't know how this is done check out our 60 second workflow on automotive photos tutorial again which explains it in more detail.
You will not see any difference at the moment as the Soft Light layer is completely empty, but we will use this layer in our next step : the quick Dodge and Burn trick ...
Step 4 : Quick Dodge and Burn
 Dodge and Burn comes from the good old days of shooting film, but we will perform this nice trick right in PhotoShop these days. Select the gradient tool and make sure the foreground colors are set to default black and white respectively by pressing the 'D' key.
Select the Foreground to Background gradient from the drop down at the top of the screen, then put this gradient on the Soft Light layer from the top of the image to the bottom in a straight line (press Shift while dragging the mouse to keep the line perfectly vertical in this case) and you will see an immediate change, the top of the image will darken while the bottom will become much lighter ... the effect is a bit too much in fact. Therefore we will lower the opacity of this layer to about 70% for this shot, this percentage will depend largely on the shot so it could be different when you try this on your own photos.
Step 5 : De-saturate
 Those were the usual steps, now we'll start with something a bit different compared to our regular workflow, we want to make parts of the background show less color so attention is drawn onto the black car in the shot.
We will use an adjustment layer for this so we don't change the original image but rather have a separate layer to work on to remove the color, this can be easily done in PhotoShop by selecting 'Layer >> New Adjustment Layer >> Hue/Saturation...', just press 'OK' on this screen, for this case study we don't change any of the setting here but rather on the next screen.
 On this screen just pull the 'Saturation' slider all the way to the left so it will say '-100' in the dialog box, this way you will see all the color from the entire shot going down the drain ... don't worry, we will get it back afterwards, for now press 'OK'.
We end up with some kind of grayscale image now, but as we are working on an adjustment layer the color version of the shot is still lurking beneath, now it's time to pull the parts we need back in the wonderful world of colors ...
Step 6 : Masking
 We will now start painting the sections that we would like to have back in color, so select a nice feathered brush and make it black, while the Hue/Saturation adjustment layer is selected start painting over the parts you want to return to color, take a look at the preview we've put here, the red sections remained white while the rest of the layer was painted black, this caused the car in front to come out again.
If you make a mistake while painting here don't worry, just switch back to a white brush a paint over the error, you'll notice the mask adjusts itself and your mistake disappears magically, that's the fun of working with layers, they allow non destructive editing.
 Now the shot looks like one of those old posters with only a small section in color while the rest is black and white, this is not the look we wanted, instead we will lower the transparency of the adjustment layer so that a small amount of color is still visible in the background, but not enough to draw attention away from the Ginetta in front.
A setting of 90% works fine for us in this case, but as usual when working on your own shot this value could be different, feel free to experiment with the layer opacity to get the exact look you prefer.
Step 7 : One more layer
 The image is starting to look like we want, but we feel something is still missing, so we decided to add another gradient, but this time from black to transparent so it will darken the background further.
Add a new layer (using 'Layer >> New >> Layer ...') and draw a gradient from the top of the image to the bottom much like you did in step 4, only this time it should be a foreground to transparent gradient using black (that's the second one from the left in the top row of the Gradient pull down). Now that's a bit too heavy, so we lower the opacity of this layer to only 50% so it nicely darkens the background and emphasizes the Ginetta even further.
Step 8 : The final touch
 It looks nice, but let's put a bit more focus on that magnificent orange stripe by increasing the saturation of it, which is very simple.
Make sure you select 'Layer 1' from your image, that's the one we were working on the first place, do not perform this on the Background layer as we want to preserve that one in case we mess up.
Now select 'Image >> Adjustments >> Hue/Saturation...' and slightly increase the Saturation setting to about 20 in this case. It will really brighten up the orange and make it 'pop' out of the image.
All done !
 And that concludes our DOF Case Study.
In only 8 relatively easy steps you can dramatically improve your photograph to a level that is worth publishing, this very shot was printed in large format and framed to be hung on the wall of the office, a very nice touch.
Please feel free to experiment with these steps on your own shots, not all images are suited for this kind of modifications, but I'm sure that you'll have a few in your collection that would work extremely well with this kind of editing.
 |
CPT Premium member BONUS : 47948 If you would like to print this DOF Case Study you can download our special PDF which is optimized for hardcopy layout. We even included the PSD file for this specific image so you can take a look at our settings. |
Note : commercial use or publishing of our tutorials in any way, written or electronic, is strictly forbidden, we present these for your personal development only. None of our material may be published in any way without prior, written permission from the Car Photography Tutorials founder. All workflows and photographs are copyright protected and owned by the Car Photography Tutorials team unless stated otherwise
Advertisement
Become a MEMBER
Premium Membership
Become a CPT Premium Member and download all our tutorials including a PDF for printing and the result as a PSD file with layers if any.
Interesting articles
Photographing an indoor car show like a pro
Indoor events and motor shows are great venues with many stunning cars, shooting them is not at easy as it might seem however.
Case study - Geneva 2009 Auto Show
In this in depth article we take a look at the specific settings and technique you could use for a high profile car show like the one in Geneva
Buying a tripod for car photography
A lot has been going on about tripods, do you really need one when your main objective is to photograph cars ? We go over the advantages and the problems and help you to select the best one.
Do I need a fistful of dollars ?
We get this question on a regular basis : how much do I have to invest to get started as a car photographer ? We explain our vision in this article : don't go for the cheapest way but get it right from the start.

Case study - Countach
In this specific case study we will take a look at how to remove unwanted clutter from the backdrop of a shot.
Keep up with CarPhotoTutorials
Why not follow us, become a fan, get our RSS feed or mail a link to a friend ?
![]()
![]()
![]()